Blocking Malware: How to Configure Block at First Sight
Gain more granular control of Windows Defender through the use of Block at First Sight, a feature for blocking malware.
August 19, 2021

The Windows operating system has long included built-in malware protection in the form of Windows Defender Antivirus. Although it’s tempting to think of Windows Defender Antivirus as something that runs silently in the background and lacks any real administrative control, there are actually numerous Group Policy settings that can be used to control its behavior. Some of these settings are related to Block at First Sight, a WIndows Defender feature for blocking malware.
Block at First Sight's model for blocking malware is to use machine learning to identify and neutralize malware in near real time. When a user accesses potentially risky content (which can include document files or executable code), Block at First Sight intercepts the action and then performs a real-time check with the Microsoft Active Protection Service to make sure that the operation is safe.
As previously noted, you can enable Block at First Sight malware blocking at the Group Policy level, with a setting called Configure the Block at First Sight Feature. It’s located at Computer Configuration | Administrative Templates | Windows Components | Microsoft Defender Antivirus | MAPS. You can see this Group Policy setting in Figure 1.

Blocking Malware 1
Figure 1
These are the group policy settings that are related to the Microsoft Active Protection Service.
To make the Block at First Sight malware blocking feature work, there are several other Group Policy settings that you will also have to enable. Two of these settings are also located at Computer Configuration | Administrative Templates | Windows Components | Microsoft Defender Antivirus | Maps. The individual Group Policy settings that must be enabled are:
Join Microsoft MAPS
Send File Samples When Further Analysis is Required
As strange as it sounds, when you enable the Join Microsoft MAPS Group Policy setting, Microsoft MAPS remains disabled. There is a drop-down menu located in the setting’s Options section. This menu is set by default to a state of Disabled, which prevents Microsoft MAPS (and Block at First Sight) from being used. In order for Microsoft MAPS to work, you will have to set this drop-down menu, which you can see in Figure 2, to either Basic MAPS or Advanced MAPS.

Blocking Malware 2
Figure 2
You must enable the Join Microsoft MAPS setting.
The difference between these two options boils down to the amount of information that gets sent to Microsoft. As the name implies, the Basic option sends the bare minimum amount of information about the file to Microsoft. With the advanced option, Windows will send information such as file names, the software’s location and how the software operates to Microsoft.
As previously noted, you will also have to enable the Send File Samples When Further Analysis is Required setting. You can see this setting in Figure 3.

Blocking Malware 3
Figure 3
You will need to enable the Send File Samples When Further Analysis is Required setting.
As was the case with the Microsoft MAPS setting, there is a bit of configuration required when you enable this Group Policy setting. Specifically, you will need to configure Windows behavior as it relates to sending file samples to Microsoft. Windows can be set to always prompt the user, send safe samples automatically, never send samples or send all samples automatically. Microsoft recommends configuring this Group Policy setting to either send safe samples or send all samples. According to Microsoft, the always prompt option will lower the protection state of the device. Similarly, using the option to never send samples will keep the Block at First Site feature from working.
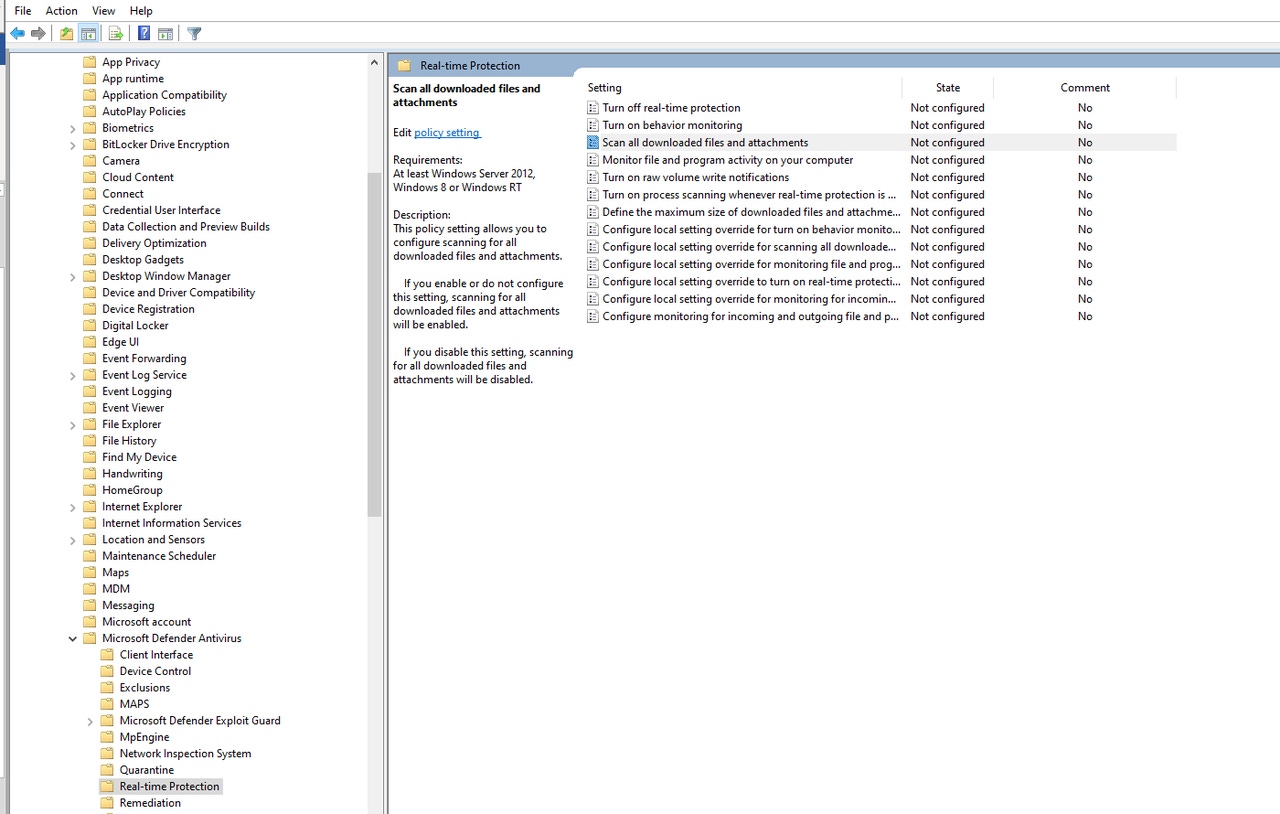
In addition to the Group Policy settings that have already been discussed, there is one more policy setting that will need to be enabled--Scan All Downloaded Files and Attachments. This setting is located at Computer Configuration | Administrative Templates | Windows Components | Microsoft Defender Antivirus |Real Time Protection. You can see this setting in Figure 4.

Blocking Malware 4
Figure 4
You will need to enable the Scan all Downloaded Files and Attachments setting.
You don’t have to do anything special with this Group Policy setting aside from enabling it. However, the policy setting must be enabled in order for the Block at First Site feature to work properly.
There are no additional Group Policy settings that have to be enabled, but there is one policy setting that must not be enabled: the Turn Off Real Time Protection setting. Like the Scan All Downloaded Files and Attachments setting, this setting is located in the Real Time Protection folder.
The Block at First Site malware blocking feature can also be enabled through Intune or Microsoft Endpoint Manager. For more information on Block at First Sight, click here.
About the Author(s)
You May Also Like


.jpg?width=700&auto=webp&quality=80&disable=upscale)


_(1).png?width=700&auto=webp&quality=80&disable=upscale)

.png?width=700&auto=webp&quality=80&disable=upscale)