How To Build Apps for HoloLens 2 Devices
From scene creation to deploying apps on HoloLens 2, this series equips readers with the foundational knowledge and hands-on skills needed for developing immersive AR experiences.
July 15, 2024
.png?width=1280&auto=webp&quality=95&format=jpg&disable=upscale)
In the first part of this series, I guided you through setting up the necessary tools for building a HoloLens 2 application. Now that the setup is complete, we will create an app.
This series aims to introduce the basics of building a HoloLens app. We will avoid overly complex projects to keep things manageable, especially considering the initial complexity of setting up the environment. In this tutorial, you will create a simple app featuring a cube that functions as a button. When pressed, the button will trigger a text message that confirms the button works.
Part 1. Installing and Configuring Development Tools: This article covers the initial setup required for HoloLens 2 development.
Part 2. Building a Simple HoloLens 2 App: I explain how to build your first HoloLens 2 application.
Part 3. Deploying Your HoloLens 2 App: The final article in the series will explain the deployment process for your HoloLens 2 application.
Make a Scene
When building HoloLens apps, you must create a “scene” within Unity. A scene is a 3D environment that contains the various objects used in the app. Instead of creating a new scene from scratch, we will configure the default scene to suit our needs.
To set up your scene:
Open Unity and load your project.
Click on the Mixed Reality menu.
Select Toolkit, then click on Add to Scene and Configure.
Turn on the Camera
Since we will be creating objects in a 3D space, we need to know where within that space to place them. Unity provides a “camera” that acts as the viewpoint within the scene, allowing you to navigate and visualize the 3D environment.
Follow these steps to turn on the camera:
Expand the Mixed Reality Playspace in the Hierarchy panel.
Find and select the Main Camera node.
Create a Cube
To start building your sample app, ensure your project is open in Unity. Follow these steps to create and configure a 3D cube.
1. Create a Cube
Right-click within the Hierarchy area.
Select 3D Object | Cube from the shortcut menu (as shown in Figure 1).
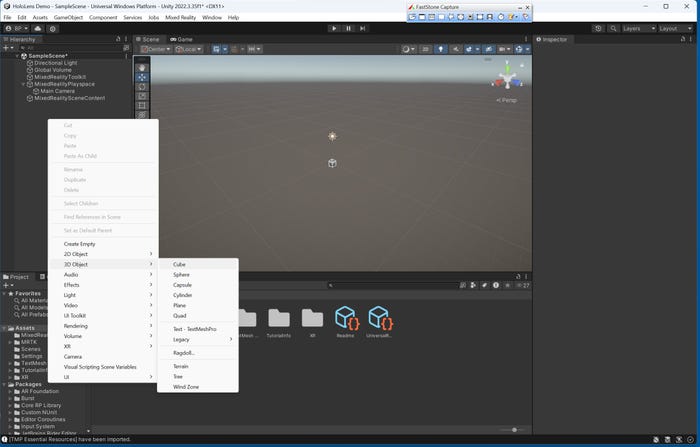
Figure 1. Right-click in the Hierarchy area and select 3D Object | Cube from the shortcut menu.
2. Configure the Cube
Unity will add a 3D cube to the existing scene. When the cube is selected, the Inspector tab (Figure 2) on the right side of the screen displays the object’s attributes, such as its scale and position. The Inspector tab is one of the places you can modify an object.
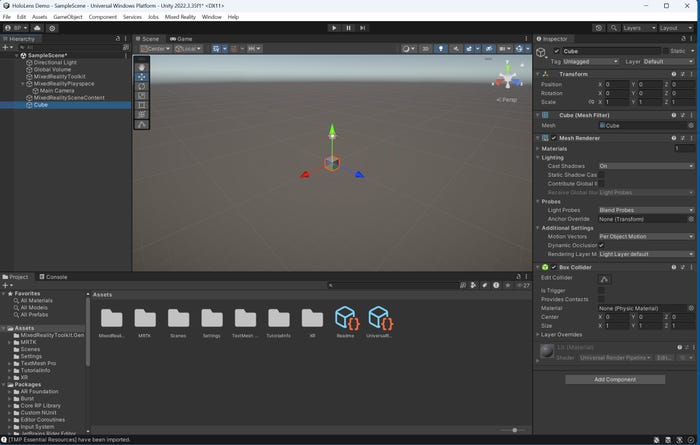
Figure 2. The Inspector tab displays the attributes of the new cube.
For this tutorial, we will construct a button that looks like a cube. Since this series is for beginners, creating a cube that functions as a button is easier than making a button from scratch. As such, let’s change the cube’s color to red and rename it from “Cube” to “Button.”
3. Changing the Cube’s Color
Right-click on Assets in the lower-left corner of the interface.
Select Create | Materials from the shortcut menu.
When the New Material pop-up appears, click the Base Map option and choose red (Figure 3).
Drag the new red material onto the cube in the scene preview window.
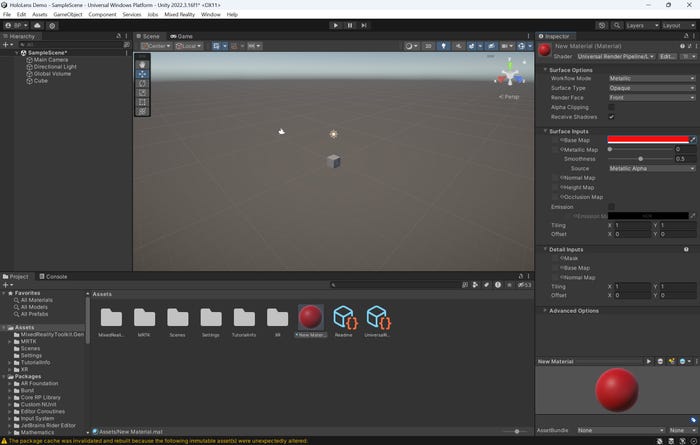
Figure 3. I have created a red material.
4. Renaming the Cube
Right-click on the Cube object within the Hierarchy list.
Choose Rename from the shortcut menu.
Rename the cube to “Button” (Figure 4).

Figure 4. The cube has been turned red and renamed “Button.”
Create a Button Handler
Next, we need to create a button handler to tell Unity what to do when we press the button.
1. Create the Script
Right-click on Assets and choose Create | C# Script from the shortcut menu. A new script will appear in the list of assets at the bottom of the screen.
2. Rename the Script
Right-click on the newly created script and select Rename from the shortcut menu.
Rename the script to “ButtonHandler.” The spelling and case are important.
3. Edit the Script
Double-click on the script object to open it in Visual Studio.
Replace the existing code with the following:
using UnityEngine;public class ButtonHandler : MonoBehaviour{ public GameObject textObject; public void OnButtonPressed() { textObject.SetActive(true); }}The name of the public class you are creating (“ButtonHandler”) must match the name of the script (“ButtonHandler”) exactly.
4. Save and Close
Once you have finished editing the code (Figure 5), save your changes and close Visual Studio.
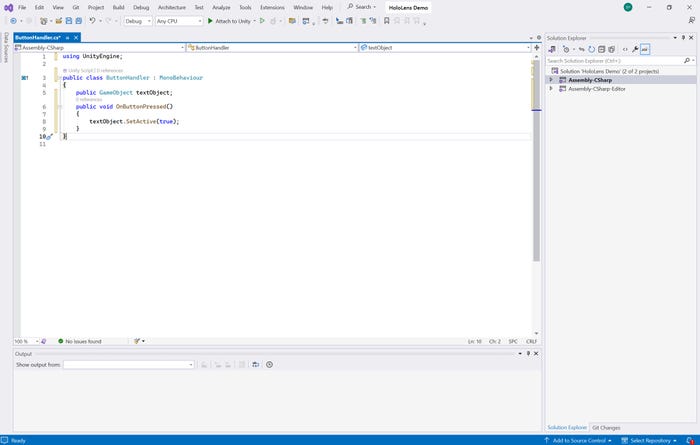
Figure 5. You can see the button handler script.
Create a Text Object
The button handler script we created calls for the application to launch a text object when we press the button. We now must generate the text object.
1. Create the Text Object
In the Hierarchy panel, right-click and select 3D Object | TextMeshPro from the shortcut menu.
In the Inspector pane that appears, set the text to display anything you like. For example, I will have it say, “Hello World” (Figure 6).

Figure 6. I have set the text object to display “Hello World.”
2. Import TMP Essentials
If prompted with a warning in the lower-middle part of the screen about needing to import TMP essentials, click on Import TMP Essentials.
3. Adjust Text Orientation
Preview your scene. Adjust the text orientation if it appears incorrectly oriented (as in Figure 6). In my case, I modified the Y-axis rotation to 180 degrees (Figure 7).
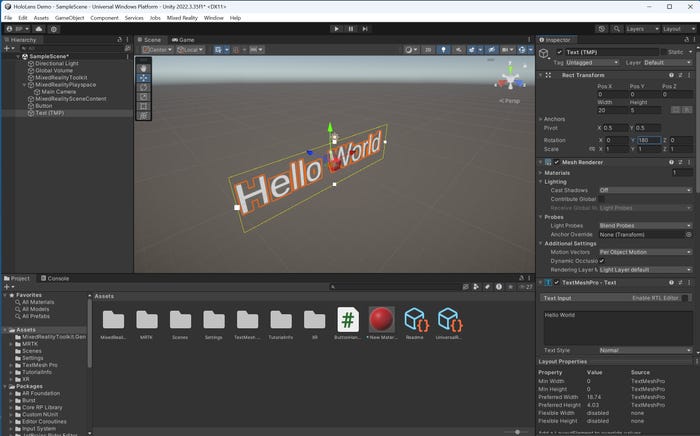
Figure 7. I have adjusted the text rotation.
4. Activate Text Only When Needed
Before moving on, make sure to deselect the Text (TMP) checkbox in the Inspector. Doing so deactivates the text. Remember, we want the text to be displayed only when the button is pressed.
Attach the Script to the Button
Next, we need to attach the script we created to the button.
In the Hierarchy window, select the Button object (previously named “Cube”).
Scroll to the bottom of the Inspector panel and click Add Component.
When prompted, select Scripts | ButtonHandler from the shortcut menu. It will add the ButtonHandler script to the Inspector (Figure 8).
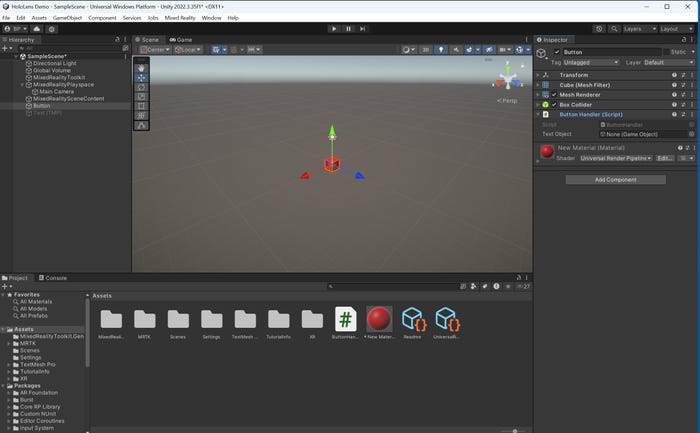
Figure 8. The Button object has the ButtonHandler script added to it.
Assign the Text Object
After adding the button handler script to the button, the next step is assigning the text object with which the script will interact.
In the Inspector, locate the Button Handler component.
Find the Text Object field within the Button Handler component. Initially, the field will display “None” (as seen in the previous figure).
Drag the Text (TMP) object from the Hierarchy panel and drop it into the Text Object field.
This action will update the field to display “Text (TMP)” (Figure 9).

Figure 9. The Text Object has been updated.
Make the Project Interactive
Now we must make the Unity project interactive and ensure the button triggers the right action.
1. Add Near Interaction Touchable
Select the Button object.
In the Inspector, click on Add Component.
Type “Near Interaction Touchable” into the search box and select it from the list. Initially, it may show errors (Figure 10).
To resolve the errors, click Fix Bounds and Fix Center.
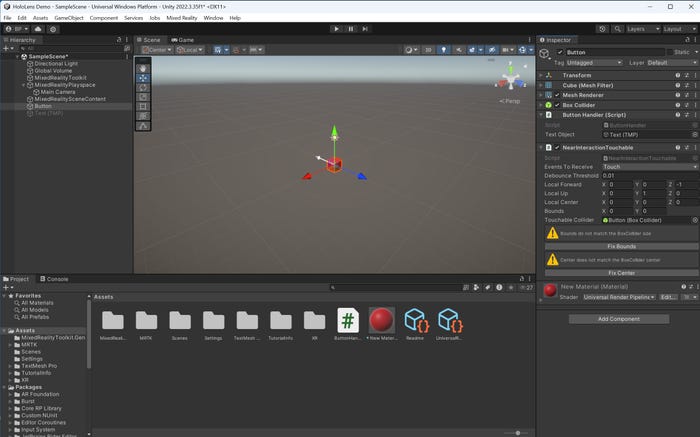
Figure 10. You may need to fix a couple of errors.
2. Add Interactable Components
Click Add Component again.
Type “Interactable” into the search box and add the component.
3. Configure Button Interaction
Scroll down to the Events section.
Click on the + icon in the OnClick section.
Drag and drop the Button object to the None (Object) field into the Events section.
Select ButtonHandler | OnButtonPressed from the drop-down menu (Figure 11).
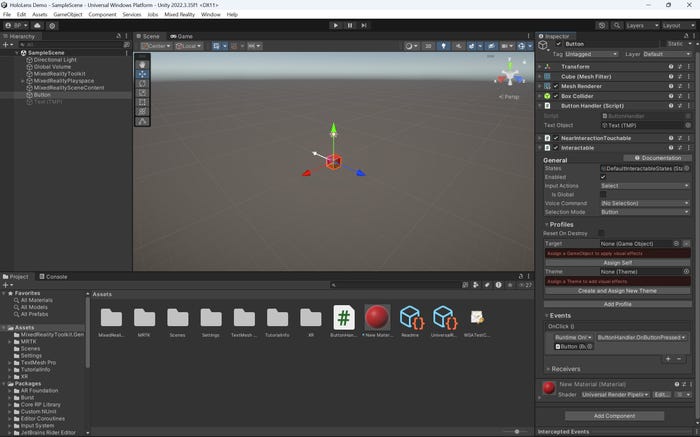
Figure 11. The button handler has been added to the Events section.
With these steps completed, your app is now ready (don’t forget to save your work). In Part 3 of this series, I will walk you through deploying the app to the HoloLens 2.
About the Author
You May Also Like


.jpg?width=700&auto=webp&quality=80&disable=upscale)
