Getting Started With HoloLens 2 App Development
This series guides readers through creating a HoloLens 2 app, starting with the initial setup of development tools.
July 9, 2024
.jpg?width=1280&auto=webp&quality=95&format=jpg&disable=upscale)
Although I have been writing code since I was a teenager, developing an application for HoloLens always seemed daunting. After all, in a mixed reality environment, an application requires capabilities far beyond those of a typical script. However, in retrospect, I have found that while HoloLens 2 development differs from what I am used to, it is not nearly as difficult as I had anticipated – though the initial setup is super complicated.
With this in mind, I wanted to create a series to guide readers through building a simple HoloLens 2 app.
Series Overview
Part 1. Installing and Configuring Development Tools: This article, the longest of the series, covers the initial setup required for HoloLens 2 development.
Part 2. Building a Simple HoloLens 2 App: I will guide you through building your first HoloLens 2 application.
Part 3. Deploying Your HoloLens 2 App: The final article in the series will explain the deployment process for your application.
Required Software and Tools
Before starting, ensure you have the following tools downloaded and ready:
1. Unity
Description: Unity is a game development platform that is also used to build mixed-reality applications.
Download link: unity.com/download
Cost: Unity can be expensive but free for personal use.
2. Microsoft Visual Studio 2019 or 2022
Description: Visual Studio is an integrated development environment required for HoloLens 2 development.
Installation steps:
Download and install: visualstudio.microsoft.com/downloads/
Include the workloads “Universal Windows Platform Development” and “Game Development with Unity.”
If you have Visual Studio installed already, launch the Visual Studio Installer from the Windows Start menu, select your installation, and click Modify. Locate and select the required workloads, as shown in Figure 1 below.
Follow the installer prompts to complete the process.
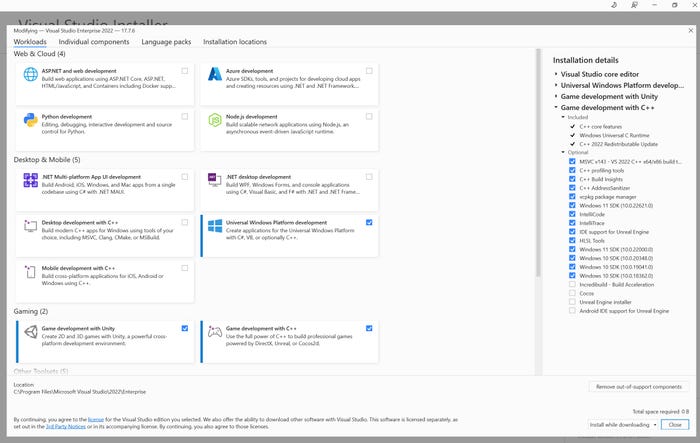
Figure 1. Install the “Universal Windows Platform Development” and “Game Development with Unity” workloads.
3. Mixed Reality Feature Tool
Description: This tool is necessary for managing mixed reality development features.
Download link (but don’t install it yet): microsoft.com/en-us/download/details.aspx?id=102778
Note: The Mixed Reality Toolkit has been integrated into the Mixed Reality Feature Tool.
Installing Unity modules
Before creating a Unity project, you must install a couple of Unity modules. Here’s how to do it:
Launch the Unity Hub and select the Installs tab.
Click the Settings icon (gear icon) for your Unity install and select Add Modules from the menu.
Scroll through the list of modules and select the checkboxes for the Universal Windows Platform Build Support module and the Windows Build Support (IL2CPP) module (Figure 2).
Ensure the Visual Studio module is installed and add it if necessary.
Click Install to install the modules.
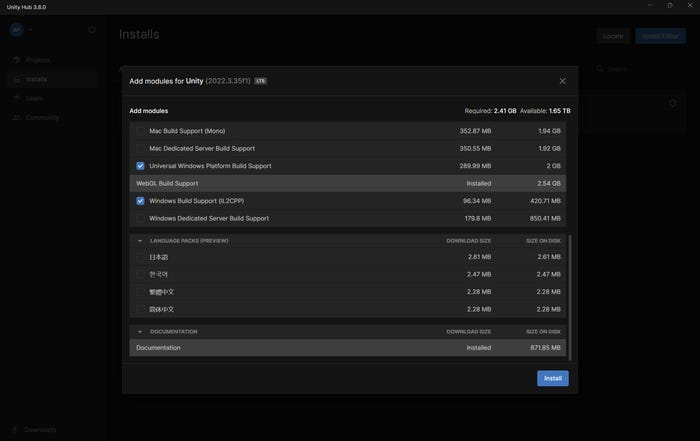
Figure 2. Install the Universal Windows Platform Build Support module and the Windows Build Support (IL2CPP) modules.
Create a Unity Project
Once all the prerequisites are in place, the next step is to create a Unity project:
1. Select the Projects tab within the Unity Hub and click on New Project.
2. Choose the Universal 3D template (Figure 3). Click the Download Template button if necessary.
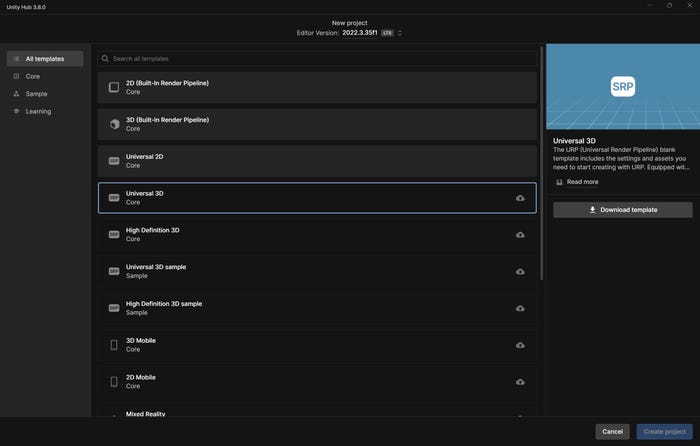
Figure 3. Select and download the Universal 3D template.
3. Provide a name for your project. For this series, the project will be called "HoloLens Demo." Note the project location, as you will need it later. Click Create Project after you have provided a name.
4. Unity will take several minutes to create the project. Your freshly created project will look like the one shown in Figure 4.
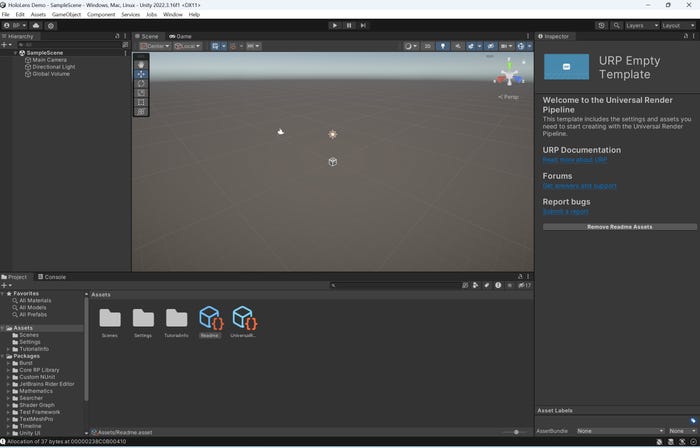
Figure 4. Here is what a new Unity project looks like.
Configure Unity for HoloLens 2
Now that you have created a Unity project, you need to configure it to work with the HoloLens 2 device:
1. Click on the File menu and select Build Settings.
2. In the Build Settings dialog box, click the Add Open Scenes button.
3. Select the Universal Windows Platform option (Figure 5).
4. Specify the target device and SDK:
Set the Target SDK Version to Latest Installed.
Set the Build Type to D3D Project.
Set the Build and Run On option to Remote Device.
Set the architecture to ARM64 (it’s vital to do this)
5. Click the Switch Platform button.
6. Close the Build Settings window once the process completes.
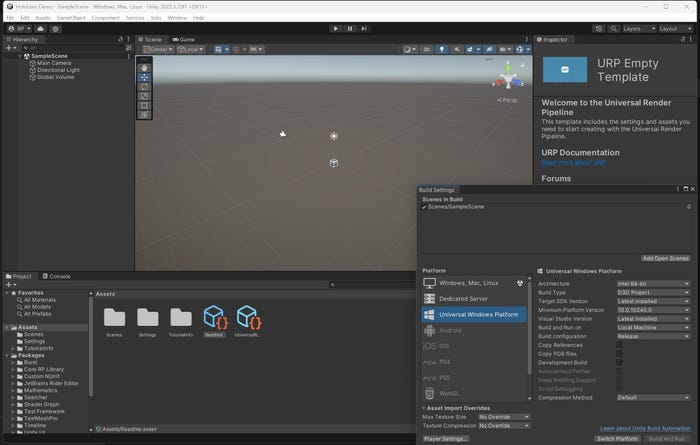
Figure 5. Select the Universal Windows Platform option and then click Switch Platform.
Install the Mixed Reality Feature Tool
The next thing you must do is install the Mixed Reality Feature Tool:
1. Provide the installer with the location of your Unity project file. In my case, I installed the project at C:\Users\Brien\Unity Projects\HoloLens Demo (Figure 6). If unsure of the path, open the Unity Hub and navigate to the Projects screen. It lists the path for your Unity project (Figure 7).
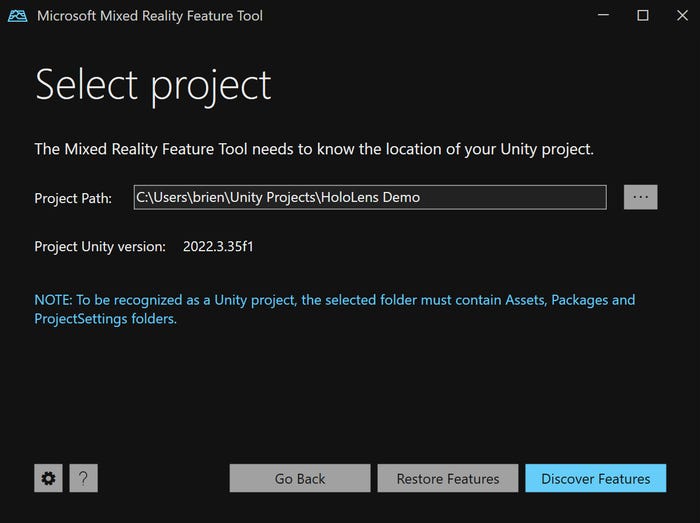
Figure 6. You must provide a path to your Unity project.
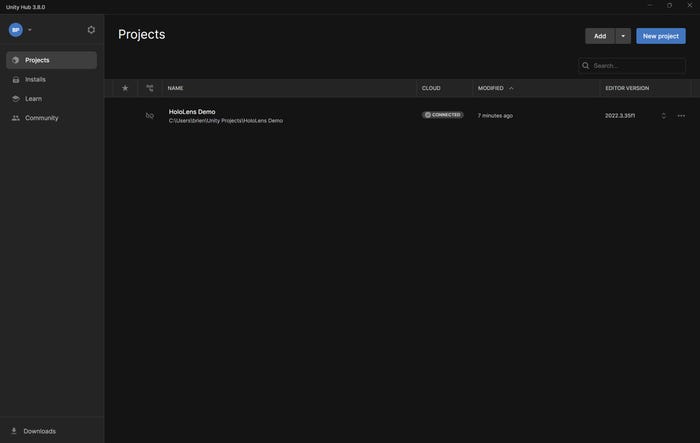
Figure 7. You can find the project path within the Unity Hub.
2. Click the Microsoft Mixed Reality Feature Tool’s Discover Features button.
3. Within the Discover Features screen, expand the Mixed Reality Toolkit section and select Mixed Reality Toolkit Foundation (Figure 8).
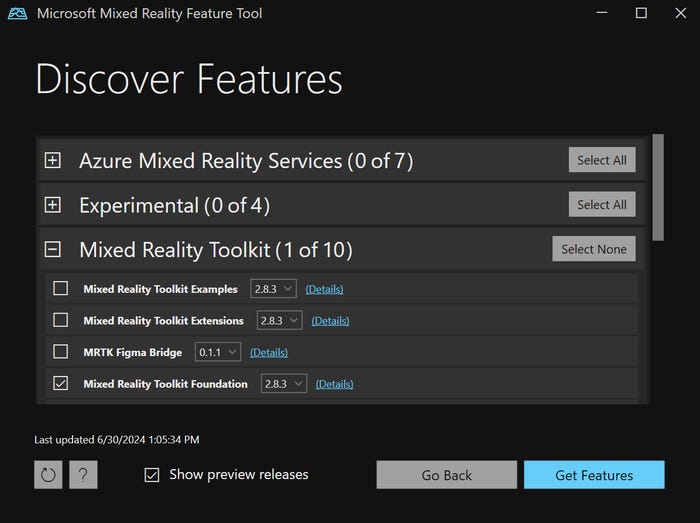
Figure 8. You will need to install the Mixed Reality Toolkit Foundation feature.
4. Expand the Platform Support section and select the Mixed Reality OpenXR Plugin (Figure 9).
5. Click Get Features, Import, Approve, and Exit to complete the process.
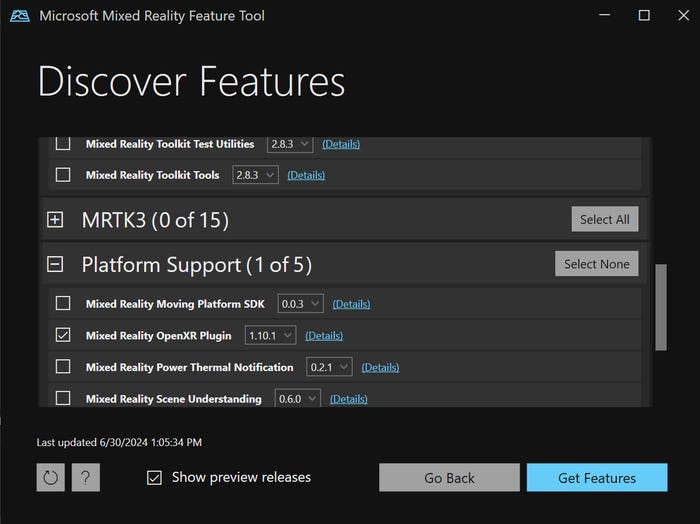
Figure 9. You will need to install the Mixed Reality OpenXR Plugin.
The Final Unity Configuration
Follow these steps to complete the Unity configuration:
1. After importing the packages, Unity will prompt you to restart. Upon restart, an MRTK splash screen will appear (Figure 10).
2. Click the Unity OpenXR plugin (recommended) button.
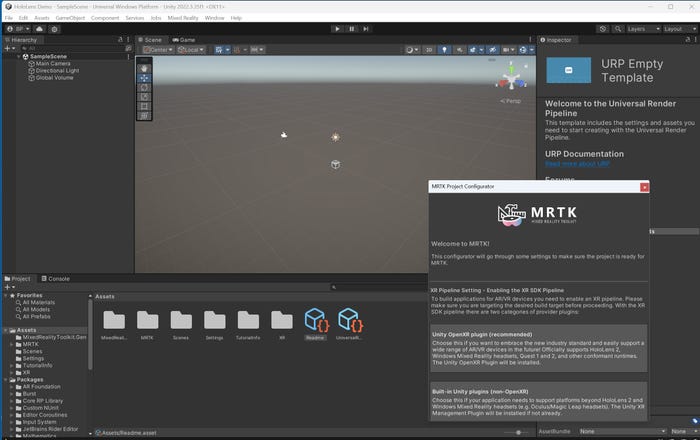
Figure 10. Click the OpenXR plugin (recommended) link.
3. Click Show XR Plug-in Management Settings on the splash screen.
4. In the resulting pop-up, make sure the XR Plug-in management tab is selected.
5. Select the OpenXR checkbox.
6. Select the Microsoft HoloLens Feature Group checkbox (this checkbox does not appear until after the OpenXR checkbox is selected).
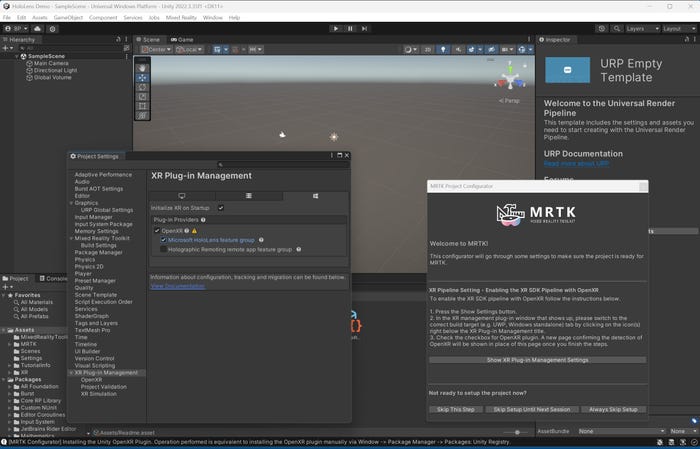
Figure 11. You need to enable the Microsoft HoloLens Feature Group.
7. In Figure 11, notice the orange warning icon next to the OpenXR plugin checkbox. Click on the icon to view validation issues.
8. Click Fix All (Figure 12) to resolve these issues. If the Fix All button isn’t visible, try expanding the window to reveal it. On my system, the window initially cut off and didn’t display the buttons until I enlarged it.
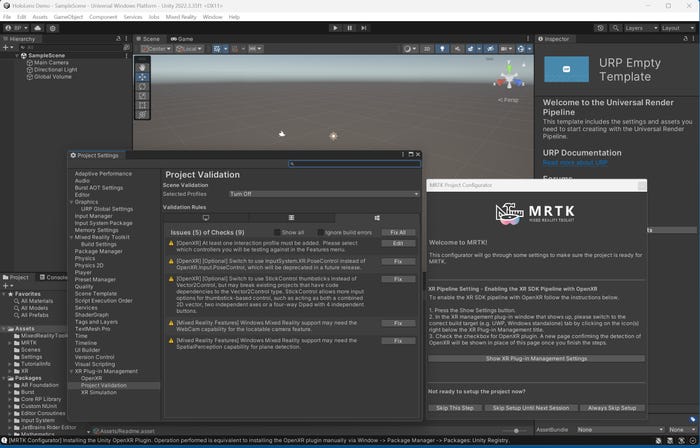
Figure 12. Click the Fix All button.
9. Even after clicking Fix All, you will still see an error about adding at least one interaction profile. To fix this, click Edit and ensure the Windows tab is selected on the resulting screen.
10. Click the plus icon in the Enable Interaction Profiles section.
11. Select the interaction profiles you want to use. I am selecting Eye Gaze and Microsoft Hand Interaction profiles. I received a warning icon when I added the Eye Gaze Interaction Profile. If that happens to you, click the icon and click Fix All to correct the problem.
12. While in Project Settings, ensure your Depth Submission Mode is set to 16-bit. You can see what these options look like in Figure 13.
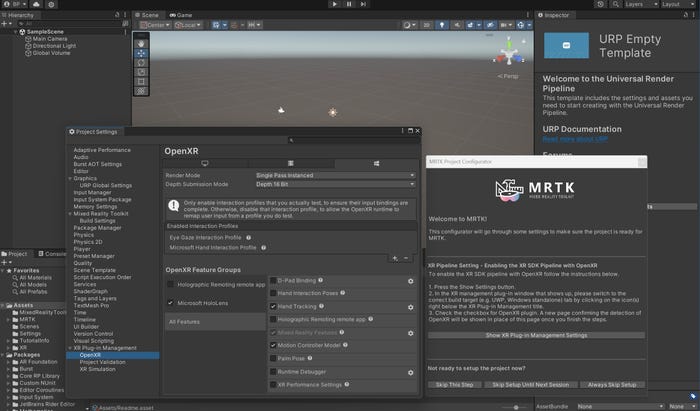
Figure 13. Add the Eye Gaze Interaction Profile and the Microsoft Hand Interaction Profile.
13. Return to the MRTK splash screen and click Apply Settings.
14. Ensure all the checkboxes are selected, and then click Apply again.
15. Restart Unity when prompted.
16. After Unity restarts, click on the Mixed Reality window, then Toolkit | Utilities | Configure Project for MRTK.
17. When the MRTK screen appears, click Next a couple of times and then click Import TMP Essentials. Once the import completes, click Done.
You must now adjust some more project settings.
18. Click on the Edit menu and select Project Settings.
19. Select the Player tab and expand the Publishing Settings section.
20. Verify the Package Name is unique. The package name will be your app’s name when installed on the HoloLens.
With that, Unity is (finally) configured for developing HoloLens applications. I will walk you through building a simple app in Part 2 of this series.
Read more about:
MicrosoftAbout the Author
You May Also Like


.jpg?width=700&auto=webp&quality=80&disable=upscale)
