How To Use Automatic PowerShell Transcription
PowerShell transcription can serve a variety of purposes, including security logging and troubleshooting. Here are the steps for using the transcription feature.
February 25, 2022

Microsoft makes it possible in PowerShell to automatically create a transcript of all commands that are entered. Although the PowerShell transcription feature is often underutilized, transcripts are useful for a variety of purposes. From a security standpoint, for example, transcripts allow you to go back and audit PowerShell activity. The transcripts provide a forensic record of how PowerShell was used.
Even if you aren’t worried about security logging, PowerShell transcription can serve other functions. If a PowerShell command does something completely unexpected, you can review the transcript to figure out why. I have also on occasions used a PowerShell transcript as the basis for creating a script from the commands that I had previously typed.
In any case, Microsoft makes it easy to turn on and off transcription in PowerShell. For example, you can manually create a transcript by using the Start-Transcript cmdlet. When you are done, you can stop the transcription process by using the Stop-Transcript cmdlet.
Manually enabling and disabling PowerShell transcription works fine if your only goal is to create a record of PowerShell commands so that you can revisit those commands later. However, if you want to use transcription for security purposes, then you will be much better off enabling transcription via a group policy setting.
Use Group Policy Editor To Enable PowerShell Transcription
To enable PowerShell transcription through the Group Policy Editor, open the console and then navigate to Computer Configuration > Administrative Templates > Windows Components > Windows PowerShell. You can see the available group policy settings in Figure 1.
Figure 1

PowerShell Transcription 1_0
Windows offers several PowerShell-related group policy settings.
As you can see in Figure 1, the second-to-last group policy setting on the list allows you to turn on PowerShell transcription. Incidentally, there are also group policy settings to turn on script block logging and PowerShell module logging.
Double-click the “Turn on PowerShell Transcription” policy setting. You will go to a screen like the one shown in Figure 2. Enable PowerShell transcription by simply selecting the Enable option and clicking OK.
You can also specify a transcript output folder if you would like one. If you opt to not specify an output directory, the PowerShell transcripts will be saved to the user’s Documents folder.
Figure 2

PowerShell Transcription 2
This is what the individual policy setting looks like.
It is worth noting that after you enable the transcription policy setting, it will not go into immediate effect. You must first reboot the system or update the group policy settings by way of the GPUpdate /Force command.
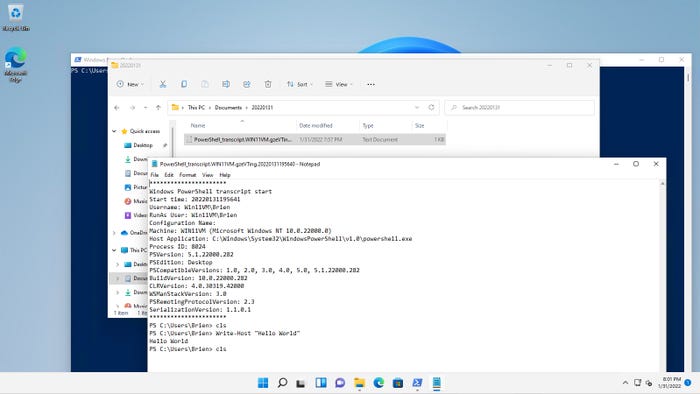
Once the new policy setting goes into effect, Windows will create a PowerShell transcript folder beneath the specified transcript location. The folder’s name reflects the date on which the files within the folder were created. Figure 3 shows the folder structure and a transcript file.
Figure 3

PowerShell Transcription 3
This is what a transcript looks like. You can see the transcript folder in the background.
PowerShell Transcript Layout
Let’s look at the transcript itself. You will notice in Figure 3 that the transcript file begins with a row of asterisks. There is an identical row of asterisks a little further down. The data that appears between these two rows provides information about the individual PowerShell session. Here you can find information about the PowerShell version, who was logged in, and that sort of thing.
The actual PowerShell transcript appears beneath the second row of asterisks. The transcript more or less echoes the PowerShell window’s contents. You can see the command prompt, as well as the command that was entered. You can also see the command output if output exists.
Having this information makes it a lot easier to see exactly what was done during a PowerShell session. For example, having the command prompt visible allows you to see the path from which a command was executed. Similarly, seeing a command’s output can help you understand what a particular command did.
Tips for Protecting PowerShell Transcription
In case you are wondering, users can’t use the Stop-Transcript cmdlet to stop the PowerShell transcription process. If a user enters Stop-Transcript, they will see an error message that says PowerShell is not currently transcribing. However, the Stop-Transcript command will be written to the transcript as evidence that the user tried to shut down the transcription process. You can see what this looks like in Figure 4.
Figure 4

PowerShell Transcription 4
PowerShell will log any attempts to shut down transcription.
One last thing that I wanted to mention about automatic PowerShell transcription: It is important to direct the transcripts to a location where the user is unlikely to find them. Otherwise, a user with nefarious intent could delete the transcript files.
How do you use PowerShell transcription? Tell us in the comments below!
About the Author(s)
You May Also Like


.jpg?width=700&auto=webp&quality=80&disable=upscale)


_(1).png?width=700&auto=webp&quality=80&disable=upscale)

.png?width=700&auto=webp&quality=80&disable=upscale)