How to Use Microsoft’s Windows Data Recovery Tool
Microsoft’s Windows Data Recovery tool provides a built-in option for retrieving deleted files.
September 28, 2020

Windows has never really had a good built-in solution for data recovery. Sure, there is the Recycle Bin, but not every deleted file gets placed into the Recycle Bin. Besides, the Recycle Bin does nothing to help you if you accidentally wipe your entire hard drive.
There are any number of third-party tools available for recovering accidentally deleted data, but Microsoft has released a new tool called Windows File Recovery. As its name implies, this tool’s job is to help you to get your data back when bad things happen.
Before I show you where to get the Windows File Recovery tool and how to use it, I need to quickly mention that Windows File Recovery is not intended to serve as a substitute for regular backups. Instead, Windows File Recovery is designed to act as a last-resort option for recovering data that seems as though it may be gone forever.
You can get Windows File Recovery by downloading it from the Windows Store. To use the tool, you must be running Windows 10, build 19041.0, or higher.
Windows File Recovery is a command-line tool, and is installed into the C:Program FilesWindowsAppsMicrosoft.WindowsFileRecovery_0.0.11761.0_x64__8wekyb3d8bbwetfssalv_cli_exe folder. Thankfully, you don’t have to navigate through the file system to this folder in order to run the Windows File Recovery tool. Once installed, Windows allows you to run the tool regardless of the Command Prompt’s current file path.
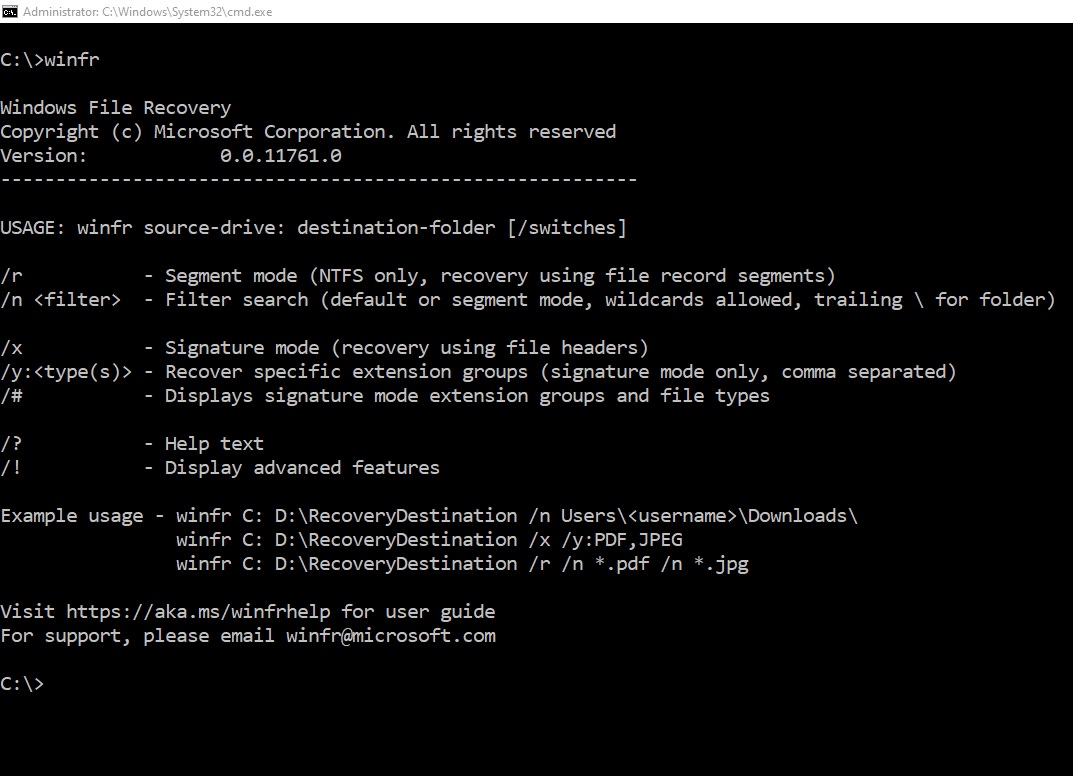
To execute the Windows File Recovery tool, simply enter the WinFR command into an elevated Command Prompt window. Doing so will cause Windows to display the command summary shown in Figure 1.

WinFR
Figure 1
This is what the Windows File Recovery tool looks like.
Like most other command line utilities, the Windows File Recovery tool requires that you supply various parameters. Fortunately, the tool’s command-line syntax is not overly complex, and most of the various options are relatively straightforward.
You need to specify both a source drive and a destination drive. The source drive is the drive from which the data was accidentally deleted. The destination drive is the drive to which you want to save a copy of any data that you manage to recover.
One of the keys to recovering deleted data is to avoid accidentally overwriting the portion of the disk where the data was previously stored. The Data Recovery Tool for Windows forces you to restore data to a disk other than the one where it was originally stored. While somewhat inconvenient, this requirement maximizes your chances of being able to get the data back. It is also worth noting that the source and destination must be separate physical disks. They cannot reside on the same partition.
Aside from the source and destination drives, there are four main switches that you need to know about:
/R – The /R switch tells the Windows File Recovery Tool to use File Record Segments (FRS) to facilitate the recovery process.
/N – The /N switch is probably the most useful of the command-line switches. It allows you to recover deleted files based on the file’s name. The nice thing about the /N switch is that it supports the use of wildcard characters, which means that you don’t have to know the exact filename.
/X – The /X switch tells the Windows File Recovery Tool to use signature mode when recovering files. This mode can be useful if you need to recover a specific type of file.
/Y – The /Y switch is used when performing a signature-based recovery and when you want to recover specific types of tiles (based on their extensions).
The Windows File Recovery Tool supports other command-line switches, but these four are likely to be the most useful.
By way of example, here’s how to recover a file using the /N switch.
For the sake of discussion, let’s say that I accidentally deleted a file named Report.xlsx from the C:UsersBrienDocuments folder. Let’s also say that I have a USB flash drive that will be used to store any recovered data, and that this drive has been assigned the letter D:. Given these parameters, here is what the recovery command would look like:
WinFR C: D: /n “UsersBrienDocumentsReport.xlsd”Notice in this command that I had to specify the source and destination disk letters before anything else. Only after specifying the source and destination did I use the /N switch to indicate that I want to perform a name-based recovery. It is also worth noting that the path to the file that is to be recovered does not require a drive letter since the source disk has already been specified.
If you need additional help using the Windows File Recovery tool, you can find the full documentation here.
Read more about:
MicrosoftAbout the Author
You May Also Like


.jpg?width=700&auto=webp&quality=80&disable=upscale)
