Why Can’t PowerShell Session Access My Network Volumes?
PowerShell will sometimes fail to recognize network storage volumes. Learn why this problem occurs and how to get around it.
March 9, 2022

When PowerShell fails to recognize network storage volumes, you have encountered one of PowerShell’s most common storage-related problems. In some cases, a native PowerShell cmdlet may refuse to acknowledge a volume’s existence. In other cases, you may find that you can’t access a particular volume during a PowerShell session.
To give you a more concrete example, I have a network volume mapped to Q:. I use this volume every day and know for sure it is healthy. Even so, check out the screen capture (Figure 1) of a PowerShell session. When a PowerShell cmdlet attempted to access the volume, it returned the error, “No MSFT_Volume objects found with property 'DriveLetter' equal to 'Q'. Verify the value of the property and retry.”
Figure 1

PowerShell Volume Does Not Exist 1
PowerShell does not acknowledge the existence of a network volume.
Incidentally, this is a standard error message that can be returned by a variety of cmdlets. You will also notice in Figure 1 that entering the drive letter caused PowerShell to return the error, “Cannot find drive. A drive with the name ‘Q’ does not exist.” However, as you can see from the File Explorer window, the volume Q: clearly does exist.
The Cause of the PowerShell Error
So, why does this happen? The problem partly stems from the fact that the PowerShell session shown in Figure 1 was running in an elevated session. If I repeat the commands in a non-elevated window, the Get-VolumeCorruptionCount cmdlet still fails, but PowerShell at least acknowledges the network volume’s existence. You can see what this looks like in Figure 2.
Figure 2

PowerShell Volume Does Not Exist 2
Running a non-elevated PowerShell session makes a difference.
The reason why both screen captures display the “No MSFT_Volume found with property ‘DriveLetter’” error message is that some PowerShell cmdlets simply do not work with network volumes. The Get-VolumeCorruptionCount cmdlet is an example of such a command.
According to Microsoft, the Get-VolumeCorruptionCount cmdlet is tied to the CHKDSK command. CHKDSK only works on local volumes. If I attempt to run CHKDSK against a network volume, I receive an error message that states Windows cannot check a disk attached through a network, as shown in Figure 3. So, if CHKDSK can’t check a network disk, the Get-VolumeCorruptionCount cmdlet is unable work with a network drive, either.
Figure 3

PowerShell Volume Does Not Exist 3
CHKDSK is not designed to check network disks.
The short explanation of what is happening is that non-administrative PowerShell sessions recognize mapped network drives while elevated PowerShell sessions do not. There are also certain PowerShell cmdlets that do not work with network drives regardless of what type of session they run in, but other cmdlets support network drives (in non-administrative sessions) without issue. The Get-ChildItem cmdlet, for example, works fine with network volumes.
Access Network Volumes From Elevated PowerShell Sessions
This explanation, of course, raises the question of whether you can access a network volume from an elevated PowerShell session. It is possible, but you must jump through an extra hoop to make it happen.
Although PowerShell ignores any previously existing disk mappings, it is not in fact denying you access to the volume. Therefore, the trick to accessing a network volume through PowerShell is to manually map the disk that you want to use. The easiest way to do this is to use the Net Use command.
The Net Use command is a leftover from the days of DOS, so there is no dash between Net and Use like you would normally expect from a PowerShell cmdlet. To use the Net Use command, you will need to enter the drive letter you want to map and the UNC path to the volume that you want to associate with that drive letter. For example, if you wanted to map Q: to \MyFileServerFiles, then you would use this command:
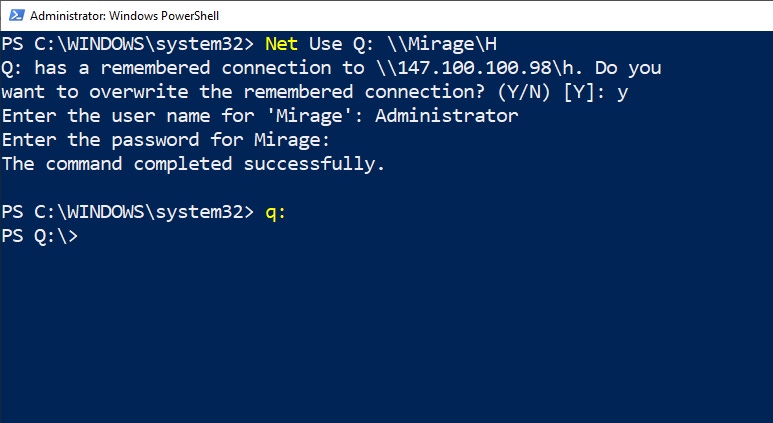
Net Use Q: \MyFileServerFilesFigure 4 demonstrates how I accessed a network drive from an administrative session by using this technique.
Figure 4

PowerShell Volume Does Not Exist 4
I have mapped a network drive in an elevated PowerShell session.
About the Author
You May Also Like


.jpg?width=700&auto=webp&quality=80&disable=upscale)
