How To Create an Interactive PowerShell Menu
Learn how to build conventional menus in PowerShell GUI applications. We will explore three techniques for making menu items interactive.
October 14, 2024
Over the years, I have written quite a few GUI-based applications in PowerShell. When it came to menus, I typically relied on an input box (a dropdown menu). Even so, I always wondered if it was possible to create more traditional menus, like the ones used by practically every Windows application in existence. As it turns out, you can. In this article, I will show you how to develop menus for your PowerShell applications.
Building a Basic Menu
I have developed an example PowerShell script that generates two basic menus. Currently, the menu options do not perform any actions except for the “Exit” option, which closes the script. I will discuss PowerShell menu functionality later in the article. For now, though, I want to show you the code for creating a simple set of menus.
Here is the code:
Add-Type -AssemblyName System.Windows.FormsAdd-Type -AssemblyName System.Drawing# Create Form$Form = New-Object System.Windows.Forms.Form$Form.Text = "PowerShell Menus"$Form.Width = 800$Form.Height = 600# Create Menu Strip$Menu = New-Object System.Windows.Forms.MenuStrip# Create File Menu$FileMenu = New-Object System.Windows.Forms.ToolStripMenuItem("File")$OpenMenuItem = New-Object System.Windows.Forms.ToolStripMenuItem("Open")$OpenMenuItem.Add_Click({ })$SaveMenuItem = New-Object System.Windows.Forms.ToolStripMenuItem("Save")$SaveMenuItem.Add_Click({ })$ExitMenuItem = New-Object System.Windows.Forms.ToolStripMenuItem("Exit")$ExitMenuItem.Add_Click({ $form.Close() })$FileMenu.DropDownItems.AddRange(@($OpenMenuItem, $SaveMenuItem, $ExitMenuItem))$Menu.Items.Add($FileMenu) | Out-Null# Edit Menu$EditMenu = New-Object System.Windows.Forms.ToolStripMenuItem("Edit")$UndoMenuItem = New-Object System.Windows.Forms.ToolStripMenuItem("Undo")$UndoMenuItem.Add_Click({ })$EditMenu.DropDownItems.AddRange(@($UndoMenuItem))$Menu.Items.Add($EditMenu) | Out-Null# Add Menu to the Form$Form.MainMenuStrip = $Menu$Form.Controls.Add($Menu)# Show the Form$Form.Add_Shown({$Form.Activate()})[void] $Form.ShowDialog()You can see what the menus look like in Figures 1 and 2.
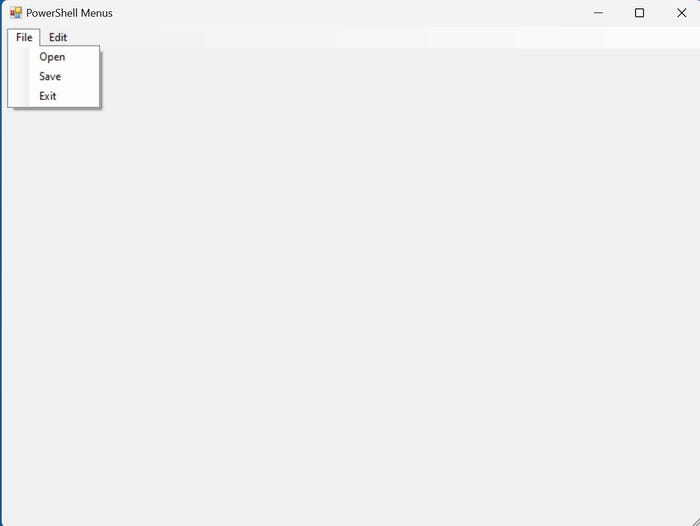
Figure 1. Here is the File menu.
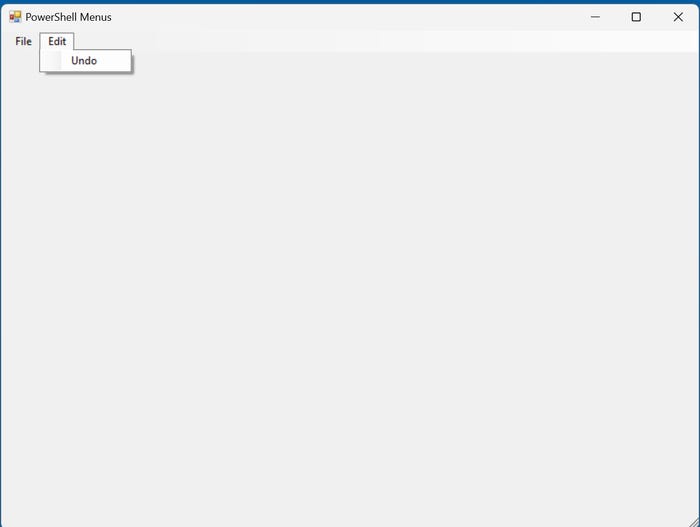
Figure 2. Here is the Edit menu.
Step 1: Setting up the PowerShell form
The script starts by loading the necessary assemblies and creating a form. Forms are the foundation of all PowerShell GUIs. In this case, the form acts as the main application window, with a resolution of 800x600 pixels. The window’s name is “PowerShell Menus.”
Step 2: Building the MenuStrip object
With the form set up, the next step is to create a menu object. PowerShell supports an object type called System.Windows.Forms.MenuStrip, commonly referred to as MenuStrip. The MenuStrip object acts as the container for all the menus you make. In this example, we will build a File menu and an Edit menu, which will be attached to the MenuStrip object. Usually, you will need only one MenuStrip object in a script, no matter how many menus you plan to create. The exception is if your script opens additional windows, each having a menu, in which case you would likely need to develop separate MenuStrip objects for those.
Step 3: Adding menus and menu items
After creating the MenuStrip object, you must create an object for each menu. Since the example script contains two menus (File and Edit), you will build two System.Windows.Forms.ToolStripMenuItem objects, one for each menu. The name you append to the object creation command will become the menu title. For instance, the command that produces the File menu is:
$FileMenu = New-Object System.Windows.Forms.ToolStripMenuItem("File")Interestingly, the individual menu items within a menu are also ToolStripMenuItem objects. You create them the same way as the menus. For example, the command used to make the “Open” option under the File menu is:
$OpenMenuItem = New-Object System.Windows.Forms.ToolStripMenuItem("Open")Since we use the same method for creating menus and menu objects, it raises the question of how PowerShell distinguishes between the two and knows which item to assign to each menu.
Looking back at the command that creates the File menu, you will notice I mapped the ToolStripMenuItem object to a variable called $FileMenu. I did the same for the Open menu item. Since variables represent objects, you can assign attributes to the variables. By doing so, you can add the Open command to the File menu and then add the File menu to the MenuStrip.
Step 4: Assign menu items to menus
To add commands to a specific menu, you define those commands as part of a collection or range. Remember, each menu item should have already been defined as an object by this point. Therefore, if you wanted to add the Open command to the File menu, you could use this command:
$FileMenu.DropDownItems.AddRange(@($OpenMenuItem))If you want to add more commands to the menu, use commas to separate the variables representing the individual objects. The command I use in the example script is:
$FileMenu.DropDownItems.AddRange(@($OpenMenuItem, $SaveMenuItem, $ExitMenuItem))Step 5: Adding menus to the MenuStrip
Now that we have added the commands to the menus, we must add the menus to the MenuStrip. We can do this using a command like this one:
$Menu.Items.Add($FileMenu) | Out-NullThe $Menu variable corresponds to the MenuStrip object, so we add the $FileMenu variable (the File menu object) to the MenuStrip. My example script also includes an Edit menu, and I add the Edit menu using a separate command:
$Menu.Items.Add($EditMenu) | Out-NullYou will notice that both of these commands end with Out-Null. I use the Out-Null cmdlet because it suppresses text output. Had I not used it, the PowerShell window would display a number for each menu created. Since this number doesn’t serve any useful purpose, it’s best to hide it from view.
Step 6: Displaying the form
The last step in the process is to add the MenuStrip to the form and then display the form. These are the commands used:
$Form.MainMenuStrip = $Menu$Form.Controls.Add($Menu)You can then use the following commands to display the form:
$Form.Add_Shown({$Form.Activate()})[void] $Form.ShowDialog()Making PowerShell Menu Items Functional
As you can see, creating menus in PowerShell is a relatively straightforward process. However, as previously noted, the menus that I have created do not do anything. As such, I will now show you three techniques for making your menu items functional.
Technique 1: The Click Action
A menu item works similarly to a GUI button. When you create a button within a PowerShell GUI environment, you assign the button a click action that determines what happens when clicked. Menu items also have click actions. The click action defines what happens when the user selects the menu item.
In the first half of this article, I showed you a script that includes a click action for one of the menu items. If you ran the script and selected “Exit” from the File menu, the script would terminate. Here is what that bit of code looks like:
$ExitMenuItem = New-Object System.Windows.Forms.ToolStripMenuItem("Exit")$ExitMenuItem.Add_Click({ $Form.Close() })In the first line, the “Exit” menu item is created as an object. The second line attaches a click action to that object. In this case, the click action closes the form when selected. Although the following two techniques I will cover are more complex, they use the same idea of attaching a click action to a menu item.
Technique 2: The GUI Expansion
In the first technique, we ran a PowerShell command when a menu item was clicked. However, instead of a single command, you can just as easily trigger an entire script block. This capability becomes particularly useful for displaying additional GUI elements in response to a click. Let me give you an example.
While testing the techniques discussed in this article, I built a text editor using PowerShell that resembles Notepad (see Figure 3). I may write about how my text editor works in a future article; for now, I will use it to illustrate the GUI expansion technique.
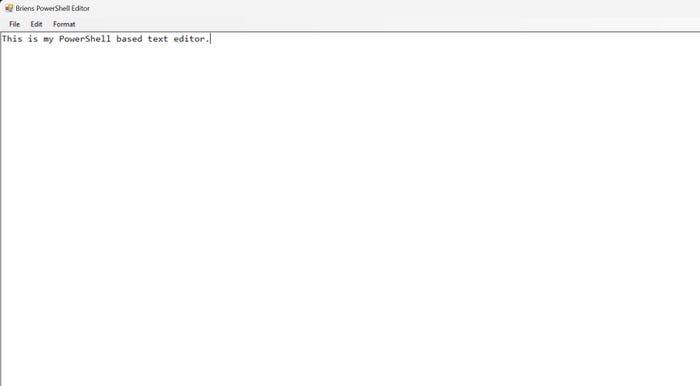
Figure 3. Here is my PowerShell text editor.
In Figure 4 below, notice the text editor’s “Edit” menu contains a “Find” option. When you click on Find, the application displays a popup (Figure 5), asking what you are searching for.
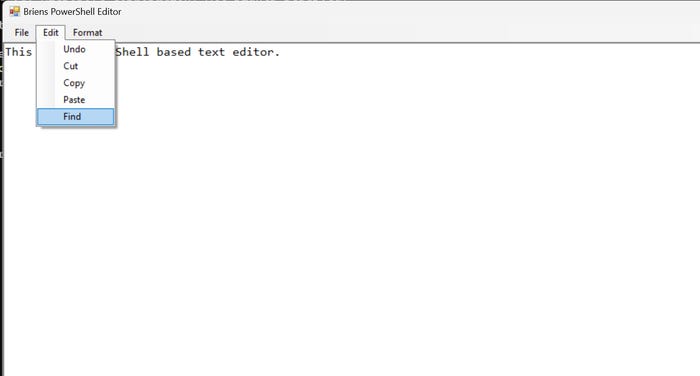
Figure 4. The Edit menu contains a Find option.
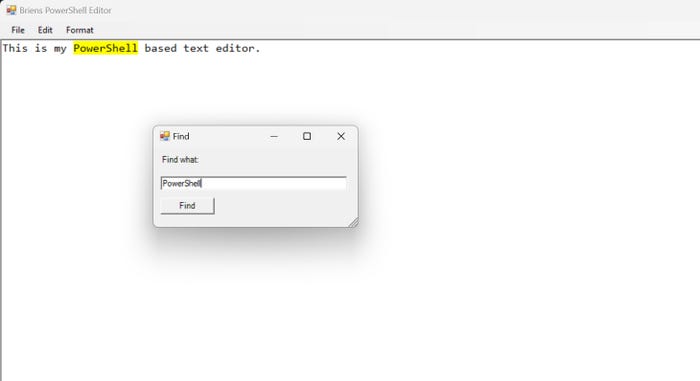
Figure 5. When you select the Find option, a popup appears.
The Find popup isn’t a native Windows element—I built it using PowerShell. I built it by assigning a click action to the Find option that defines additional GUI elements. In some ways, it is like a nested click action because the Find dialog box contains a button that you must click to initiate the search. In other words, the user clicks Edit→Find, enters the search term, and then clicks the Find button to perform the search. Here is a code excerpt:
# Add the "Find" functionality$FindMenuItem = New-Object System.Windows.Forms.ToolStripMenuItem("Find")$FindMenuItem.Add_Click({ # Create a new dialog to ask for the search term $FindDialogBox = New-Object System.Windows.Forms.Form $FindDialogBox.Text = "Find" $FindDialogBox.Width = 300 $FindDialogBox.Height = 150 $FindLabel = New-Object System.Windows.Forms.Label $FindLabel.Text = "Find what:" $FindLabel.AutoSize = $True $FindLabel.Location = New-Object System.Drawing.Point(10, 10) $FindDialogBox.Controls.Add($FindLabel) $FindtextBox = New-Object System.Windows.Forms.TextBox $FindtextBox.Location = New-Object System.Drawing.Point(10, 40) $FindtextBox.Width = 260 $FindTextBox.Text = "" $findDialogBox.Controls.Add($FindtextBox) $FindButton = New-Object System.Windows.Forms.Button $FindButton.Text = "Find" $FindButton.Location = New-Object System.Drawing.Point(10, 70) $FindButton.Add_Click({ $SearchTerm = $FindtextBox.Text If (![String]::IsNullOrWhiteSpace($SearchTerm)) { # Clear previous highlights by resetting the text color and background $TextBox.SelectAll() $TextBox.SelectionBackColor = [System.Drawing.Color]::White $TextBox.DeselectAll() # Search and highlight all occurrences of the search term $Index = 0 While ($Index -ge 0) { $Index = $TextBox.Text.IndexOf($SearchTerm, $Index) if ($Index -ge 0) { $TextBox.Select($Index, $SearchTerm.Length) $TextBox.SelectionBackColor = [System.Drawing.Color]::Yellow $Index += $SearchTerm.Length } } } $FindDialogBox.Close() }) $FindDialogBox.Controls.Add($findButton) # Show the find dialog $FindDialogBox.ShowDialog() | Out-Null})As you can see, the click action looks just like my previous example. The difference here is that rather than executing a single command (as with the Exit menu item), PowerShell executes an entire code block. In this case, we are defining several GUI elements:
A dialog box (the popup window)
A label (the text within the popup)
A text box (for entering the search term)
A button (to submit your request)
As previously mentioned, the Find button has its own click action.
Technique 3: Leveraging .NET
The final technique involves using the power of .NET. Like the previous methods, this is based on associating a click action with a menu item. However, instead of executing a single PowerShell command (like we did for the Exit option) or building additional GUI elements (like we did for the Find option), we can let .NET do all the heavy lifting.
In many Windows applications, you have likely noticed that certain functions—like “Save As” or “Open”—have a consistent look and feel across different programs. This uniformity exists because Windows application developers often use prebuilt components from the .NET framework rather than build dialog boxes from scratch, as I did with the Find option earlier.
Microsoft .NET offers numerous prebuilt dialog boxes you can integrate into your applications. All you need to do is figure out the name of the dialog box you need and any required parameters.
For example, Figure 6 shows the Font dialog box used in my text editor. Now, imagine how much code would be required to build the dialog box from scratch—fortunately, .NET simplifies this task.
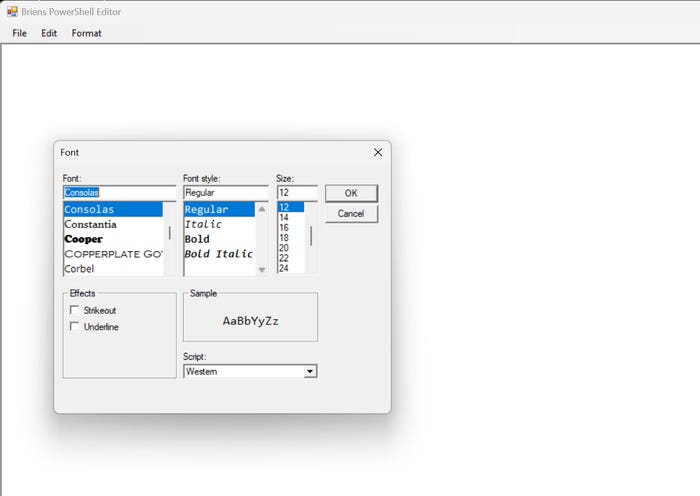
Figure 6. Here is the Font dialog box within my text editor.
Here is a code excerpt that demonstrates how I created this dialog box:
$FontMenuItem = New-Object System.Windows.Forms.ToolStripMenuItem("Font")$FontMenuItem.Add_Click({ $FontDialog = New-Object System.Windows.Forms.FontDialog $FontDialog.Font = $TextBox.Font If ($FontDialog.ShowDialog() -eq [System.Windows.Forms.DialogResult]::OK) { $TextBox.Font = $FontDialog.Font }})I started by defining a Font menu item with an associated click action. Next, I created a new object called FontDialog, which is of the type System.Windows.Forms.FontDialog. This object type represents the prebuilt font selection dialog box provided by Microsoft. The following line of code defines the default font. The last line updates the font in the text editor to match the user’s selection from the dialog box.
The takeaway is that you can easily incorporate a prebuilt dialog box into your PowerShell scripts. If there is sufficient interest, I may write a future article explaining how to find available dialog boxes and integrate them into your code.
About the Author
You May Also Like


.jpg?width=700&auto=webp&quality=80&disable=upscale)
