
A couple of months back, when I signed up for GitHub Copilot, I was surprised to find out that it can assist with PowerShell. Despite having always written PowerShell code manually, I recently began experimenting with GitHub Copilot for PowerShell development.
While I still prefer writing PowerShell code myself, as opposed to relying entirely on AI, I have come to see GitHub Copilot as a valuable tool for speeding up development and maintaining control over my code. Specifically, GitHub Copilot has proven useful for debugging and understanding unfamiliar commands or code snippets sourced online.
The goal of this article is to show you how to get started with GitHub Copilot for PowerShell scripting. In the first half of the article, I will cover the setup process and demonstrate how GitHub Copilot writes code on your behalf. In the article's second half, I will present some of my favorite tricks for GitHub Copilot.
Getting Started
- Signing Up for a GitHub Copilot Subscription
- Enabling GitHub Copilot in Visual Studio Code
- Using GitHub Copilot
Tricks and Tips
Signing up for a GitHub Copilot Subscription
Before you can use GitHub Copilot for PowerShell development, you will need a GitHub account (which is free for individuals) and a GitHub Copilot subscription.
There are currently three different plans to choose from. The Individual plan costs $10 per month, while Copilot Business and Copilot Enterprise cost $19 and $39 per month, respectively.
Enabling GitHub Copilot in Visual Studio Code
For this article, we will enable GitHub Copilot within Visual Studio Code. If you are unfamiliar with Visual Studio Code, it’s a free, open-source development tool by Microsoft that supports various programming languages, including PowerShell. You can download Visual Studio Code here: https://code.visualstudio.com/download.
The installation process for Visual Studio Code is straightforward. After completing the installation, click the Extensions icon in the toolbar on the left side of the screen. This will open the Extensions Marketplace. In the search box, enter “GitHub Copilot” to find the extension. You will see it appear among the search results. Click the Install button (shown below in Figure 1 to install the GitHub Copilot extension.
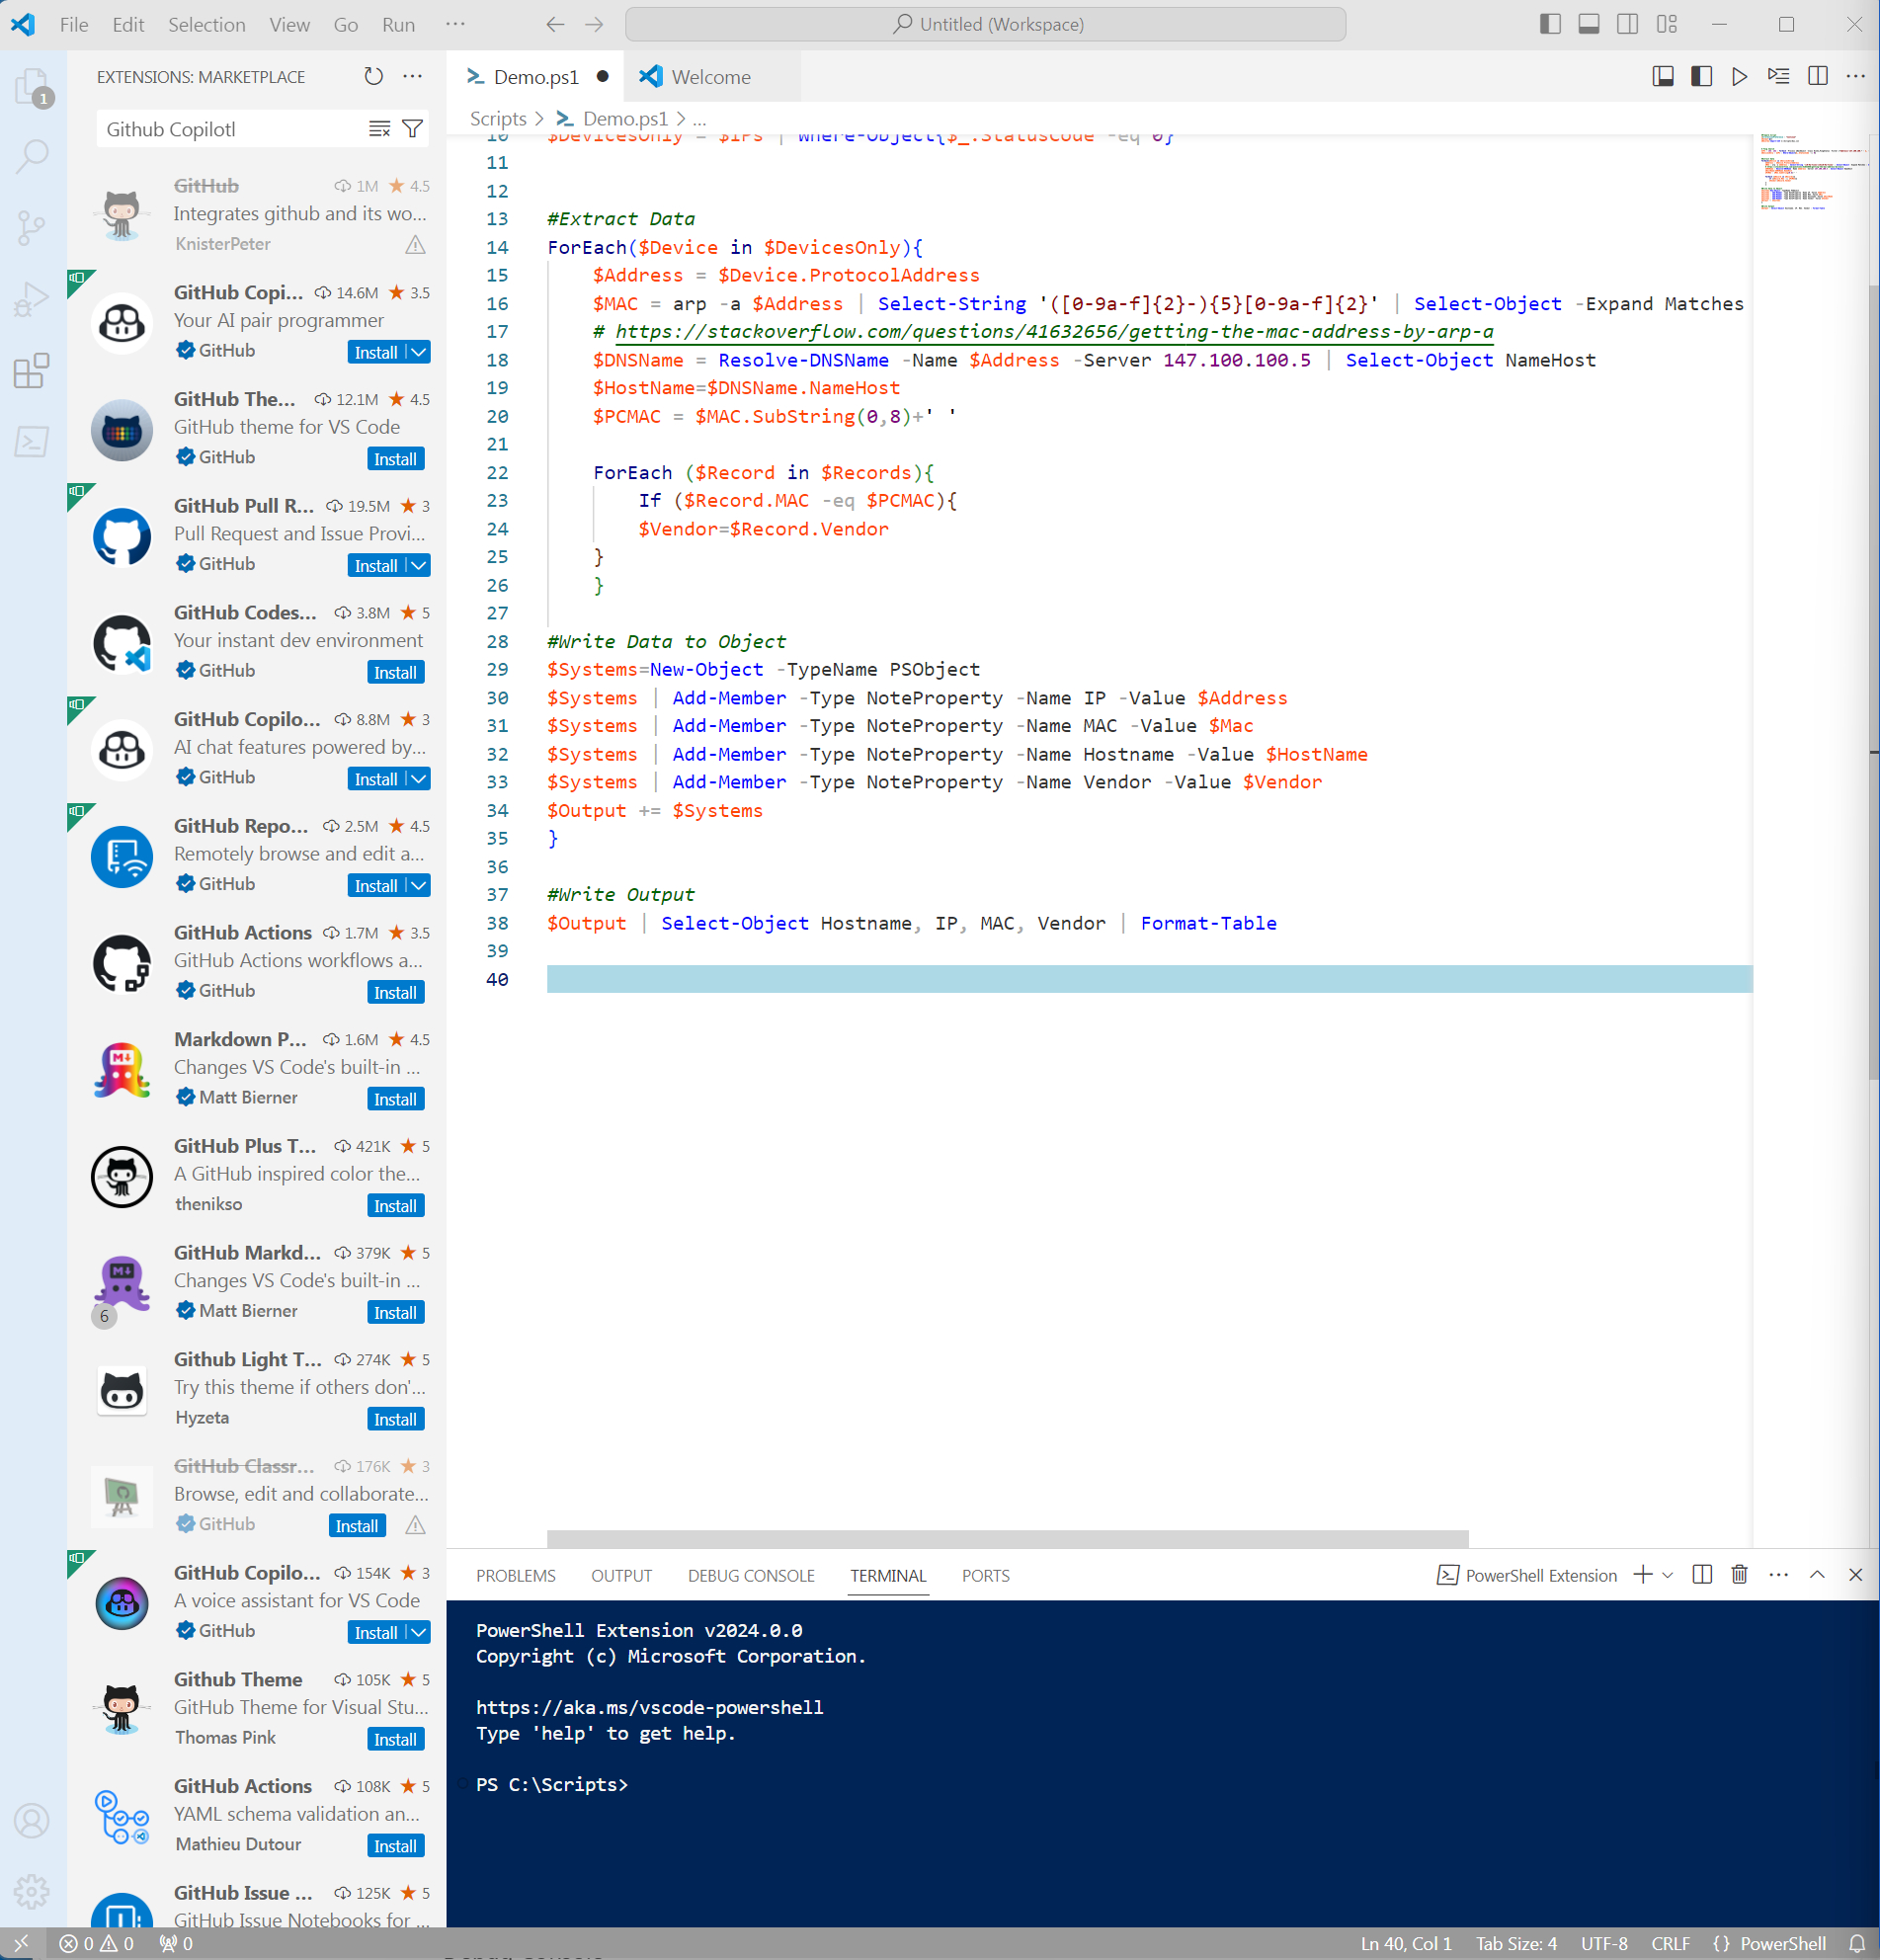
Figure 1. Click the Install button next to GitHub Copilot.
At this point, a prompt will ask you to log into GitHub Copilot. Click the “Sign in to GitHub” button, then click Allow. This action will open a browser tab where you will be prompted to log into your GitHub account. After logging in, click the “Authorize Visual Studio Code” button (shown in Figure 2) to complete the authentication process.
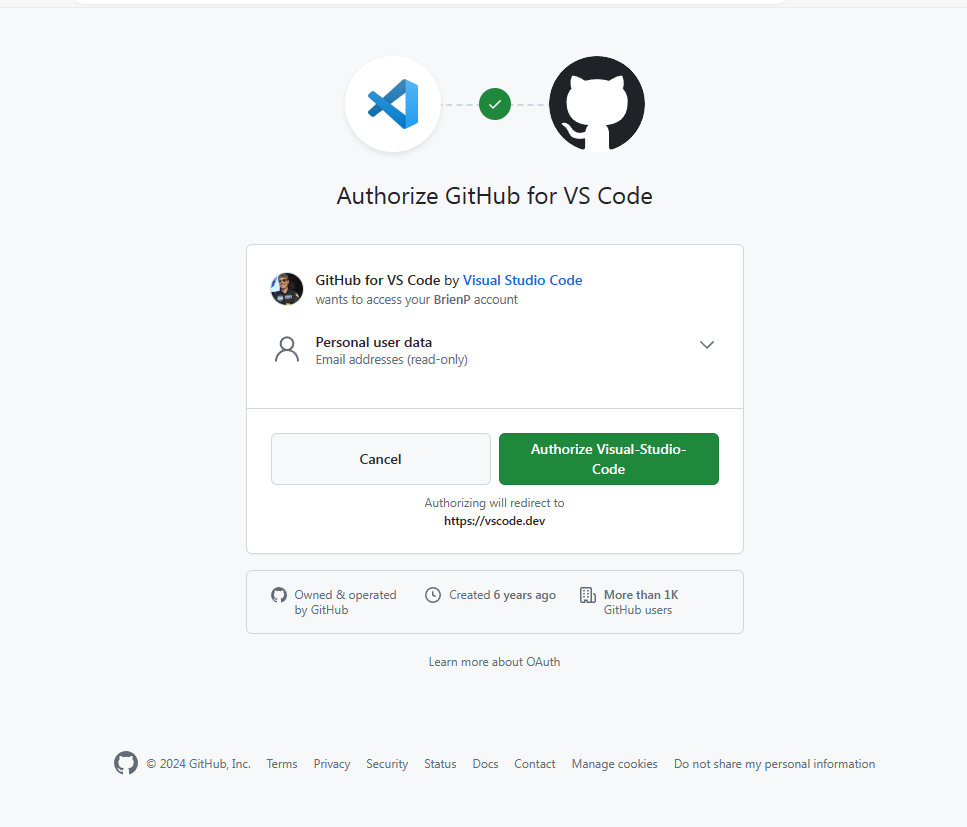
Figure 2. Click the Authorize Visual Studio Code button.
Using GitHub Copilot
Now the GitHub Copilot extension is installed, you can begin using it.
To have GitHub Copilot write code for you, start by selecting the File menu and then the option to create a new file. Make sure to use the .PS1 extension for the file name to indicate it’s a PowerShell script. This will prompt Visual Studio Code to create an empty PowerShell script. Once created, Visual Studio Code will display a message (see Figure 3) telling you to press Ctrl+I to invoke GitHub Copilot Chat.
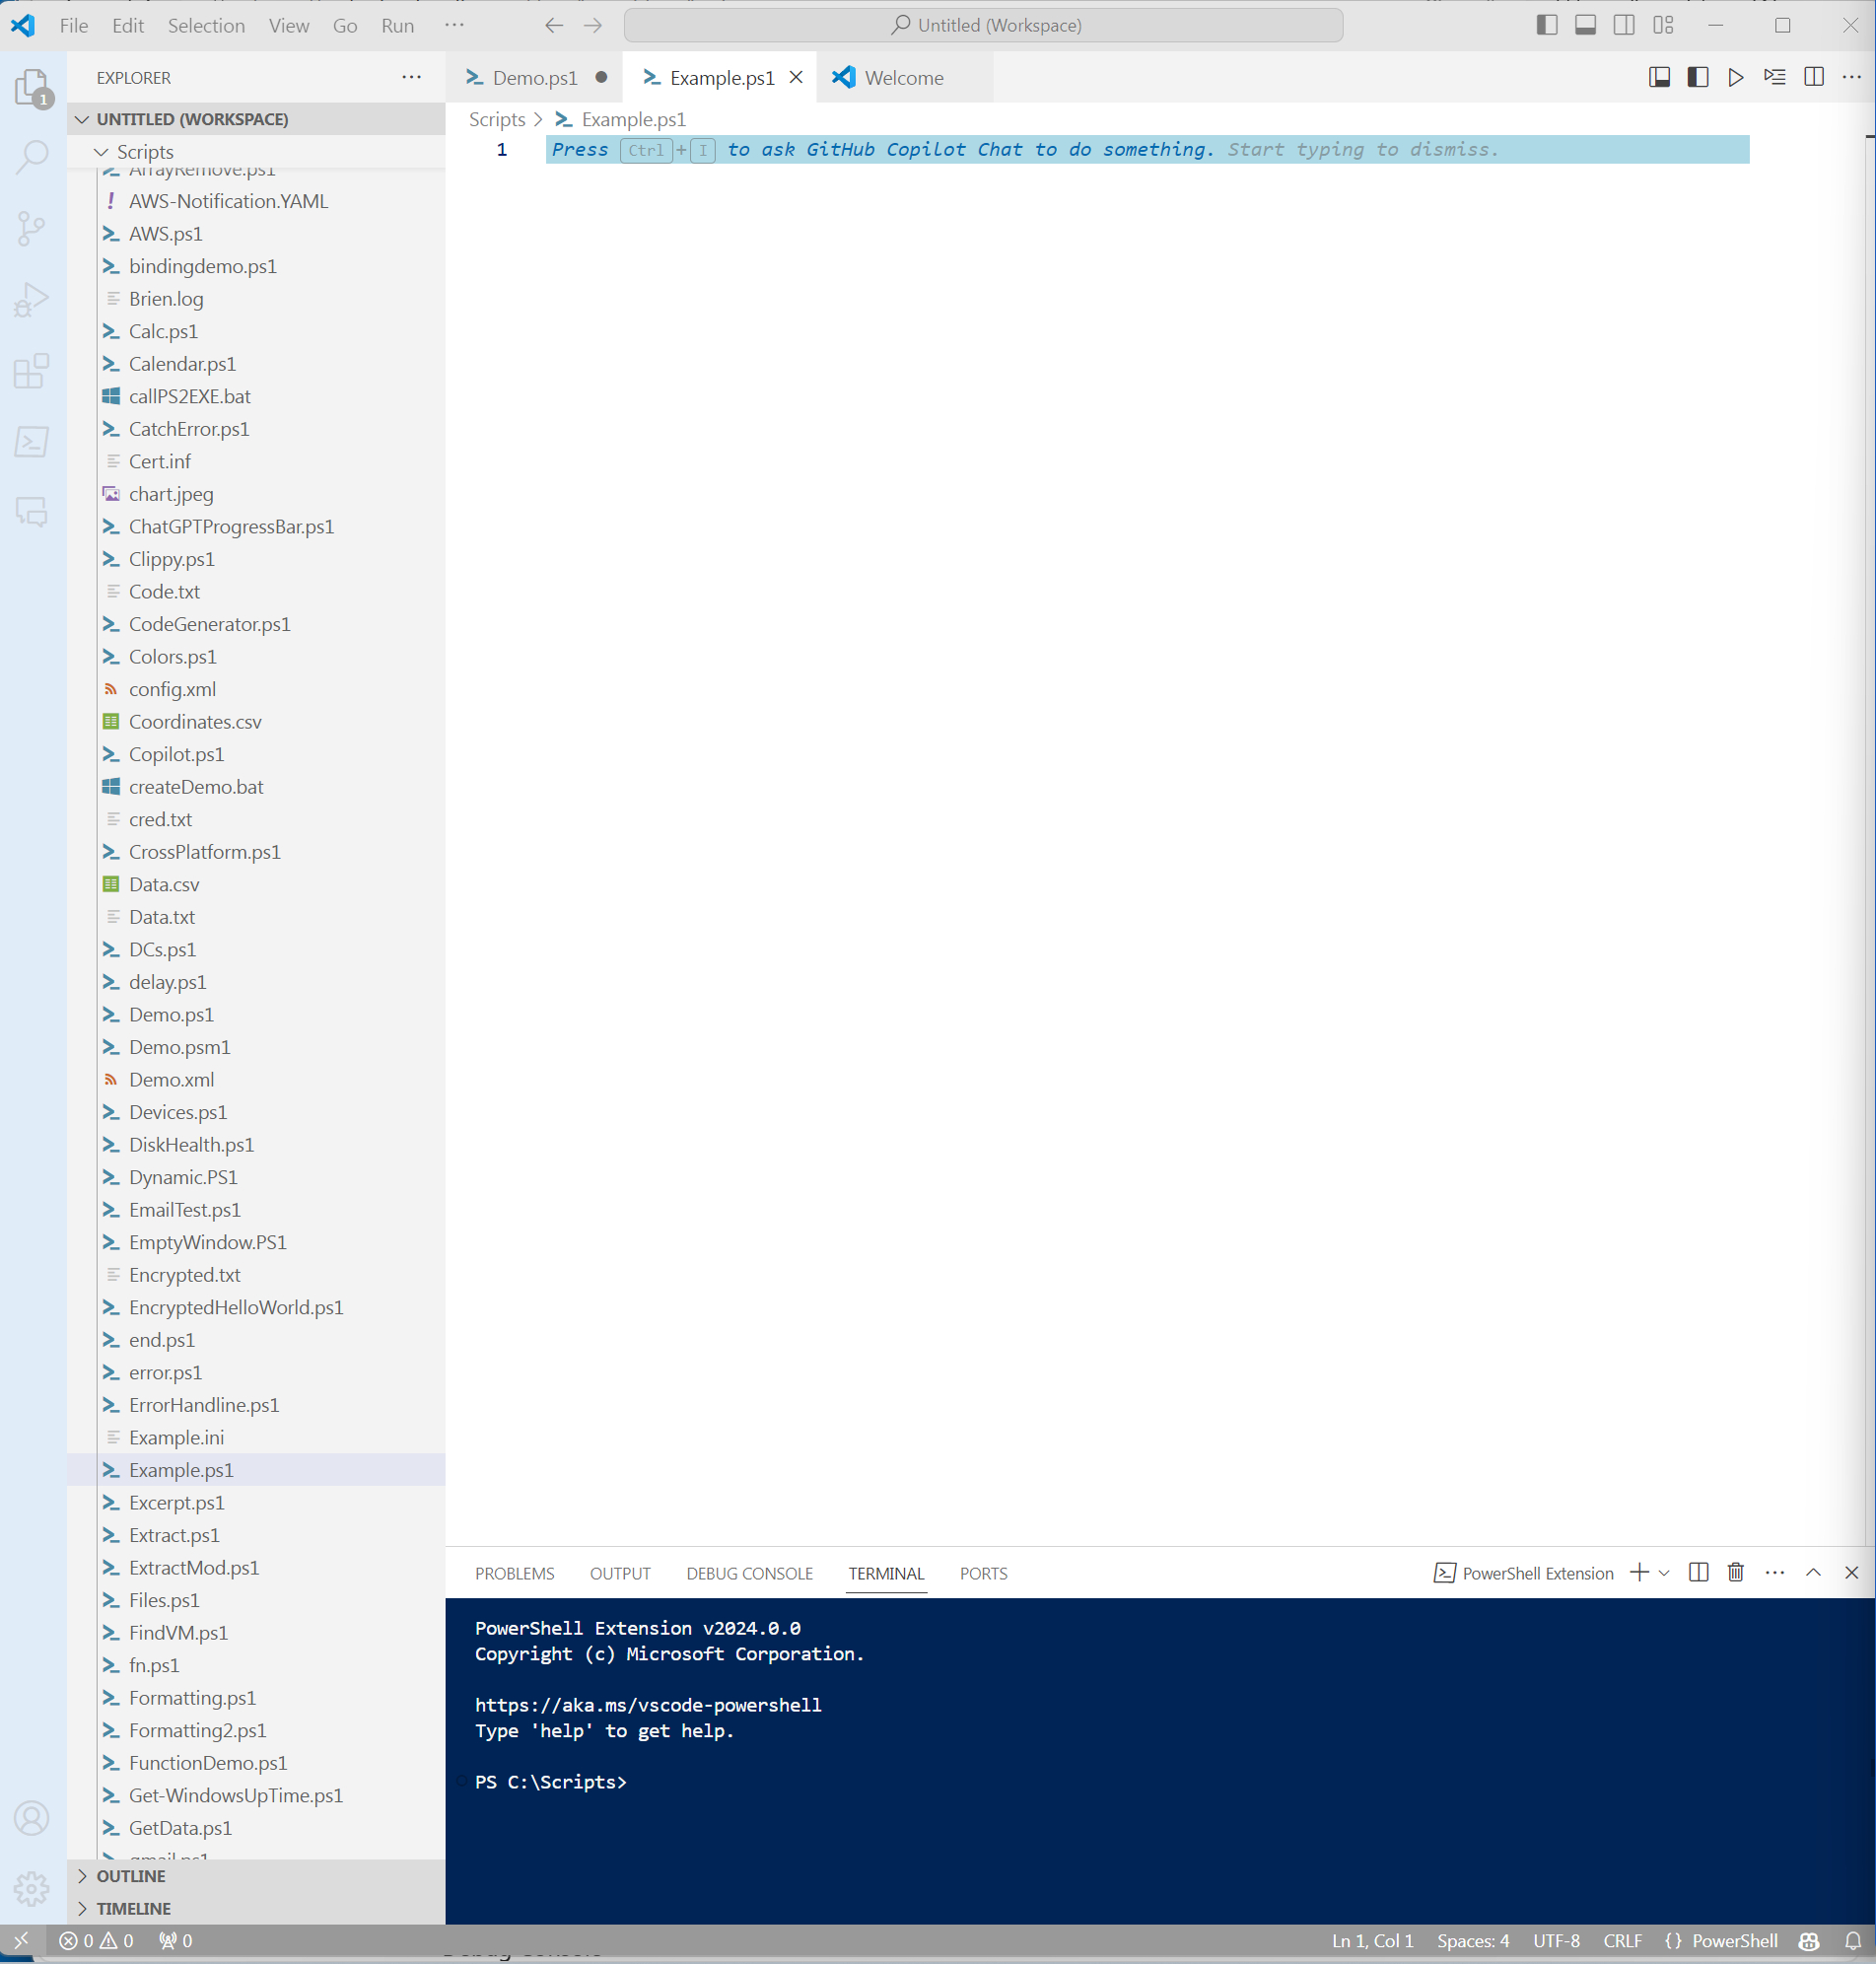
Figure 3. Press Ctrl+I to invoke GitHub Copilot Chat.
When you press Ctrl+I, a Copilot Chat window will appear at the top of the script window. As you can see in Figure 4, you can ask Copilot to generate code. Note that the chat window features a standard disclaimer warning you that AI-generated code may be incorrect.
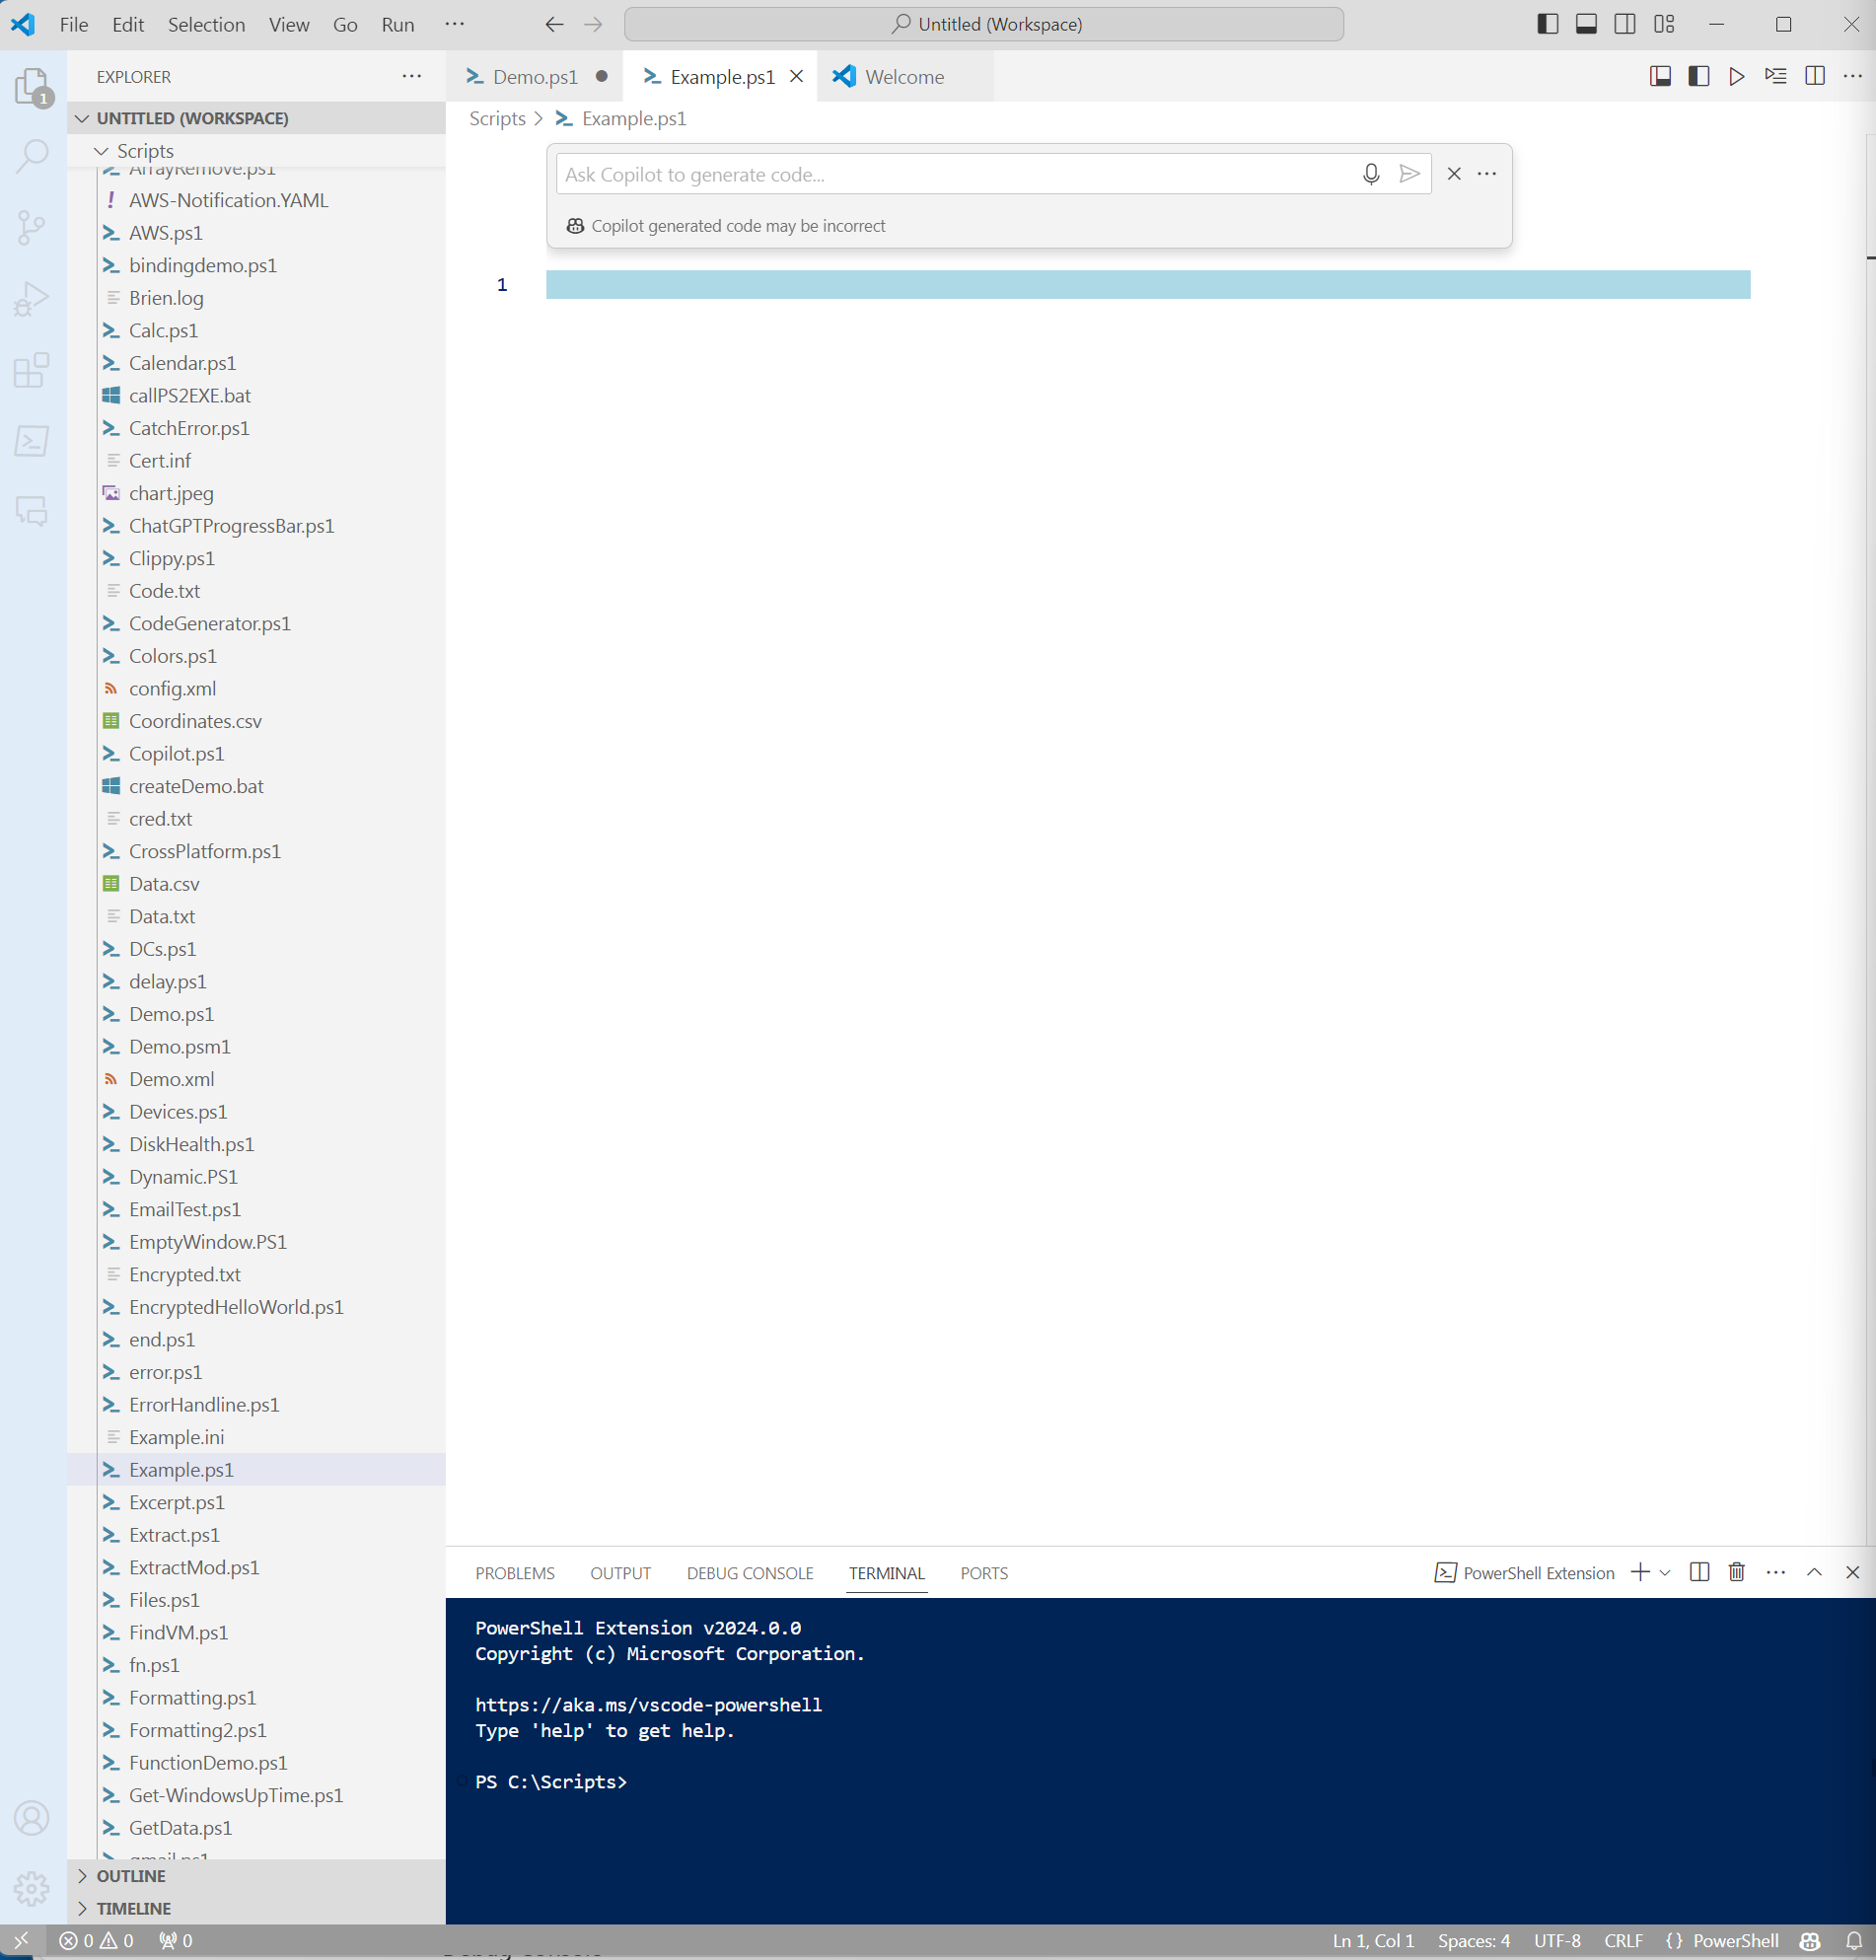
Figure 4. You can ask GitHub Copilot to write code on your behalf.
To try out GitHub Copilot, simply describe the script you want it to generate. For the sake of demonstration, I asked GitHub Copilot to write a PowerShell script that displays the words “Hello World” within a GUI interface. As shown in Figure 5, Copilot produced a short script that does exactly what I asked for. Figure 6 shows the resulting script in action.
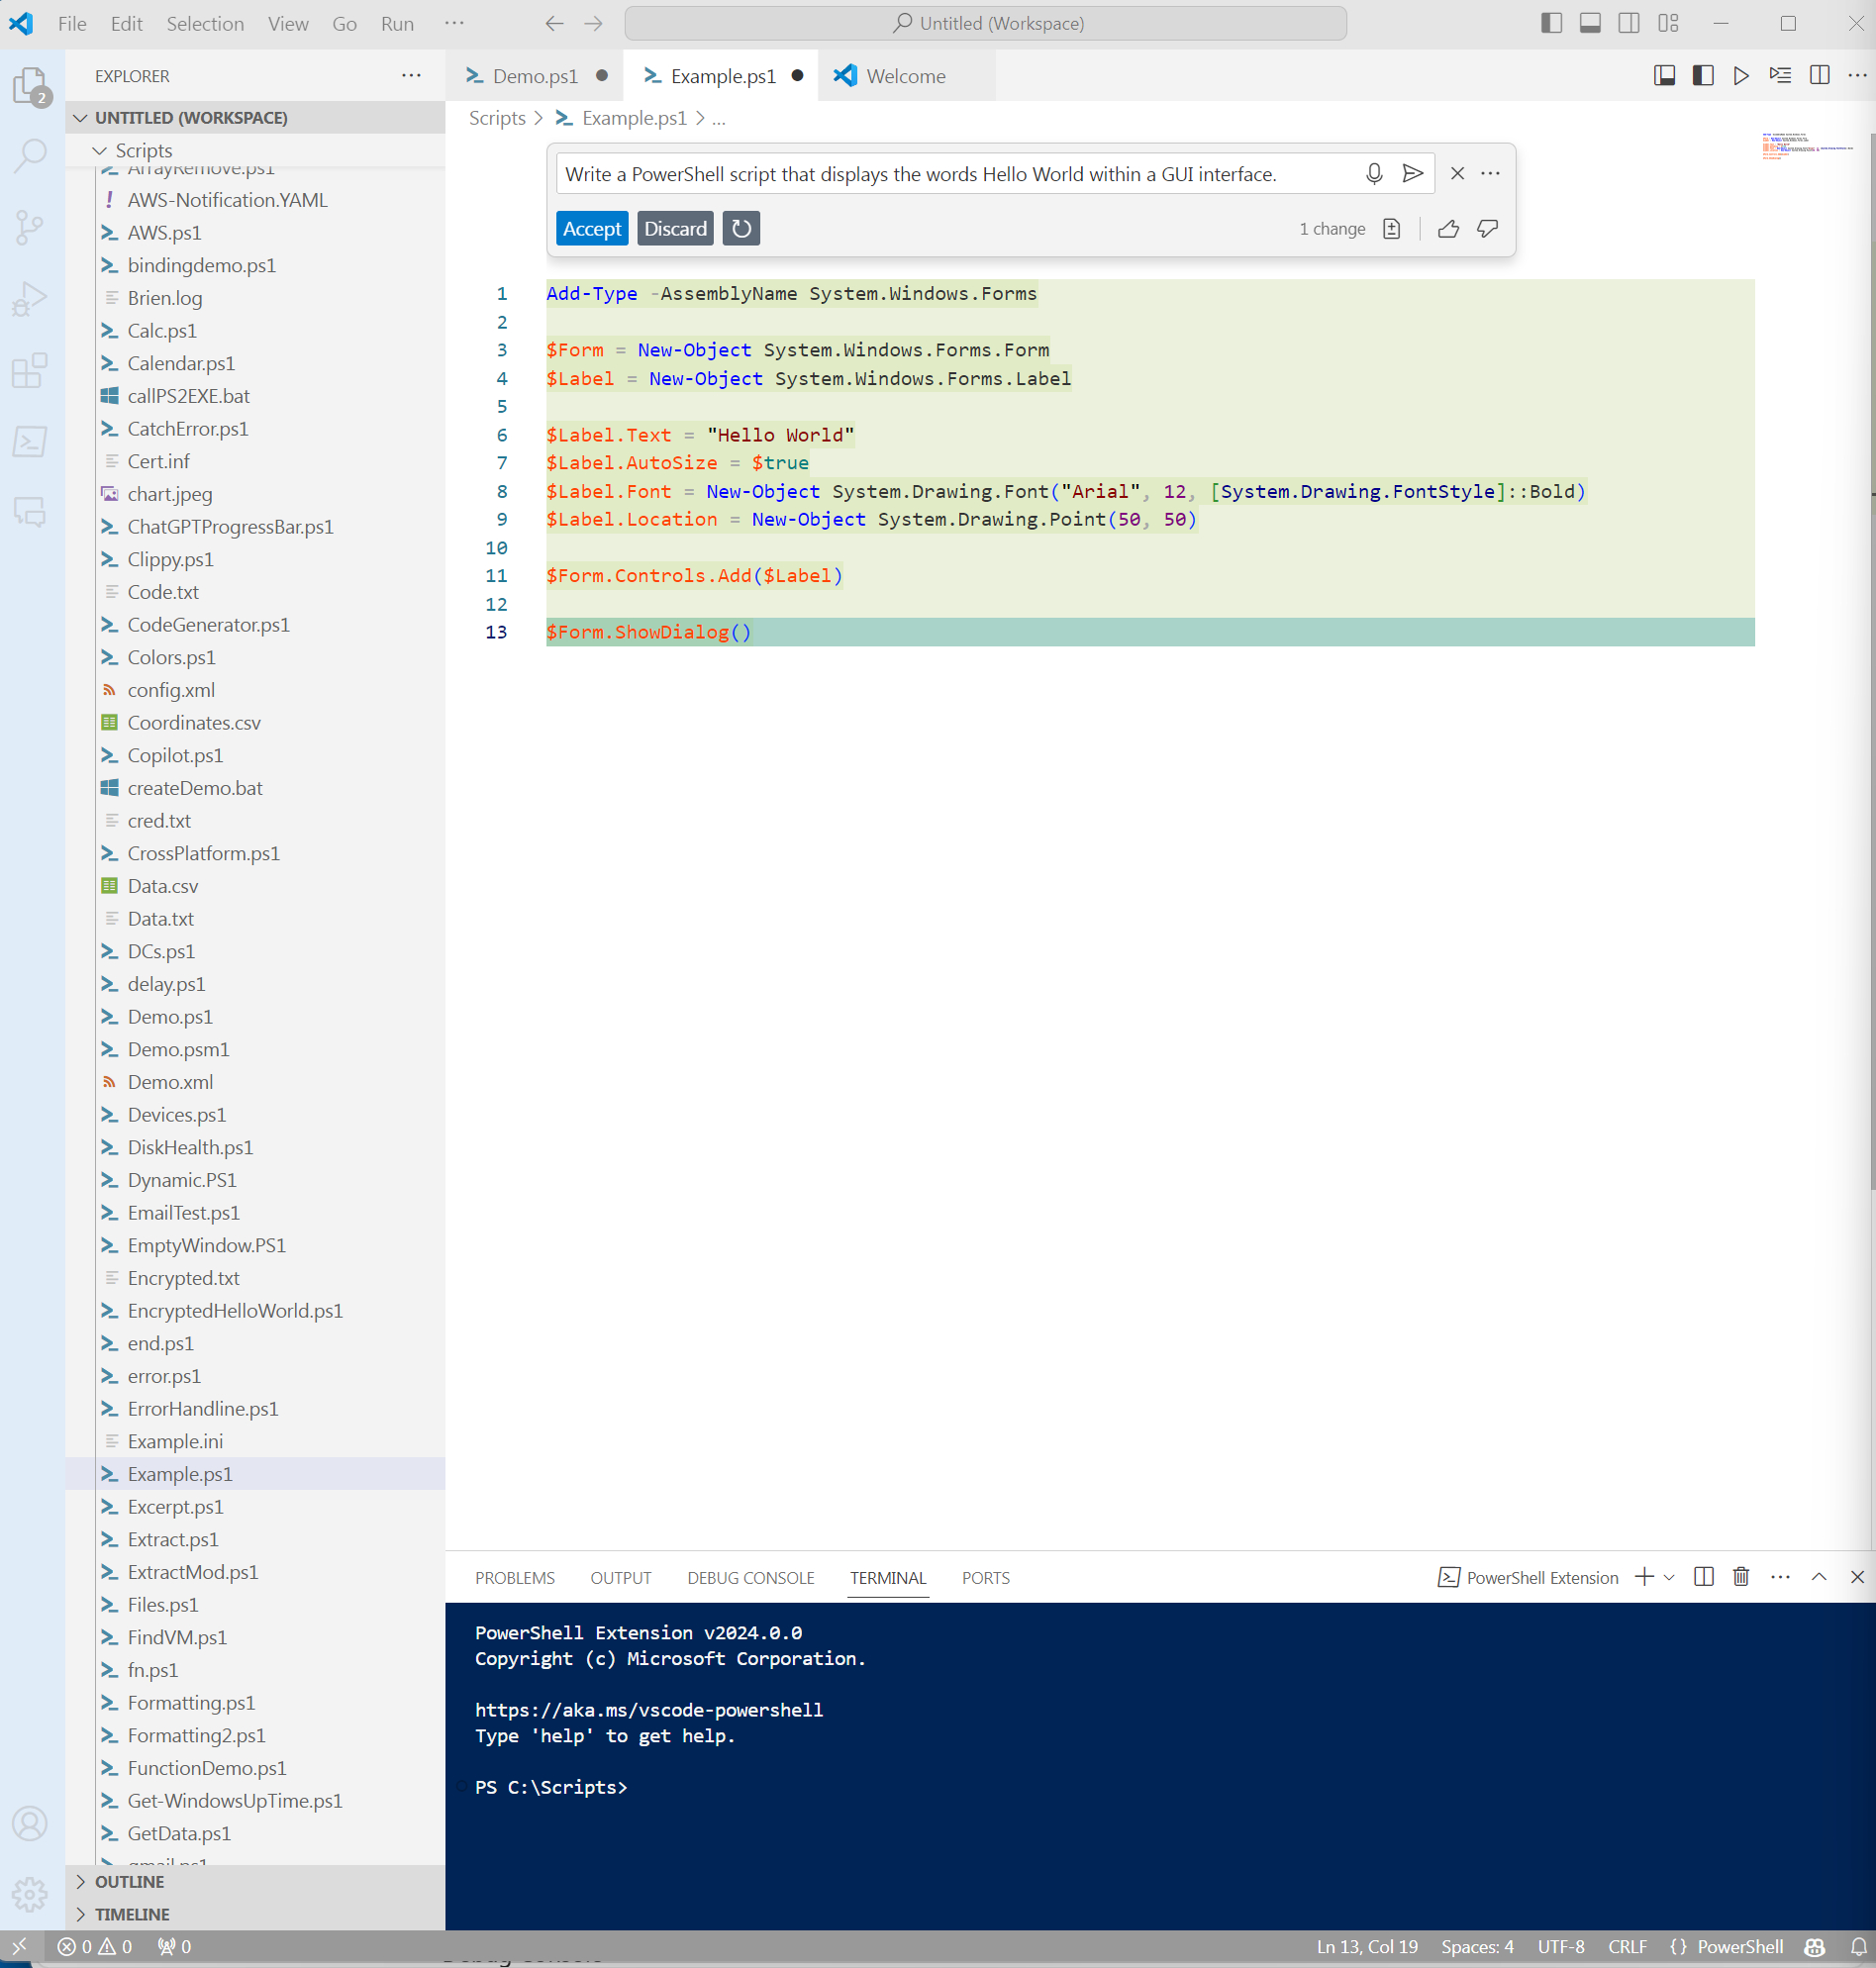
Figure 5. GitHub Copilot produced the script that I asked for.

Figure 6. This is the AI-generated script being run.
Whenever GitHub Copilot writes code, you will need to click the Accept button (see the chat window in Figure 5) to add that code to the script. As usual, you will also need to save the script for the changes to take effect.
Now that I have demonstrated how to set up and use GitHub Copilot, I will share some GitHub Copilot tricks geared toward those who like to write their own code.
Explaining a Block of Code
As much as I might like to think of myself as a PowerShell expert, the truth is that, like anyone else, I seek help online occasionally. If you have ever searched for “how do I do … in PowerShell,” you have no doubt encountered pages with overly complex code blocks. These code samples often use aliases and shortcuts, making them tough to read and understand. GitHub Copilot can help in such situations. It can analyze code, even a single command, and explain how it works.
In Figure 7, you will see that I have pasted a script of mine into Visual Studio Code. Let’s imagine I found this script online and don’t fully understand how it works. I selected a line (though I could have just as easily selected multiple lines) and right-clicked on it. Then, I selected the “Copilot” and “Explain This” commands from the shortcut menus, as shown in Figure 7. In Figure 8, you can see that Copilot has generated a detailed explanation of what the code does and displays it in the pane on the left side of the screen.
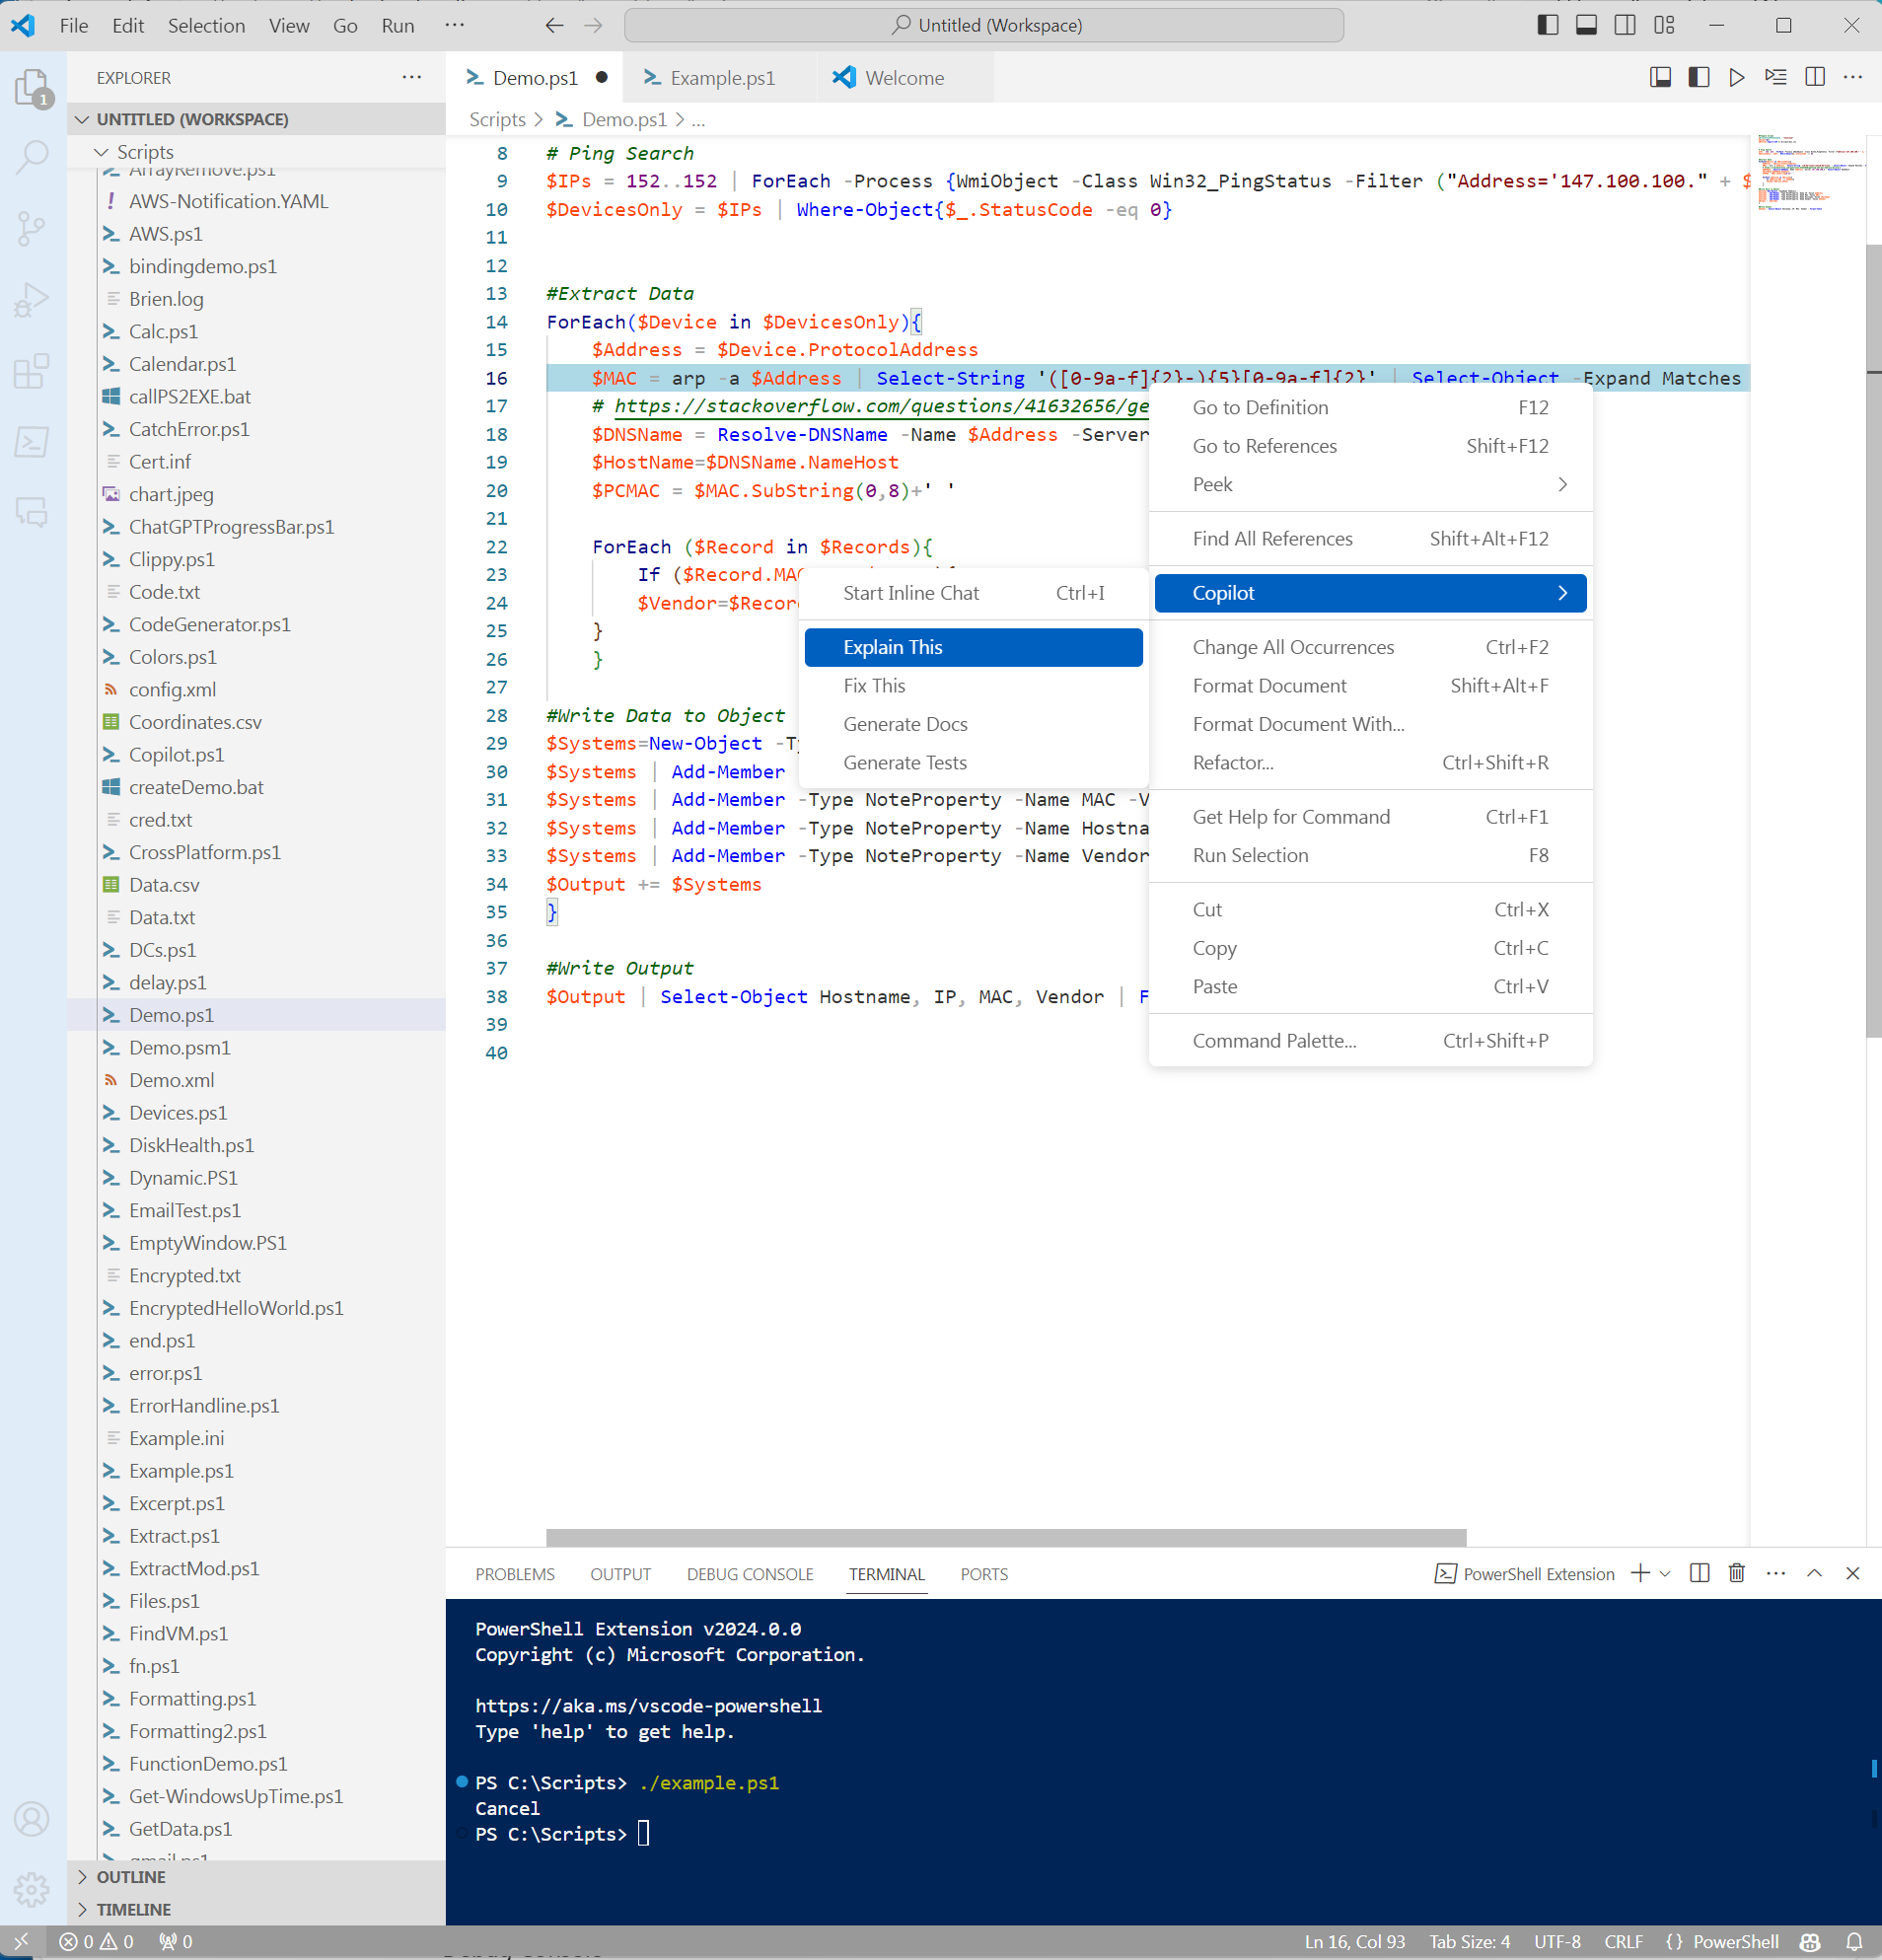
Figure 7. Right-click on a selected block of code and then click on Copilot, followed by Explain This.
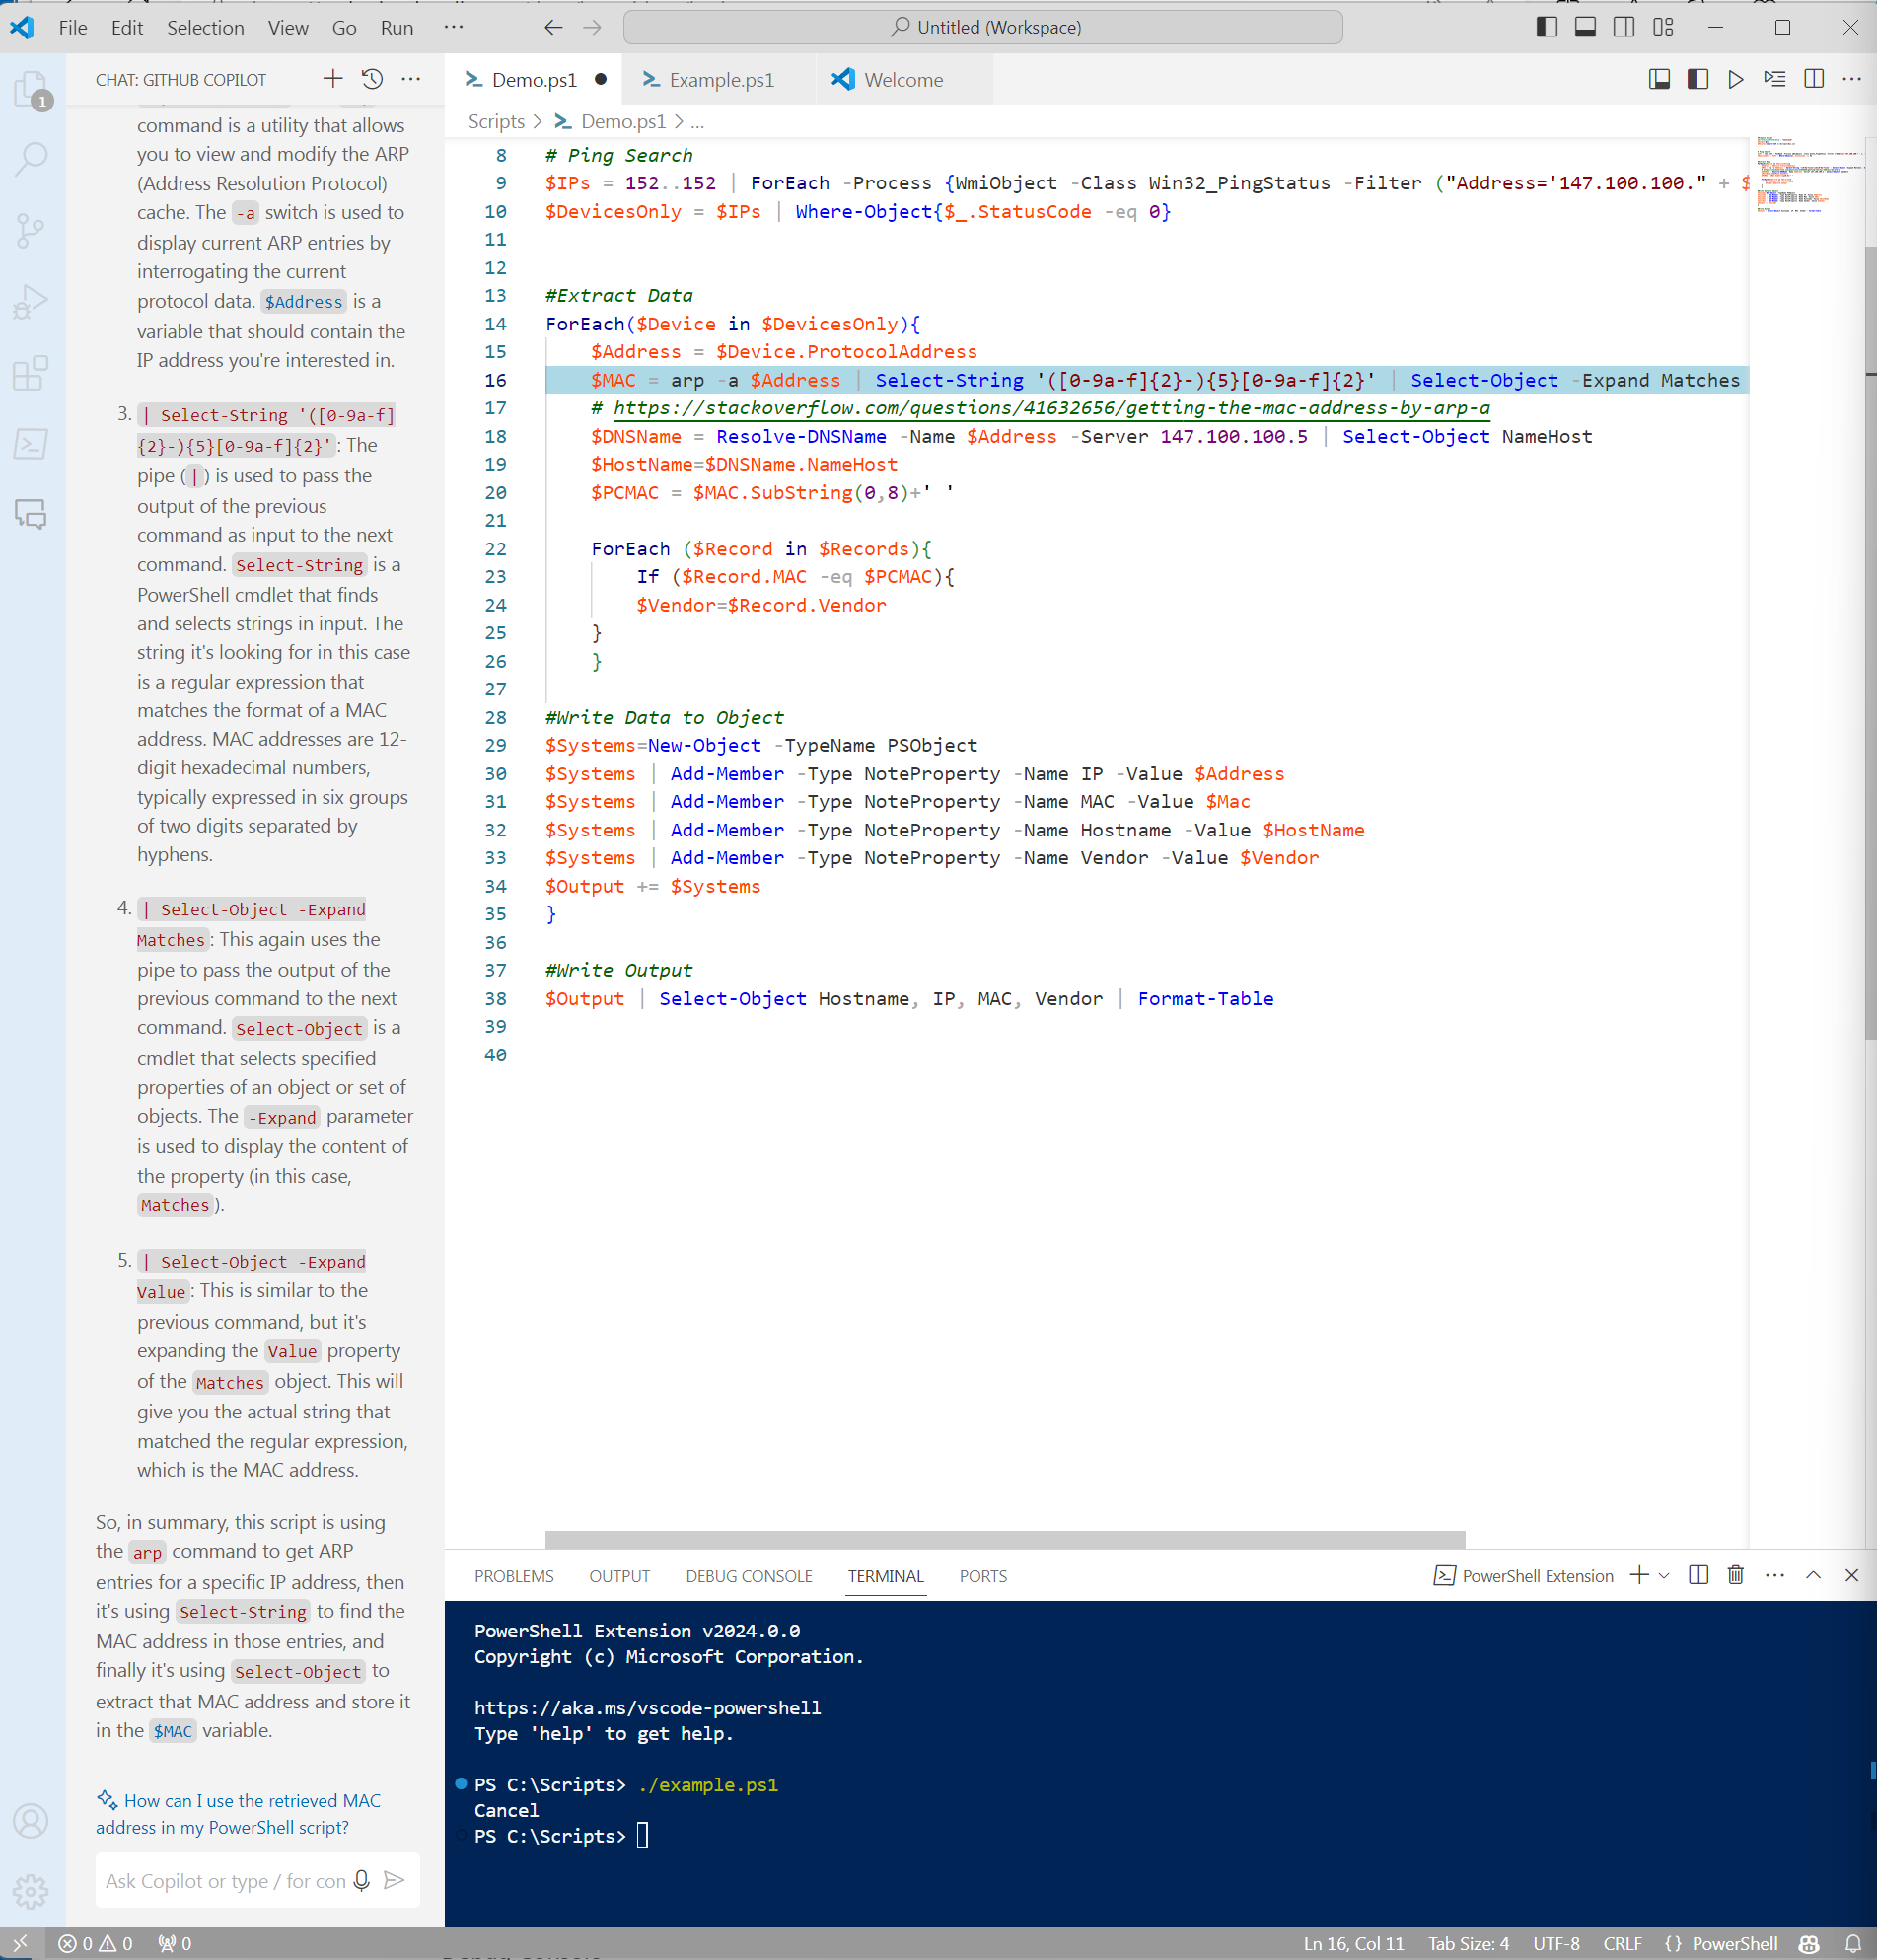
Figure 8. GitHub Copilot has generated an explanation of what the code does.
Automate Documentation
Another cool feature of Copilot is its ability to automatically document your code. Although I aim to include documentation in longer scripts, I am by no means a professional developer so my documentation is probably lacking. If I am to be totally honest, I occasionally wonder if the documentation in my PowerShell scripts is of help to anyone.
Thankfully, GitHub Copilot can write documentation for you. Simply select a block of code, right-click on it, and then choose “Copilot” and “Generate Docs” commands from the shortcut menus. Copilot will then add a few lines of documentation above the selected code and may also insert additional lines within the code itself.
For example, in Figure 9, you can see one line of documentation above the selected code block, which simply states, “Extract Data.” While this description might be useful to me, it probably isn’t all that helpful to others. Additionally, there is a line of documentation within the code block that references a URL where a command within the block was obtained. The line serves as a credit to the command’s original author.
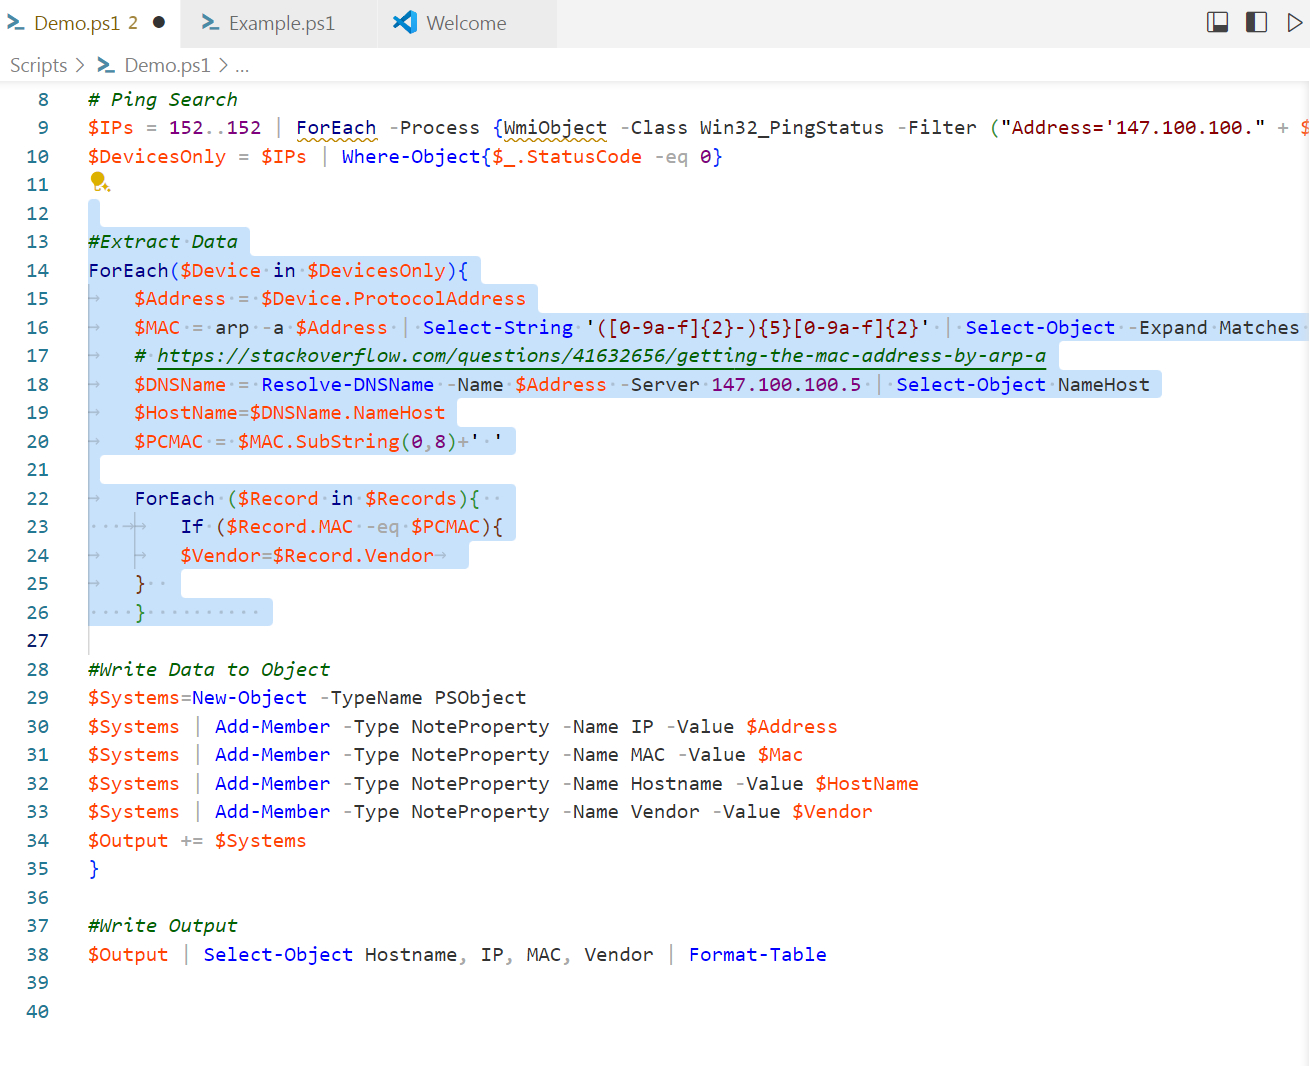
Figure 9. This is the code in its original form.
Turning to Figure 10, you will see the result of asking Copilot to document the code. As shown, a lengthy documentation section was inserted before the selected code block. I should mention that the first time I did this, Copilot inserted four lines of documentation before the script block and an additional three lines within the script block. After accidentally discarding the changes, I had Copilot redo the documentation, which resulted in much more extensive documentation the second time around.
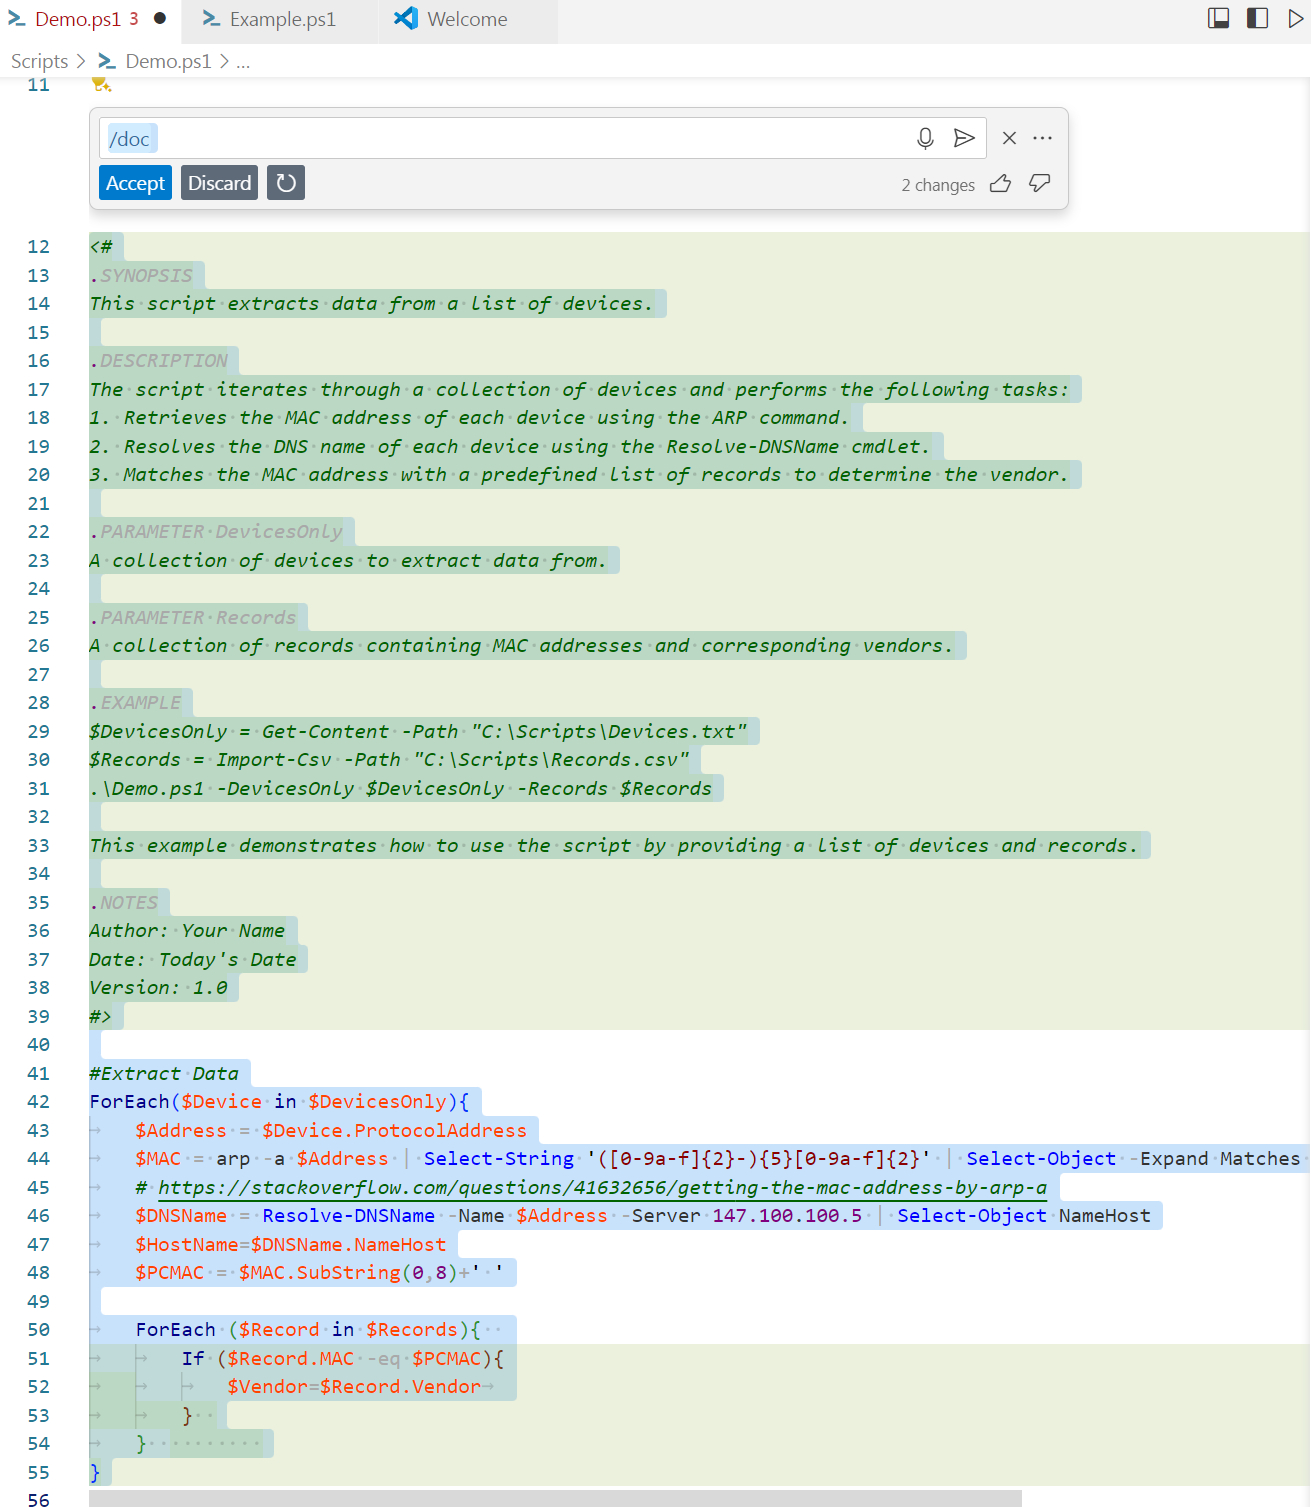
Figure 10. Copilot has added documentation to my script.
Incidentally, if you go to the Copilot Chat interface located on the left side of the screen and enter \DOC, Copilot will populate the Chat window with a detailed description of the entire script’s functionality.
Correcting Errors
Copilot can also assist in locating and fixing errors within your code. However, it’s important to note that while Copilot can sometimes fix errors without issue, there are instances where it may inadvertently introduce more problems.
To fix an issue in a script, just right-click on the problematic code and choose the “Copilot” and “Fix This” commands from the shortcut menu.
Getting Help From the Internet
One fascinating aspect of GitHub Copilot is its ability to tap into the information available on the public internet and provide insights related to the script, not just the code itself.
For example, let’s consider a PowerShell-based password generator I recently developed. This GUI-based script allows users to select checkboxes for elements they want in their passwords (uppercase letters, lowercase letters, numbers, and symbols), along with a slider to set the password length. The script generates a random password based on the provided criteria.
Out of curiosity, I opened this script in Visual Studio Code and queried GitHub Copilot if it adhered to best practices for passwords. Copilot responded with detailed guidance on password best practices, as seen in Figure 11. Keep in mind that this response had nothing to do with the script’s code itself but offered real-world advice on what my script should do to ensure effectiveness.
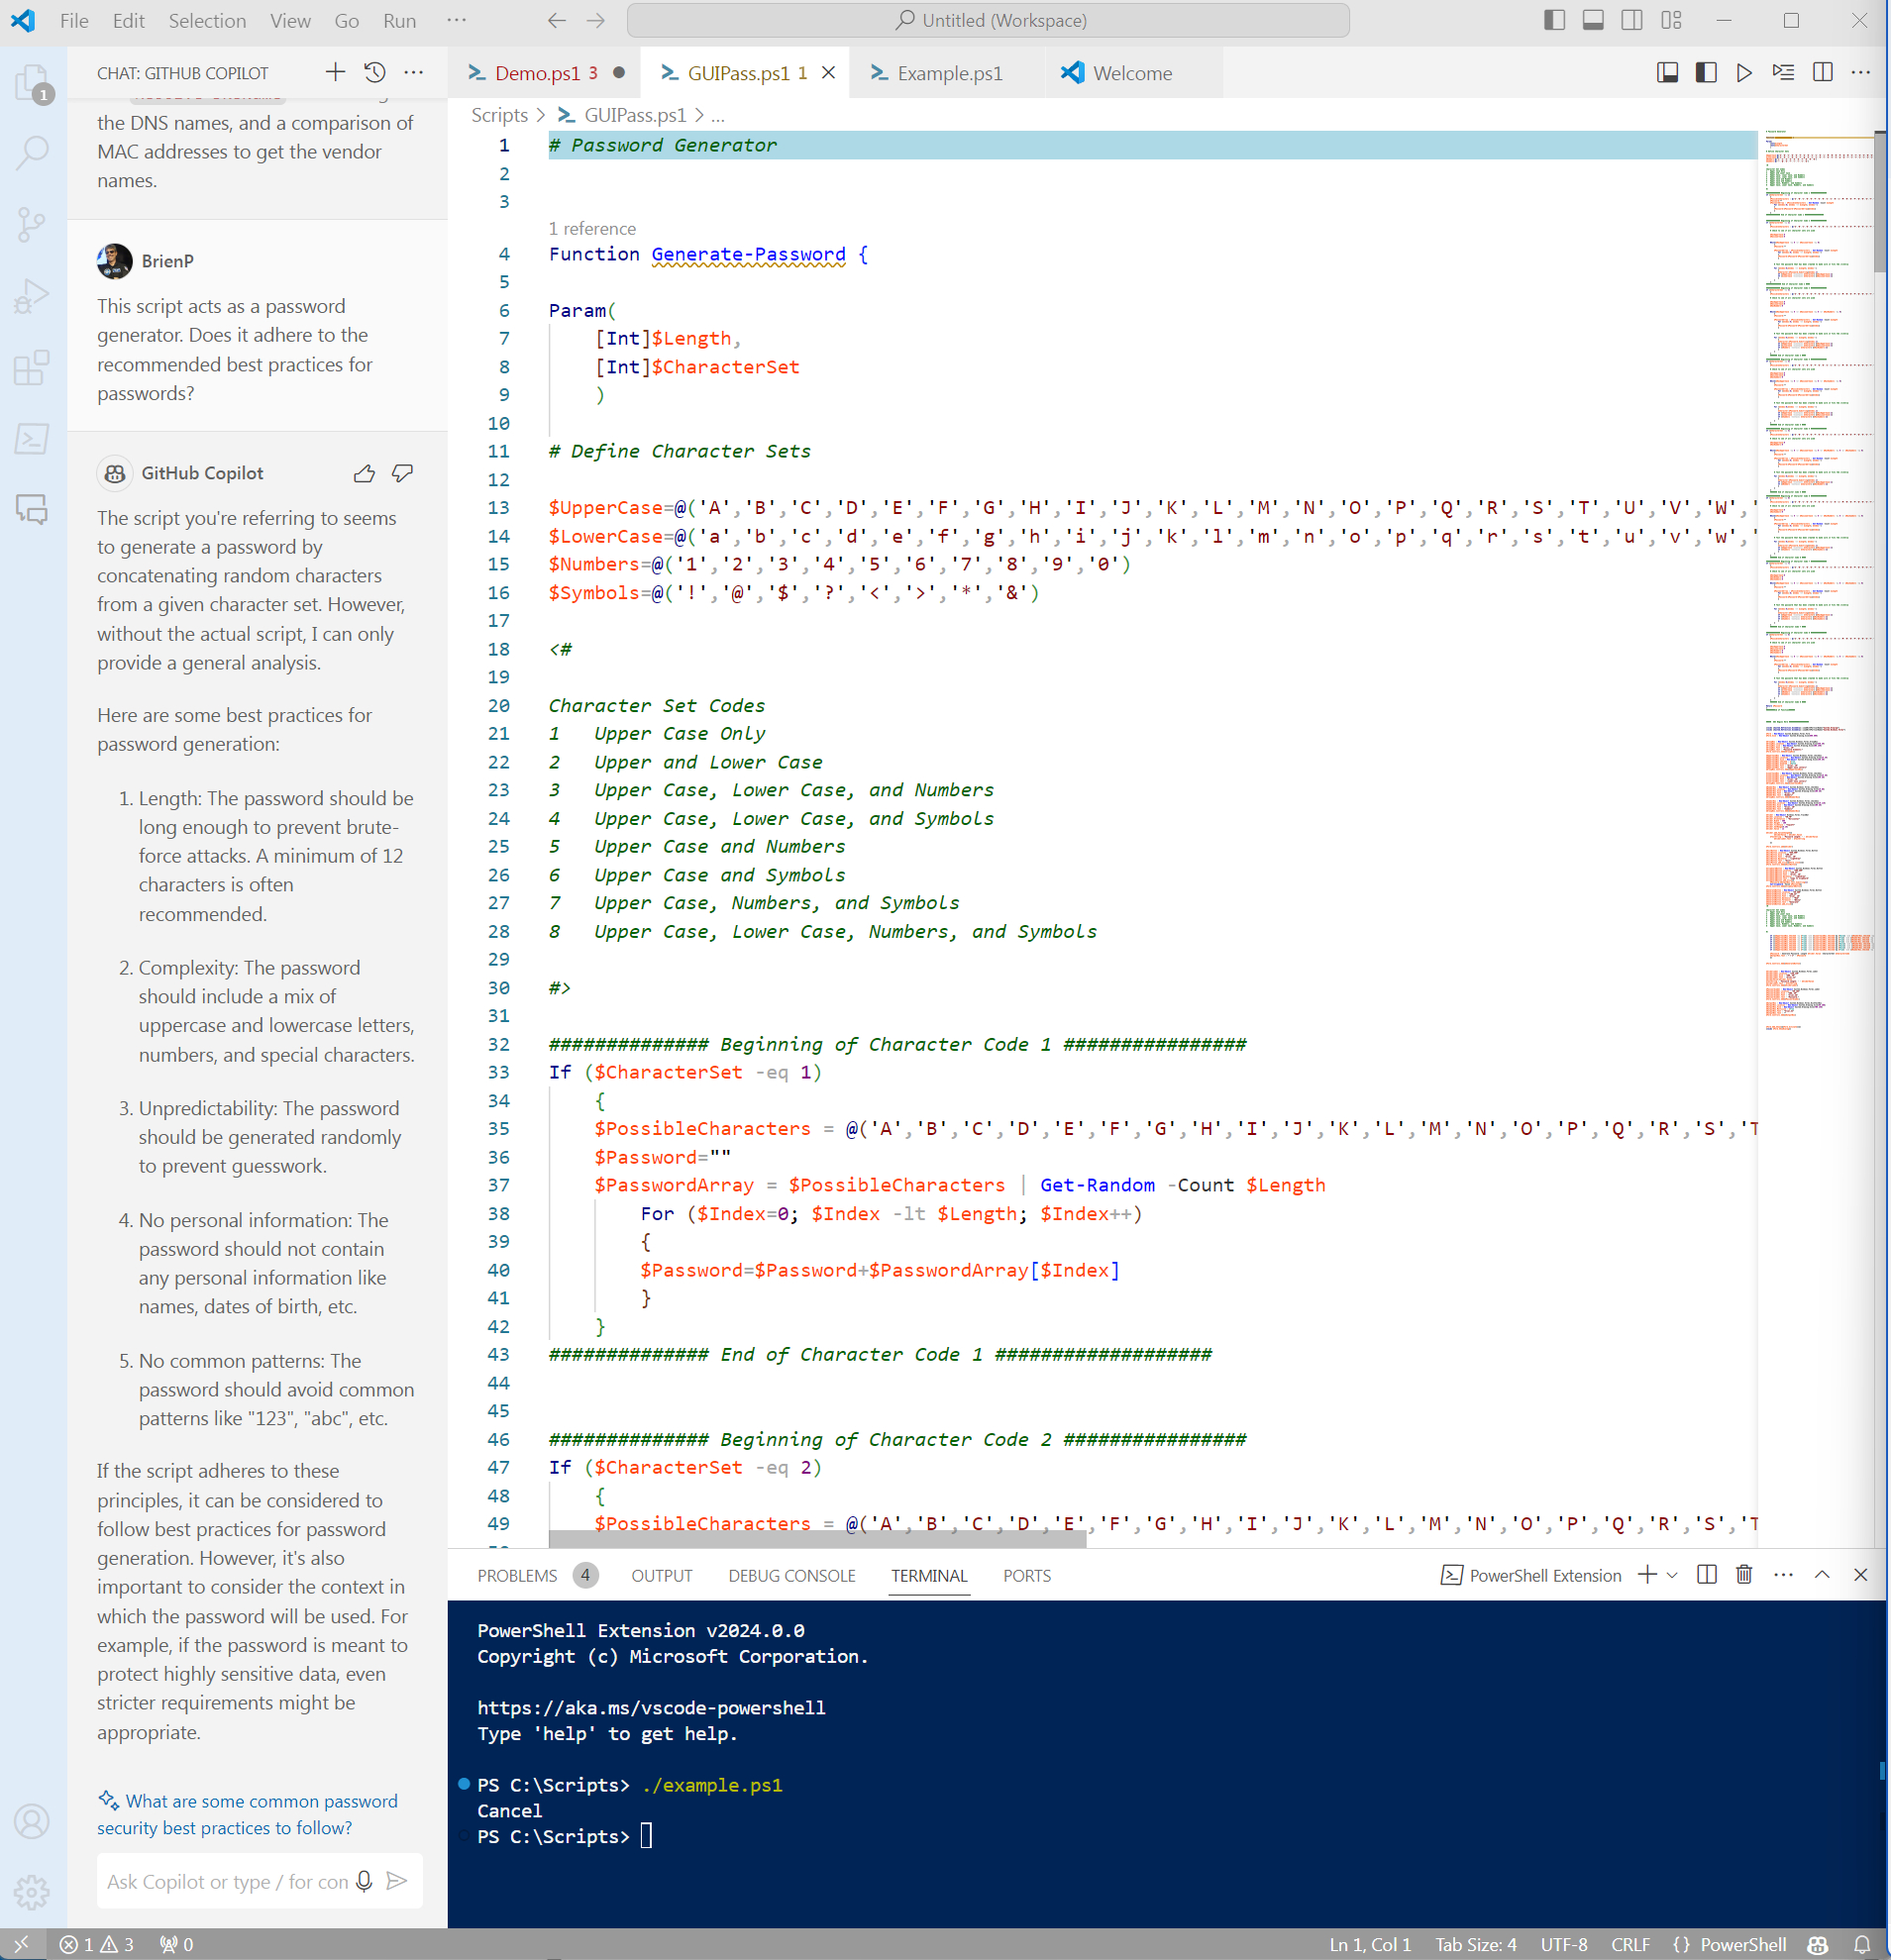
Figure 11. GitHub Copilot provided detailed information about password best practices.
About the author
 Brien Posey is a bestselling technology author, speaker, and 21x Microsoft MVP. In addition to his ongoing work in IT, Posey has trained as a commercial astronaut candidate in preparation to fly on a mission to study polar mesospheric clouds from space.


