Executing a Zero-Downtime Storage Hardware Refresh
Performing a storage hardware refresh that avoids downtime and data loss involves a thorough plan. Here’s a real-world example.
February 22, 2024

In a recent article, I explained how I planned a storage refresh in my environment. I outlined five basic requirements that my refresh had to meet:
Increase storage capacity to meet my needs for the next five years.
Complete the storage upgrade without any downtime.
Perform the storage upgrade without experiencing data loss.
Ensure that the new storage maintains or improves upon the current level of resilience.
Match the performance of the new storage with my current setup.
Given these requirements, I would like to discuss how I executed the storage refresh to ensure zero downtime and prevent any data loss (meeting requirements 2 and 3).
The Production Environment’s Setup
Before the hardware refresh, my production environment consisted of two Hyper-V hosts, each connected to a dedicated NAS. I have a single, very large virtual machine that contains all my data. The virtual machine is replicated across both servers by way of the Hyper-V replication feature.
I chose to build my production environment this way, instead of creating a failover cluster, to achieve genuine shared-nothing redundancy. The replication process occurs automatically every 30 seconds. As such, in the event of a critical failure, I could simply activate the standby replica, and so, theoretically, I should never lose more than 30 seconds’ worth of data.
A Redundancy-Driven Approach
I decided to maintain this type of redundancy since it has worked so well for me in the past. For the hardware refresh, my plan involved creating an offline backup, which would act as a last line of defense if something went horribly wrong. From there, I would:
Verify that the replicas are in sync, and then break the replica pair.
Shut down the replica NAS and the replica host.
Remove and replace the replica NAS, bring it online, and then re-enable Hyper-V replication.
Once all data was replicated to the new NAS, I would perform a lossless failover to the replica server, making it host the running copy of the production virtual machine.
Break the replica pair again, replace the other NAS, bring it back online, and then reestablish the replication process.
Finally, I would perform one more lossless failover to return the running copy of the VM to its original host.
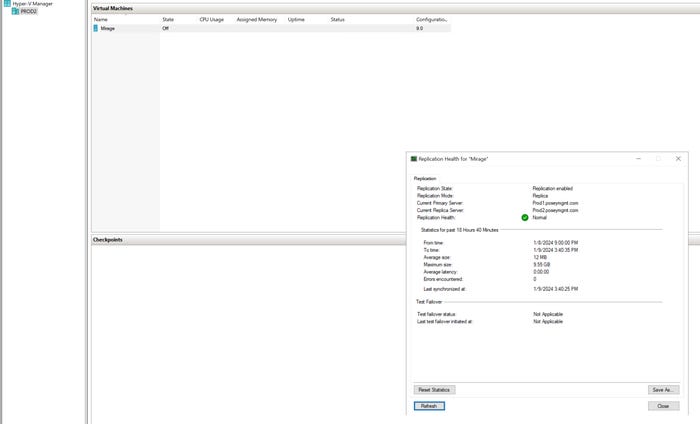
Verifying a replica’s health in Hyper-V is a simple process. Just open the Hyper-V Manager, right-click on the virtual machine, and select the Replication | View Replication Health commands from the shortcut menus.
It’s a good idea to perform this check on both replication partner hosts. In rare circumstances, I have seen two replication partners report completely contradictory health data. Given that one of the replication partners will be taken offline, it’s important to thoroughly confirm the replication’s health.

Hyper-V Transition 1
Figure 1. It’s important to verify that Hyper-V replication is healthy.
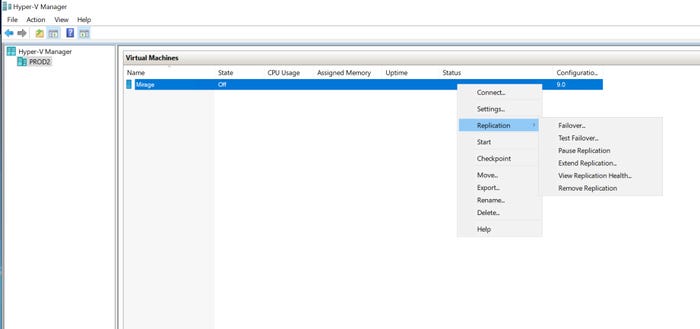
After verifying the replication health and confirming that all data has been replicated between the two hosts, the next step is to disable replication. In the Hyper-V Manager, right-click on the virtual machine and select the Replication | Remove Replication commands from the shortcut menus. This action needs to be performed on both Hyper-V hosts. This process does not delete the virtual machine copy (the replica), but it does stop any further data replication to it.

Hyper-V Transition 2
Figure 2. You can use the Remove Replication menu option to terminate the replication partnership.
Addressing Downtime and Data Loss
This brings up two important points. First, as previously noted, my requirements included zero downtime and no data loss. Technically, the type of migration that I am performing cannot be accomplished with literally no downtime and no data loss. A lossless failover (referred to as a planned failover by Microsoft) requires powering down the virtual machine during the failover process. However, the downtime is minimal, usually lasting around a minute or so. The alternative, an unplanned failover, results in the loss of any data not yet replicated.
The second point is that the migration method I performed requires a very small amount of downtime, but this only holds true so long as the primary Hyper-V host does not fail during the storage refresh. Through the refresh, there is no standby virtual machine replica to fall back on. Even so, there is some hardware-level redundancy that will help mitigate the risk of a failure. For example, my Hyper-V host servers have redundant power supplies, while my existing NAS appliances are configured with redundancy to protect against disk failures.
Read more about:
Technical ExplainerAbout the Author
You May Also Like


.jpg?width=700&auto=webp&quality=80&disable=upscale)
