Creating Data Lifecycle Management Rules for AWS S3, Part 2
Data lifecycle management rules can help organizations drive down costs. Learn how to set up rule actions in part two of this two-part article.
January 28, 2022

Although there are significant advantages to storing data in the cloud, there are also some potential disadvantages. One such disadvantage is the direct cost associated with data storage. AWS and other public cloud providers charge a per gigabyte, per month fee for data storage.
Organizations can reduce their cloud data storage costs by creating data lifecycle management rules. These rules can ensure that aging data is automatically deleted or moved to a less expensive storage tier.
In part one of this two-part article, I explained how to set up a data lifecycle rule in AWS S3 and create filters to identify the data for which a rule will apply. In part two, I will show you how to set up actions that are triggered by your data lifecycle rules.
How To Set Up a Rule Action
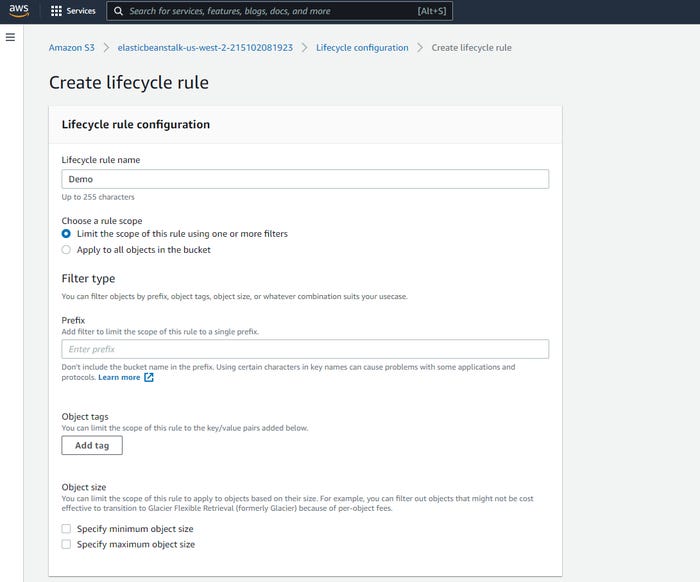
As I detailed in part one, the first step in creating a data lifecycle management rule is to open the AWS S3 console and select a storage bucket. Next, you select the Management tab and then click the Create Lifecycle Rule button. From there, you assign a name to the rule. Optionally, you can create one or more filters. Figure 1 shows the interface that is used to assign a name to a rule and to apply filters.
Figure 1

S3 Lifecycle 2-1
This is the interface that is used to create a data lifecycle management rule.
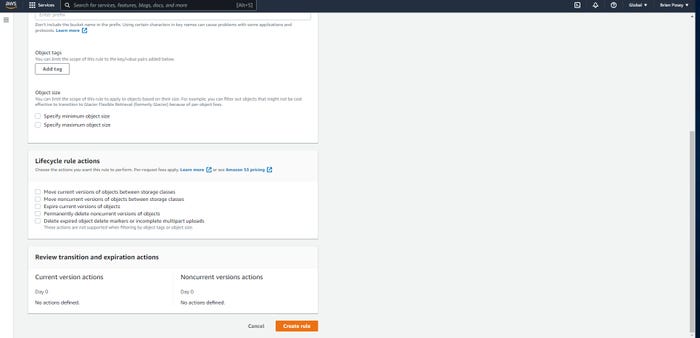
Once you have assigned a name to the rule and set up any filters that you need, it’s time to define one or more rule actions. The interface for setting up these rule actions is located beneath the interface shown in Figure 1, so you must scroll down to find it. You can see the Lifecycle Rule Actions in Figure 2.
Figure 2

S3 Lifecycle 2-2
You can create rule actions by selecting the checkboxes that correspond to the actions that you wish to perform.
Before I get into a discussion of the lifecycle rule actions, there are two things worth noting. First, performing a rule action typically incurs a fee. Remember, AWS bills you for the resources that you consume within the AWS cloud. Performing a rule action typically consumes a small amount of resources, resulting in a nominal charge.
The second thing to know is that while all of the rule actions are supported for rules without filters or for rules that solely use prefix filters, not all rule actions work when combined with filters based on object tags or object sizes.
So, with that said, there are five different types of rule actions that are supported:
Move current versions of objects between storage classes
Move noncurrent versions of objects between storage classes
Expire current versions of objects
Permanently delete noncurrent versions of objects
Delete expired object delete markers or incomplete multipart uploads
Enabling these rule actions is a simple process. All you do is select the corresponding checkbox, then populate a few options that further define the rule action’s behavior. As simple as this process might be, however, there are some important concepts to understand before creating a rule action.
Versioning and Expiration
The first of these concepts is that of a current vs. noncurrent version of an object. AWS S3 storage allows you to set up versioning for the objects (files) that you create. If versioning is enabled, then every file modification results in a new version of the file being created.
The advantage to enabling versioning is that it allows you to revert a file to a previous state. This can be valuable to have if a file is incorrectly modified or infected by ransomware.
The disadvantage, however, is that file versions can accumulate and take up a lot of space. That’s why there is a rule action that will move noncurrent versions (old versions) of objects (files) to another storage class (where storage costs less). You can see an example of this rule action in Figure 3.
Figure 3

S3 Lifecycle 2-3
You can move noncurrent versions of objects between storage classes.
The other concept to understand is that of expiration. When you expire an object, you essentially mark it for deletion. In more technically precise terms, when an object is expired, it becomes unavailable.
That unavailable object may or may not be permanently deleted depending on the versioning state of the bucket. That’s why if you look at Figure 2, you will see that some rule actions mention expiring objects while others mention deleting objects. You can expire a current version of an object, and you can delete noncurrent versions of objects.
When you are done setting up the rule actions, the last step in the process is to scroll to the bottom of the screen and review the rule parameters in place. Assuming everything looks good, just click Create Rule and the rule will be created.
About the Author
You May Also Like


.jpg?width=700&auto=webp&quality=80&disable=upscale)
