We have had numerous questions from users on Windows 7 and 8.1 systems who, after reserving their free Windows 10 upgrade using the Get Windows 10 App, have decided to not upgrade.
Their reasons are varied but the bottom line is they do not want to have the upgrade downloading and installing on their systems.
I have tested several scenarios to stop the upgrade using a Windows 7 (SP1) Virtual Machine and I expect they willl also work on Windows 8.1.
Here is how this VM was setup:
- KB3035583 was installed which contained the Get Windows 10 App and therefore was displaying the white Windows icon in the system tray.
- I had already requested a reservation of the Windows 10 upgrade.
- The Windows 10 Upgrade files had already been downloaded to the VM and were stored in a directory on the main system drive (typically C:\) labeled $Windows.~BT. That folder can range in size from 3-6GB in size based on my experience so far.
So if you have decided to not upgrade to Windows 10 here are the scenarios to prevent your Windows 7 and 8.1 system from installing/downloading the upgrade from this point.
Scenario 1
KB3035583 is installed and the Get Windows 10 App is running in the system tray but no reservation has been made.
1. Uninstall KB3035583 (instructions here). You will be prompted to reboot your system
2. Once the system has restarted check for updates once again and if KB3035583 or an offer to get the Windows 10 Upgrade show up then hide those updates by right clicking on each one of them and selecting Hide updates. I have seen hidden updates reappear so be vigilant when you do future update checks. Since these are optional updates they should not start automatically.
3. Since there was no reservation made no pre-downloading of the install files should have occurred. You can verify this by checking for the $Windows.~BT described above.
4. If for some reason it is there you can use the Disk Cleanup tool to remove the temporary installation files.
Scenario 2
KB3035583 is installed and the Get Windows 10 App is running in the system tray and a reservation was made to get the free Windows 10 Upgrade.
1. You can verify your system is waiting for the Windows 10 upgrade by clicking on the Get Windows 10 App and seeing what it says in the Get Windows 10 App window. If it indicates you have a reservation, then it is likely the pre-download has already happened on your system.
2. Uninstall KB3035583 and then choose to reboot later when prompted.
3. Run the Disk Clean up tool and select the Clean up system files after the initial scan. Select the Temporary installation files for deletion. Once they are removed reboot your system and then check for Windows Updates once again.
4. When/If KB3035583 and/or the Windows 10 Upgrade are offered just hide those updates as described in Scenario 1 above.
Scenario 3
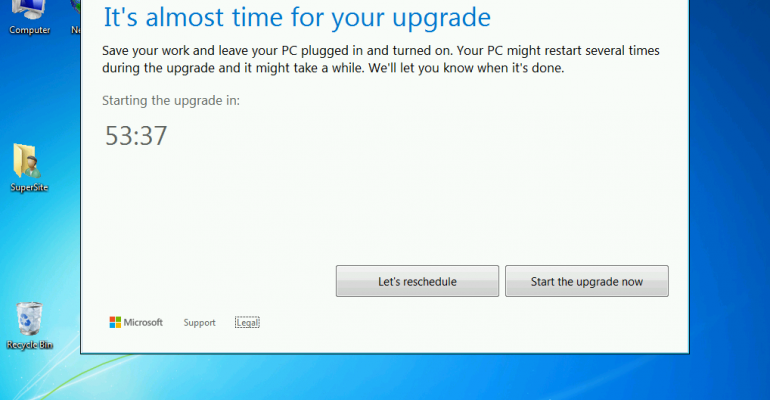
You have already reserved your Windows 10 upgrade and received the prompt on your system that the upgrade is ready to begin.
The prompt offers you the opportunity to schedule the upgrade over the following 72 hours or to start it immediately.
If you pick the later then the upgrade will begin immediately and there is no getting away from it. On the plus side you can always use the Revert option in Windows 10 to revert to your previous operating system if you decide Windows 10 is not for you.
If you schedule the update sometime in the next three days, then you can still stop it from happening by following these steps:
1. Uninstall KB3035583 and select the option to reboot later just like in Scenario 2.
2. Run the Disk Cleanup tool as described in Scenario 2 and remove the installation files.
3. Wait for the scheduled time to arrive because that has alreay been set in motion if you choose a time for the upgrade. One hour prior to that you will see a window on your screen indicating that it is almost time for the upgrade to happen. This dialog does offer you the chance to reschedule as well.
4. Once the timer reaches zero then the system will begin the upgrade process.
5. Following the reboot, the attempt to upgrade will fail because you removed the temporary installation files earlier in this scenario.
6. You now need to check Windows Update and hide KB3035583 and the Windows 10 Upgrade when it is offered so they will not start again.
Scenario 4
If all else fails and you get the upgrade and find yourself in Windows 10 then you have two options.
One – since you upgraded successfully to Windows 10 why not spend some time in the OS and see how it performs on your system. You never know – it might be very agreeable with you and your hardware.
Two – If you simply do not want to have Windows 10 or it is not compatible with some of your hardware and software then just revert back to your previous operating system.
Be aware there is one caveat to this process and that is you must do it within 30 days of upgrading to Windows 10 or the capability will be gone because your old Windows installation related files will be automatically removed from the upgraded system.


