
Amazon Web Services (AWS) cloud provides a suite of infrastructure services that enable you to deploy SharePoint Server securely, affordably, and with high availability. Running SharePoint Server on the AWS cloud gives you flexibility and agility, and you can fully customize and extend SharePoint for your business processes. Running servers within the Amazon cloud, comes at a cost for not just the servers but all processes that you run as part of the infrastructure.
Amazon has published a whitepaper that shows how to estimate the cost of a SharePoint deployment. You can open an example cost in the Simple Monthly Calculator, then change the configuration and revise any of these estimates to fit what you need.
Whitepaper: http://d0.awsstatic.com/whitepapers/estimating-aws-deployment-costs-for-sharepoint.pdf
Calculator: http://calculator.s3.amazonaws.com/index.html#r=IAD&s=EC2&key=calc-28ECE6D1-0C94-4360-BB83-E3F870C41865
The quickest way of getting started, is to use the AWS quick start guide and templates to stand up a SharePoint 2016 environment. This process is very simple and provisions the following servers:
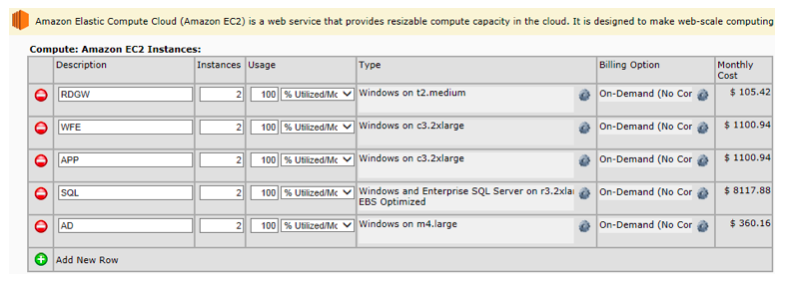
The overall solution uses the following components within Amazon Web Services.
AWS CloudFormation – AWS CloudFormation gives you an easy way to create and manage a collection of related AWS resources, and provision and update them in an orderly and predictable way. You use a template to describe all the AWS resources (e.g., Amazon EC2 instances) that you want. You don't have to individually create and configure the resources or figure out dependencies—AWS CloudFormation handles all of that.
Amazon VPC – The Amazon Virtual Private Cloud (Amazon VPC) service lets you provision a private, isolated section of the AWS cloud where you can launch AWS services and other resources in a virtual network that you define. You have complete control over your virtual networking environment, including selection of your own IP address range, creation of subnets, and configuration of route tables and network gateways.
Amazon EC2 – The Amazon Elastic Compute Cloud (Amazon EC2) service enables you to launch virtual machine instances with a variety of operating systems. You can choose from existing Amazon Machine Images (AMIs) or import your own virtual machine images.
NAT Gateway – NAT Gateway is an AWS managed service that controls NAT gateway resources. A NAT gateway is a type of network address translation (NAT) device that enables instances in a private subnet to connect to the Internet or to other AWS services, but prevents the Internet from connecting to those instances.
IAM – AWS Identity and Access Management (IAM) enables you to securely control access to AWS services and resources for your users. With IAM, you can manage users, security credentials such as access keys, and permissions that control which AWS resources users can access, from a central location.
Amazon S3 – Amazon Simple Storage Service (Amazon S3) provides developers and IT teams with secure, durable, highly scalable, cost-effective object storage. Amazon S3 is easy to use and includes a web services interface to store and retrieve any amount of data from anywhere on the web. Object storage is not appropriate for workloads that require incremental data insertions, such as databases. However, Amazon S3 is an excellent service for storing snapshots of Amazon Elastic Block Store (Amazon EBS) volumes.
Getting Started
The first step is to make sure you have an Amazon account, which can be done by navigating to https://aws.amazon.com, creating an account and following the steps outlined here:
http://docs.aws.amazon.com/quickstart/latest/sharepoint/step1.html
Next, you need to download SharePoint and store that within your S3 storage for use later when creating the Virtual Machines.
- Sign in to your AWS account and open the Amazon S3 console at https://console.aws.amazon.com/s3.
- Choose Create Bucket.
- Complete the Create a Bucket dialog box:
- In the Bucket Name box, enter a globally unique name for the bucket (you might try using your account name).
- In the Region list, select the AWS Region where you plan to launch the Quick Start.
- Choose Create.
- The console will display your new bucket in the Buckets pane.
- Choose the bucket name to navigate to it.
- Choose Upload.
- In the Upload – Select Files and Folders dialog box, choose Add Files.
- In the file selection dialog box, browse to the SharePoint ISO file you downloaded from Microsoft, and then choose Open.
- Choose Set Details, and then choose Set Permissions.
- Select Make everything public, and then choose Start Upload.
- When the upload is complete, select the file in the bucket, and then choose Properties.
- Copy the link to the ISO file from the object properties pane and paste it into a temporary text file on your computer. You will use the link in the next section when you launch the AWS CloudFormation stack.
Now that you have the ISO for SharePoint stored, you are ready to move onto setting up the servers and installing SharePoint.
To provision the solution a service called AWS Cloudformation will be used. To start you can access: https://console.aws.amazon.com/cloudformation/home?region=us-west-2#cstack=sn%7ESharePoint%7Cturl%7Ehttps://s3.amazonaws.com/quickstart-reference/microsoft/sharepoint/latest/templates/SharePoint_2016_Master.template
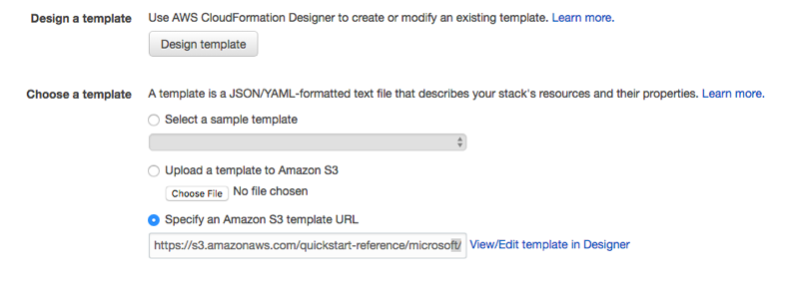
This will start to provision the main template, more details on the steps needed can be read here: http://docs.aws.amazon.com/quickstart/latest/sharepoint/step3.html
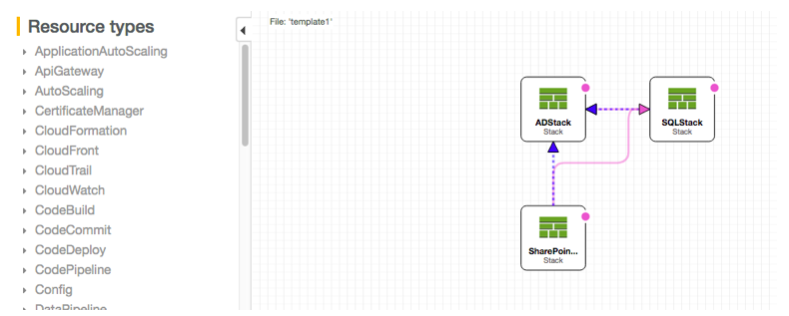
Choosing to edit the template will display the components in the canvas, showing you what is about to be provisioned.
Choosing the template as-is, and clicking through will display screens where you can define, the details for not only SharePoint but Active Directory and SQL Server. Once you have completed all the fields as needed, you can review and then initiate the creation, can take up to 3 hours to deploy.
Once it is deployed you can simply Remote Desktop (RDP) to the servers as you would if they were On-premises create what you need.
What is great about using Amazon Web Services is the ability to spin-up and spin-down the servers needed. More importantly though the provisioning process is simple and does not require anything else once it has all been configured.
Using Amazon Web Services is a great approach to provisioning SharePoint, and takes advantages of cloud services, as well Amazon’s long experience of running large cloud services.
More details for setup can be found here: https://docs.aws.amazon.com/quickstart/latest/sharepoint/welcome.html


