How to Track Down High-Latency Physical Disks in Storage Spaces Direct
Keep your Microsoft Storage Spaces Direct cluster healthy by rooting out unhealthy physical disks.
October 12, 2020

For more technical explainers on PowerShell, read our PowerShell 101: A Technical Explainer for IT Pros report.
One of the ways that you can help to keep a Storage Spaces Direct cluster healthy is by monitoring the latency of the physical disks that are used in the cluster. If you have a physical disk that is experiencing significantly more latency than the other disks in your cluster, it is likely a sign that the disk is going bad and needs to be replaced. A disk with excessive latency can sometimes cause an entire cluster node to perform more slowly than it should.
Thankfully, Microsoft makes it relatively easy to keep tabs on the latency of the disks within your Microsoft Storage Spaces Direct cluster. You can do this through PowerShell, or you can use the Windows Admin Center. I will show you both techniques.
Examining Disk Latency with PowerShell
If you want to track storage latency using PowerShell, the first thing you will need to do is to name physical disks to a variable. Here is the command that I use for this purpose:
$Disks = Get-PhysicalDiskIf I output this variable’s contents (by entering the variable name) PowerShell displays my physical disks, as shown in Figure 1.

Disk Latency 1
Figure 1
These are the physical disks in my system.
The only real problem with what you see in the figure above is that PowerShell is displaying all of my physical disks, not just the ones making up the Storage Spaces Direct cluster. If I wanted to narrow things down a bit, I could do so by creating a Where-Object condition that looked at the disk size. In this case, the 25 GB disks are the disks of interest.
The next step in the process is to combine this variable with the Get-ClusterPerf cmdlet. This cmdlet is designed to return a variety of statistics related to the cluster’s performance. Since we are interested in latency, the most relevant series are:
Volume.Latency.ReadVolume.Latency.WriteVolume.Latency.AverageFor the sake of demonstration, let’s take a look at how to retrieve the average latency for the physical disks defined by the $Disks variable. The command that I am using is:
$Disks | Get-ClusterPerf -PhysicalDiskSeriesName “PhysicalDisk.Latency.Average”As you can see in Figure 2, this command displays the average latency of each of the physical disks defined by the $Disks variable. In this case, my cluster is completely idle, which is why most of the disks are shown as having no latency.

Disk Latency 2
Figure 2
PowerShell displays the latency of each physical disk.
In case you are wondering, the Get-ClusterPerf cmdlet typically displays disks in the same order that they are stored in within my $Disks variable. If you find a disk that is problematic and you want to verify that you are looking at the correct disk, you can always map the $Disks variable to one specific disk rather than to all physical disks and then check the latency again.
Using the Windows Admin Center to Check Disk Latency
The Windows Admin Center makes it a little bit easier to check the latency of the disks within a Storage Spaces Direct cluster. To do so, open the Windows Admin Center and add your Storage Spaces Direct cluster to the list of connections. If you look at Figure 3, for example, you can see my lab cluster and three Hyper-V nodes that have been added to the list of connections.

Disk Latency 3
Figure 3
My cluster has been added to the list of connections.
To view the latency of the individual disks, click on the link for your cluster. When the Windows Admin Center opens the cluster, click on the Drives tab. When you do, you will see a summary of the cluster disks, as shown in the figure below.

Disk Latency 4
Figure 4
The Windows Admin Center shows a summary of the cluster disks.
Now, click on the Inventory tab. This will cause the Windows Admin Center to show you all of the individual disks within the Storage Spaces Direct cluster. As you look at the list of disks in the figure below, you will notice that each is clickable.

Disk Latency 5
Figure 5
The Inventory tab shows a list of the physical disks within the Storage Spaces Direct cluster.
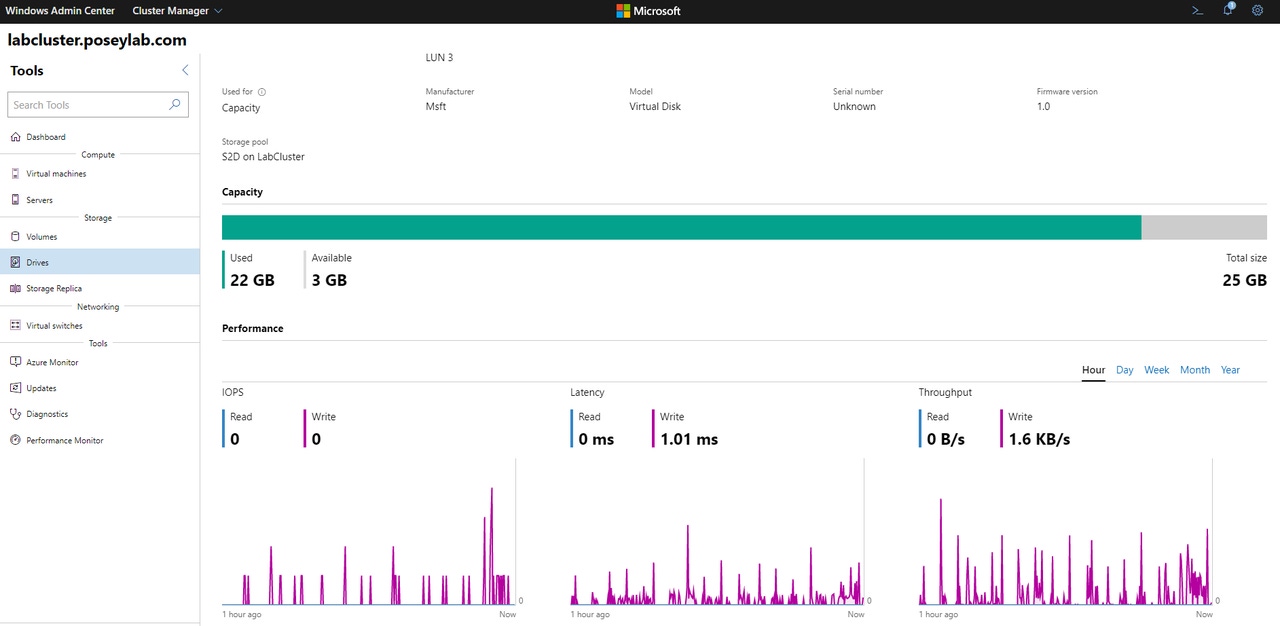
Finally, click on an individual disk and you will be taken to a screen that displays a summary of the disk. The disk latency is included among the summary items, as shown in Figure 6.

Disk Latency 6
Figure 6
You can check the latency for each individual disk.
About the Author
You May Also Like


.jpg?width=700&auto=webp&quality=80&disable=upscale)
