In a perfect world, the power never goes out–or, if it does, batteries keep everything running until power is restored. In reality, though, power outages happen, and backup batteries last only for so long. If a backup battery is depleted before power comes back on and before systems can be shut down gracefully, the abrupt loss of power can cause problems for Windows Storage Spaces Direct. Thankfully, it is usually possible to fix these problems without too much trouble.
The most common issue that occurs with Storage Spaces Direct following a power failure is that virtual disks fail to come online. This condition is often accompanied by an error message indicating that there is not enough redundancy information.
The first step in fixing the problem is to enter the Get-ClusterSharedVolume cmdlet. As you can see in Figure 1, this cmdlet returns the name of the cluster shared volume, as well as its state. In this particular case, the cluster shared volume is listed as being offline.

Figure 1
This cluster shared disk is currently offline.
Once you have confirmed that the cluster shared disk is indeed having problems, the next step in the process is to remove the virtual disk that is having problems from the cluster shared volume. The command used for doing so is:
Remove-ClusterSharedVolume -Name “”
As you can see in Figure 2, the disk’s resource type is listed as Physical Disk, and the disk has been added to the Available Storage group.

Figure 2
The disk has been returned to the available storage group.
The next thing that you will need to do is to figure out which node owns the Available Storage group. To do so, enter the Get-ClusterGroup cmdlet. As you can see in Figure 3, my Available Storage cluster group is currently owned by a server named SSD3. The remainder of the repair procedure will need to be performed from this server.

Figure 3
The Get-ClusterGroup cmdlet tells you which node owns the Available Storage group.
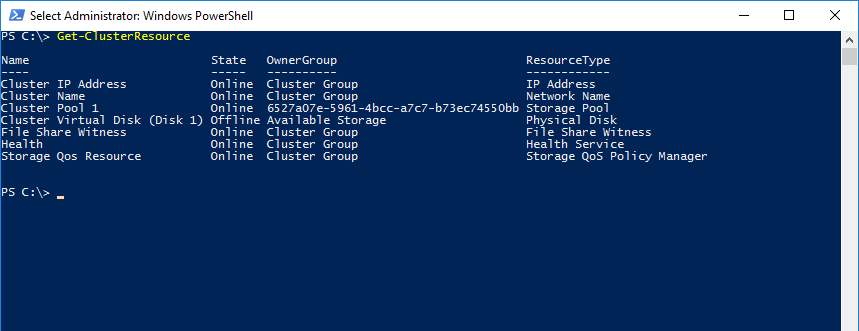
The next thing that you will need to do is to identify the exact name of the offline cluster disks. You can get this information by entering the Get-ClusterResource cmdlet. Doing so will cause Windows to display a list of all of the resources that are being used by the cluster. For example, you should see the cluster name, the cluster disk name, the cluster IP address, the Storage QoS resource and possibly a few other items. You can see what this looks like in Figure 4.

Figure 4
The Get-ClusterResource cmdlet displays the various cluster resources.
Once you know the cluster disk name, then you will need to set the DiskRecoveryAction flag to a value of 1 on the cluster disk. This tells Windows that the cluster disk needs to be recovered. To set this flag, enter the following command:
Get-ClusterResource “” | Set-ClusterParameter -Name DiskRecoveryAction -Value 1
The next thing that you will need to do is to add the cluster disk back to the physical disk. I like to use the Failover Cluster Manager for this step. Just right click on the cluster disk and select the Add to Cluster Shared Volumes command from the shortcut menu.
The last step in the process is to start the physical disk. Starting the disk will initiate the repair process. You can start the disk by entering the following command:
Start-ClusterResource -Name “”
Depending on the disk’s condition, you may find that the process takes a long time to complete. It may even periodically go into a suspended state and then automatically resume. You can use the Get-StorageJob cmdlet to check up on the repair’s progress. When the repair completes, use the Get-VirtualDisk cmdlet, shown in Figure 5, to verify that the virtual disk is healthy.

Figure 5
Make sure that the virtual disk is reported as being healthy.
Once the disk is reported as being healthy, you may need to do a bit of cleanup work to complete the process. The first thing that Microsoft recommends is to set the DiskRecoveryAction flag to 0. You can use exactly the same command as before, but set the value to 0 instead of 1, as shown below:
Get-ClusterResource “” | Set-ClusterParameter -Name DiskRecoveryAction -Value 0
Once you have done this, you will need to restart the physical disk by using these commands:
Stop-ClusterResource -Name “”

Start-ClusterResource -Name “”
Finally, add the disk that you removed back to the cluster shared volume by using this command:
Add-ClusterSharedVolume -Name “”
Don’t forget that you will need to run this command on the same server from which you initially removed the disk. You can see what this process looks like in Figure 6.

Figure 6
You will need to add the disk back to the cluster shared volume.


