
One of the most important steps in hardening any system is attack surface reduction. Generally speaking, this means uninstalling or disabling any features that are not being used to limit the options an attacker has for compromising the system. One way to reduce the Windows attack surface is to use Group Policy to implement attack surface reduction rules.
Before I get started I need to point out two important things.
First, Group Policy using Group Policy settings is not the only option for attack surface reduction. If you are using Microsoft Intune or Microsoft Endpoint Manager, then you should use those tools instead of Group Policy settings. Not only do those management platforms make it easier to reduce the Windows attack surface, but you can cause conflicts if you try to reduce the attack surface through both Group Policy and through Intune or Endpoint Manager.
Second, the available settings for Windows attack surface reduction vary based on the operating system build you are running. The settings and techniques discussed in this article are based on Windows 10 or Windows Server 20H2.
If Group Policy is your go-to, you can create attack surface reduction rules by opening the Group Policy Editor and navigating to Computer Configuration | Administrative Templates | Windows Components | Microsoft Defender Antivirus | Microsoft Defender Exploit Guard | Attack Surface Reduction. As you can see in Figure 1, there are two Group Policy settings in this location.

Figure 1
The attack surface reduction rules are found at: to Computer Configuration | Administrative Templates | Windows Components | Microsoft Defender Antivirus | Microsoft Defender Exploit Guard | Attack Surface Reduction
Using the Exclude Files and Paths From Attack Surface Reduction Rules setting is completely optional. This setting is used if you have specific file paths (or even executable files) for which the attack surface reduction rules should not apply.
When you enable the exclusion setting, you will have to click on a Show button, which you can see in Figure 2. This causes Windows to display a dialog box, which you can also see in the figure. This dialog box contains two columns: Value Name and Value. The Value Name column is where you enter either a folder path or a path and filename. The value should always be set to 0. Each path or file that you want to exclude should appear on a separate line.
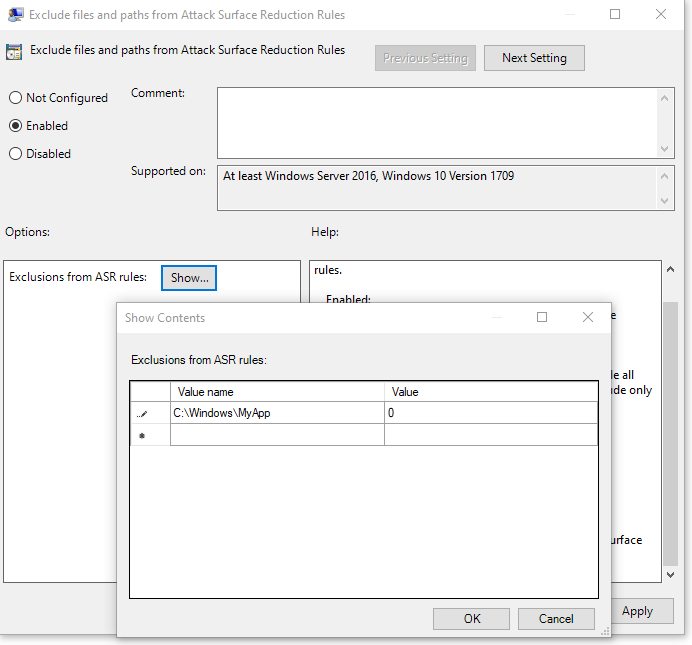
Figure 2
This is where you enter path exclusions.
The other Group Policy setting shown is the Configure Attack Surface Reduction Rules setting. As was the case for the Exclude Files and Paths setting, you will need to enable the Configure Attack Surface Reduction Rules setting and then click on a Show button, which will cause Windows to reveal a screen where you can enter a series of key/value pairs. You can see what this looks like in Figure 3.

Figure 3
This is where you enter the Configure Attack Surface Reduction rules.
So as you can see, the Configure Attack Surface Rules setting doesn’t simply contain a list of rules that you can enable or disable using checkboxes. Unfortunately, things are a bit more complicated than that.
The Value Name column is where you enter the attack surface reduction rule that you want to enable. More specifically, you don’t enter the rule’s name, but rather it’s GUID. You can find a list of rules and their corresponding GUIDs here.
As you look through the list of rules, there are a few things that you should pay attention to. First, as previously mentioned, not all rules work with all Windows versions, so be sure to look at what builds each rule works with.
Another thing to pay attention to is that not all of the rules support the use of exclusions. The list of rules at the previously mentioned URL indicates which rules do and do not work with exclusion rules.
As you add rules to the Group Policy setting, you will need to specify a value for each rule. There are three possible values:
- A value of 0 disables the rule, causing the rule to be ignored.
- A value of 1 indicates that the condition defined by the rule should be blocked. Think of using a value of 1 as enforcing the rule.
- A value of 2 places the rule into audit mode. This means that the rule does not cause anything to be blocked, but information is written to the event logs so that you can get a feel for what the rule would be doing if it were enabled.
It’s always a good idea to audit rules before enforcing them.
To put all of this together, let’s say you wanted to create a rule to block the abuse of exploited vulnerable signed drivers, and you wanted to audit the rule. The GUID associated with the rule is 56a863a9-875e-4185-98a7-b882c64b5ce5, so you would enter this GUID as the value name and set the value to 2. You can see what this looks like in Figure 4.

Figure 4
This is what it looks like when you create an attack surface reduction rule.


