Use PowerShell to Initialize a Disk and Create Partitions
There are advantages to using PowerShell to provision storage within Windows Servers. Here are PowerShell commands to initialize a new disk and create partitions.
April 15, 2022

This article is the second installment of a two-part series about using PowerShell to provision storage within Windows Server. Part one explains how to identify a newly installed disk and bring the disk online. Part two explains how to initialize the disk and create a partition.
In the previous article, I explained how to use PowerShell to identify newly installed disks that have yet to be provisioned. I also showed you how to bring those disks online. In this article, I will show you how to initialize a disk and how to create a partition.
Initializing a Disk
So, now that we have brought a new disk online, the next thing to do is initialize the disk. Initialization is the process of specifying the partition style that the disk will use. You can set the partition style to either MBR or GPT. Incidentally, GPT is the default partition style for all the newer Windows operating systems.
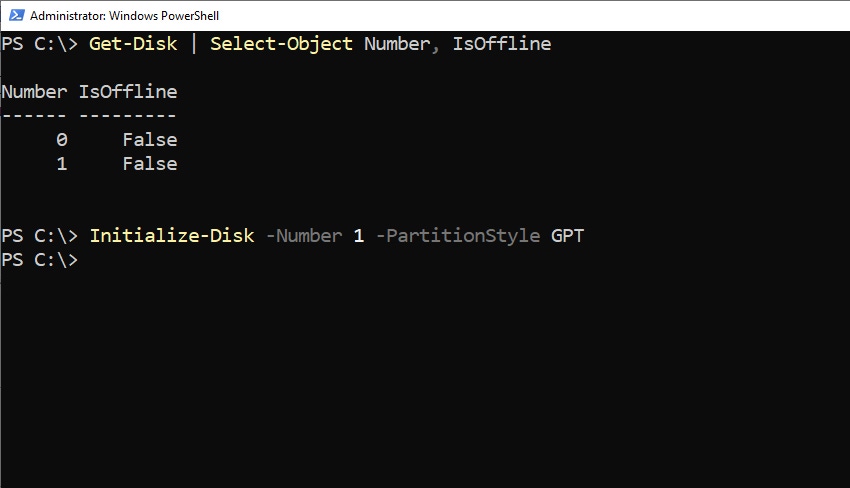
The cmdlet used to initialize a disk is Initialize-Disk. When you use this cmdlet, you will need to include the Number parameter along with the number of the disk that you want to initialize. You can also include the PartitionStyle parameter, followed by either MBR or GPT. For example, if you wanted to initialize Disk 1 to use GPT partitions, you would use this command:
Initialize-Disk -Number 1 -PartitionStyle GPTYou can see what this looks like in Figure 1.

PowerShell Storage Provisioning 2-1
Figure 1. This is how you initialize a disk.
In the previous article, I made the point that PowerShell is useful for bulk operations. As such, you can initialize multiple disks at once. If you want to initialize multiple disks as GPT, you can do so with this command:
Get-Disk | Where-Object {$_.PartitionStyle -eq ‘Raw’} | Initialize-Disk -PartitionStyle GPTCreating a Partition
Now that I have shown you how to initialize a disk, let’s go ahead and create a partition on the disk.
The PowerShell cmdlet that is used to create a new partition is New-Partition. You can use a lot of parameters with this cmdlet. As a general rule, when you create a new partition, you will need to tell PowerShell which disk you want to create the partition on, which drive letter you want to assign to the partition, and how large to make the partition.
Suppose you wanted to create a 500 MB partition on Disk 1 and you wanted to give that partition a drive letter of X:. To do so, you would use this command:
New-Partition -DiskNumber 1 -Size 500MB -DriveLetter XYou can see what this looks like in Figure 2.

PowerShell Storage Provisioning 2-2
Figure 2. I have created a new 500 GB partition with the drive letter X:.
UseMaximumSize
In the example, I had a size in mind for the partition that I created (500 MB). But let’s suppose that I was trying to script the operation and had no way of knowing exactly how much storage space was going to be available. In a situation like that, you can tell PowerShell to use the maximum partition size rather than specify a particular size. To do so, you would use the same command as before, but replace the Size parameter with UseMaximumSize. Here is what the command looks like:
New-Partition -DiskNumber 1 -DriveLetter Y -UseMaximumSizeFigure 3 demonstrates the command. Notice that I used the Get-Partition cmdlet to display the partitions that exist on each of the system’s two disks.

PowerShell Storage Provisioning 2-3
Figure 3. I have created the largest partition possible.
Format the Partitions
There is one last thing to make the new partitions usable: The partitions must be formatted.
To format a partition, use the Format-Volume cmdlet. You will need to supply the drive letter and specify the file system that you want to use. The file system can be NTFS or ReFS. Here is an example of a format command:
Format-Volume -DriveLetter X -FileSystem NTFSThe results are shown in Figure 4.

PowerShell Storage Provisioning 2-4
Figure 4. I have formatted the new volume. It is now ready for use.
As you can see, PowerShell makes it possible to start with a raw disk, bring the disk online, initialize the disk, create a volume, and format it. In a one-off situation where you need to provision a single disk, it may be faster to use the Disk Management Console. However, PowerShell is far more efficient for bulk operations.
About the Author
You May Also Like


.jpg?width=700&auto=webp&quality=80&disable=upscale)
