
In this post, I will show you to connect to Office 365services including Office 365 tenant, Exchange Online, SharePoint Online, and Skype for Business Online with the help of available PowerShell modules.
Prerequisites
1. Download and install the following PowerShell modules for Office 365, SharePoint Online, and Skype for Business Online on your machine.
- Microsoft Online Service Sign-in Assistant for IT Professionals RTW
- Windows Azure Active Directory Module for Windows PowerShell (64-bit version)
- SharePoint Online Management Shell
- Skype for Business Online, Windows PowerShell Module
- SharePoint Online Management Shell
2. Work or school account you use to connect to Office 365 should be a member of Global admin role.
3. Microsoft .NET Framework 4.5.x and Windows Management Framework 3.0 or 4.0 should be installed.
Connecting to Office 365
The first step is to create a Windows PowerShell credentials object which will be used in subsequent command while connecting to Office 365.
$credential = Get-Credential
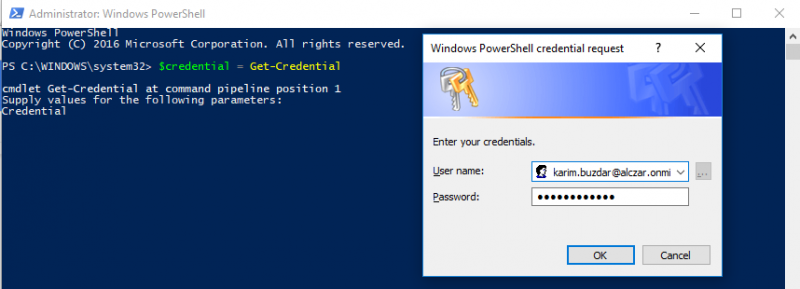
When you are prompted, provide Office 365 work or school account credentials. Click OK when you are done.
Next, verify the creation of PowerShell credentials object.
$credential
Above command will return something to the following screenshot. You can be sure that the object is created successfully.

Figure 2 Credential Command Output
Now, we have saved the users’ credentials. Go ahead and connect to Office 365.
Connect-MsolService -Credential $credential
Let us verify that we are connected with Office 365.
Get-MsolDomain
The command will return something similar to following screenshot (although it depends on how many domains you have configured in your Office 365 tenant).

Figure 3 Get-MsolDomain Command Output
We are now connected with Office 365, we can start managing it with PowerShell. For example, let us create a single user and generate its random password in Office 365 tenant.
New-MsolUser -UserPrincipalName [email protected] –DisplayName “Tome Jerry”

Connecting to Exchange Online
Create a remote Windows PowerShell session with Exchange Online.
$exchangeSession = New-PSSession -ConfigurationName Microsoft.Exchange -ConnectionUri "https://outlook.office365.com/powershell-liveid/" -Credential $credential -Authentication "Basic" -AllowRedirection
Import the remote session.
Import-PSSession $exchangeSession -DisableNameChecking
Above command when executed successfully would return something to the following screenshot.

Verify the connection with Exchange Online by checking all the domains configured for email addresses.
Get-AcceptedDomain
When above command runs successfully, it should return the list of domains similar to the following screenshot.

Figure 5 Get-AcceptedDomain Command Output
Connecting to Skype for Business Online
Import Skype for Business Online module.
Import-Module SkypeOnlineConnector
Now you have imported the Skype for Business Online PowerShell module. Create a remote PowerShell session with one of the Office 365 servers.
$sfboSession = New-CsOnlineSession -Credential $credential
Download the scripts, cmdlets, and other items which are required to manage Skype for Business Online.
Import-PSSession $sfboSession
When you run the above command, you should see a progress bar similar to the following screenshot.
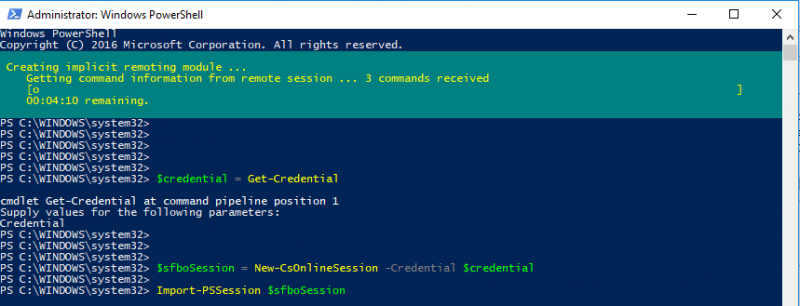
Figure 6 Executing Import-PSSession Command
When all of the commands have been imported and progress bar completes, you will get something similar to following screenshot.

Figure 7 Importing PowerShell Session Created with Exchange Online
Connecting to Security & Compliance Center
Execute the following command to create a remote PowerShell session with the Security and Compliance Center.
$ccSession = New-PSSession -ConfigurationName Microsoft.Exchange -ConnectionUri https://ps.compliance.protection.outlook.com/powershell-liveid/ -Credential $credential -Authentication Basic -AllowRedirection
When above command is executed, you may receive a warning similar to following screenshot (Ignore it).

Figure 8 Creating PowerShell Session with Security and Compliance Center
Execute the following PowerShell command to import the session.
Import-PSSession $ccSession -Prefix cc
If nothing causes any issue, you will end up with something similar to the following screenshot.

Figure 9 Importing PowerShell Session Created with Security and Compliance Center
Connecting to SharePoint Online
Execute the following command to import the SharePoint Online module.
Import-Module Microsoft.Online.SharePoint.PowerShell -DisableNameChecking
Now you have imported the PowerShell module, next step is to determine the SharePoint Online admin site URL so that you can connect to it.
https://
If Fully Qualified Domain Name (FQDN) is alczar.onmicrosoft.com, the hostname is alczar. Similarly, if FQDN is thewinadmins.com, the hostname is ‘thewinadmins’.
When you have determined the site URL, execute the following command to connect to SharePoint Online.
Connect-SPOService -Url https://alczar-admin.sharepoint.com -credential $credential
To verify the connection, execute the following command.
Get-SPOSite
On successful execution of above command, you will get your SharePoint Online sites something similar to the following screenshot.

Figure 10 Get-SPOSite Command Output
Conclusion
Now you have been connected with Office 365 services, you can start managing them with their related PowerShell commands. For example, you can change the password of an Office 365 user account.


